vue-cli 创建项目小结 - 钩子(不定期更新)
Posted 圈地自萌
tags:
篇首语:本文由小常识网(cha138.com)小编为大家整理,主要介绍了vue-cli 创建项目小结 - 钩子(不定期更新)相关的知识,希望对你有一定的参考价值。
原文地址:https://segmentfault.com/a/1190000008010666
1. 钩子的用法:
beforecreate: 举个栗子:可以在这加个loading事件created:在这结束loading,还做一些初始化,实现函数自执行 。可发起异步请求,拿到数据,再和DOM一起渲染mounted: 挂载元素,获取到DOM节点updated : 如果对数据统一处理,在这里写上相应函数
beforeDestory: 你确认删除XX吗?destoryed :当前组件已被删除,清空相关内容
nextTick : 更新数据后立即操作dom
2. Vue.nextTick
在下次 DOM 更新循环结束之后执行延迟回调。在修改数据之后立即使用这个方法,获取更新后的 DOM。
官方还提供了一种写法,vm.$nextTick,用 this 自动绑定到调用它的实例上:
created() {
    setTimeout(() => {
          this.number = 100
          this.$nextTick(() => {
            console.log(\'nextTick\', document.getElementsByTagName(\'p\')[0])
          })
    },100)
}
在数据变化后要执行的某个操作,而这个操作需要使用随数据改变而改变的 DOM 结构的时候,这个操作都应该放进 Vue.nextTick() 的回调函数中。
3. 路由钩子
3.1 全局路由钩子
const router = new VueRouter({
    mode: \'history\',
    base: __dirname,
    routes: routerConfig
})

router.beforeEach((to, from, next) => {
    document.title = to.meta.title || \'demo\'
    if (!to.query.url && from.query.url) {
        to.query.url = from.query.url
    }
    next()
})

router.afterEach(route => {
  //全局后置钩子,不会接受 next 函数也不会改变导航本身
})
3.2 某个路由的钩子
const router = new VueRouter({
  routes: [
    {
      path: \'/foo\',
      component: Foo,
      beforeEnter: (to, from, next) => {
        // ...
      },
      beforeLeave: (to, from, next) => {
        // ...
      }
    }
  ]
})
3.3 组件内钩子
你可以在路由组件内直接定义以下路由导航钩子
beforeRouteEnter
beforeRouteUpdate (2.2 新增)
beforeRouteLeave
路由组件,不等于组件。路由组件:直接定义在router中component处的组件
官网:https://router.vuejs.org/zh-cn/advanced/navigation-guards.html
4. Vue实例的生命周期
<div id="app">
     <p>{{ message }}</p>
</div>

<script type="text/javascript">

  var app = new Vue({
      el: \'#app\',
      data: {
          message : "xuxiao is boy"
      },
       beforeCreate: function () {
                console.group(\'beforeCreate 创建前状态===============》\');
               console.log("%c%s", "color:red" , "el     : " + this.$el); //undefined
               console.log("%c%s", "color:red","data   : " + this.$data); //undefined
               console.log("%c%s", "color:red","message: " + this.message)
        },
        created: function () {
            console.group(\'created 创建完毕状态===============》\');
            console.log("%c%s", "color:red","el     : " + this.$el); //undefined  %c 格式化占位符 - css格式化样式
               console.log("%c%s", "color:red","data   : " + this.$data); //已被初始化
               console.log("%c%s", "color:red","message: " + this.message); //已被初始化
        },
        beforeMount: function () {
            console.group(\'beforeMount 挂载前状态===============》\');
            console.log("%c%s", "color:red","el     : " + (this.$el)); //已被初始化
            console.log(this.$el);
               console.log("%c%s", "color:red","data   : " + this.$data); //已被初始化
               console.log("%c%s", "color:red","message: " + this.message); //已被初始化
        },
        mounted: function () {
            console.group(\'mounted 挂载结束状态===============》\');
            console.log("%c%s", "color:red","el     : " + this.$el); //已被初始化
            console.log(this.$el);
               console.log("%c%s", "color:red","data   : " + this.$data); //已被初始化
               console.log("%c%s", "color:red","message: " + this.message); //已被初始化
        },
        beforeUpdate: function () {
            console.group(\'beforeUpdate 更新前状态===============》\');
            console.log("%c%s", "color:red","el     : " + this.$el);
            console.log(this.$el);
               console.log("%c%s", "color:red","data   : " + this.$data);
               console.log("%c%s", "color:red","message: " + this.message);
        },
        updated: function () {
            console.group(\'updated 更新完成状态===============》\');
            console.log("%c%s", "color:red","el     : " + this.$el);
            console.log(this.$el);
               console.log("%c%s", "color:red","data   : " + this.$data);
               console.log("%c%s", "color:red","message: " + this.message);
        },
        beforeDestroy: function () {
            console.group(\'beforeDestroy 销毁前状态===============》\');
            console.log("%c%s", "color:red","el     : " + this.$el);
            console.log(this.$el);
               console.log("%c%s", "color:red","data   : " + this.$data);
               console.log("%c%s", "color:red","message: " + this.message);
        },
        destroyed: function () {
            console.group(\'destroyed 销毁完成状态===============》\');
            console.log("%c%s", "color:red","el     : " + this.$el);
            console.log(this.$el);
               console.log("%c%s", "color:red","data   : " + this.$data);
               console.log("%c%s", "color:red","message: " + this.message)
        }
    })
</script>
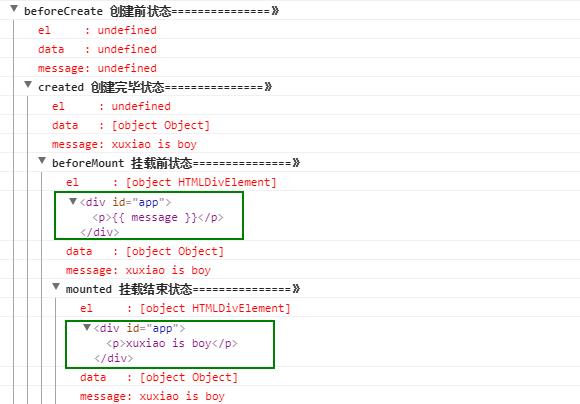
控制台输出:


以上是关于vue-cli 创建项目小结 - 钩子(不定期更新)的主要内容,如果未能解决你的问题,请参考以下文章