ImageSharp一个专注于NetCore平台图像处理的开源项目
Posted 大壮他哥-专注于营销软件开发
tags:
篇首语:本文由小常识网(cha138.com)小编为大家整理,主要介绍了ImageSharp一个专注于NetCore平台图像处理的开源项目相关的知识,希望对你有一定的参考价值。
今天大家分享的是一个专注于NetCore平台图像处理的开源项目,老实说为这篇文章取名字想了5分钟,可能是词穷亦或是想更好的表达出这款开源项目的作用;这个项目在图像处理方面有很多功能,如:缩放,裁剪,绘画,组合图片等;今天主要讲的是用她怎么来绘图和生成验证码的实际例子。
- 简单介绍ImageSharp
- 试试画两条线(实线和虚线)
- 生成个缩略图
- 在图片上画字
- 制作一个验证码图片
- 结合RazorPage模板,展示验证码图片
简单介绍ImageSharp
ImageSharp是对NetCore平台扩展的一个图像处理方案,在写下本文为止它最新的nuget下载量为4,034次,作者团队最近一个月刚更新的包;没错这里说最新是因为她前身和之前的版本都很受欢迎下载量也超高;她的git项目地址:https://github.com/SixLabors/ImageSharp。如果您的项目和我一样是2.0版本(2.0以前的略过),那么直接可以通过vs的nuget控制台下载对应的包,注意绘图的话需要分别下载如下两个包:
Install-Package SixLabors.ImageSharp -Version 1.0.0-beta0001
Install-Package SixLabors.ImageSharp.Drawing -Version 1.0.0-beta0001
ImageSharp用法有朋友之前写过,不过都主要针对于之前的版本,本章主要用到的都是最新的,有部分写法可能不相同。
试试画两条线(实线和虚线)
这里将用她来画两条直线并保存成图片,主要起到一个介绍作用,先来看实线如下代码:
var path = @"D:\\F\\学习\\vs2017\\netcore\\Study.AspNetCore\\WebApp02-1\\wwwroot\\images";
            //默认实线
            using (Image<Rgba32> image = new Image<Rgba32>(500, 500))   //画布大小
            {
                image.Mutate(x => x.
                        BackgroundColor(Rgba32.WhiteSmoke).   //画布背景
                            DrawLines(
                            Rgba32.HotPink, //字体颜色
                            5,   //字体大小
                            new SixLabors.Primitives.PointF[]{
                                    new Vector2(10, 10),
                                    new Vector2(200, 150),
                                    new Vector2(50, 300)
                            } //两点一线坐标
                        )
                    );

                image.Save($"{path}/1.png"); //保存
            }
总要步骤我都备注上文字了,这里主要通过两点一线来绘制图形,Vector2对象值得注意就是C#二维坐标(x,y)对象,其实除了Vector2还有Vector3(三维坐标)等,这对于做u3d的朋友来说不会陌生,老实说这个也是我在接触u3d时候才知道有这个类的。下面来看效果图:
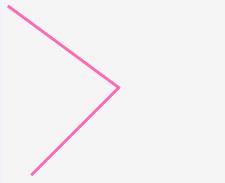
由两个两点一线构造的一个角,下面来看下虚线绘制:
//虚线
            using (Image<Rgba32> image = new Image<Rgba32>(500, 500))   //画布大小
            {
                image.Mutate(x => x.
                        BackgroundColor(Rgba32.WhiteSmoke).   //画布背景
                            DrawLines(
                            Pens.Dash(Rgba32.HotPink, 5),   //字体大小
                            new SixLabors.Primitives.PointF[]{
                                    new Vector2(10, 10),
                                    new Vector2(200, 150),
                                    new Vector2(50, 300)
                            } //两点一线坐标
                        )
                    );

                image.Save($"{path}/2.png"); //保存
            }
步骤都差不多,只是调用了DrawLines的扩展方法而已,其他线条例子就不多说了各位自行实验。
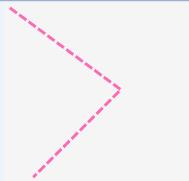
生成个缩略图和在图片上画字
对于图片类型的网站来说缩略图是常见的,这里用ImageSharp生成缩略图很简单,本实例用8.png做样本来生成缩略图8-1.png,直接看例子如下是netstandard 1.3+的例子:
 //缩略图
            using (Image<Rgba32> image = Image.Load($"{path}/8.png"))
            {
                image.Mutate(x => x
                     .Resize(image.Width / 2, image.Height / 2)
                     );
                image.Save($"{path}/8-1.png");
            }
为了更好的对比缩略图和原图的区别这里对接拿两图的属性做对比如:
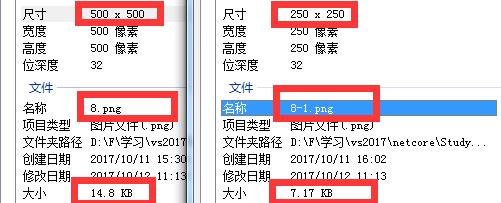
能很好的看出缩略图文件大小和像素都减半了,实际缩略的时候不一定减半,这全由参数控制Resize(width,height);
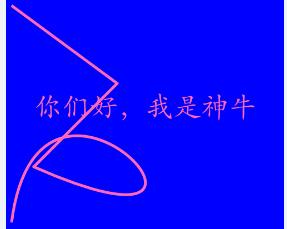
画字:在图片上画我们想要的字,其实类似于水印的一种需求,下面是在图片上画字的代码:
//画字
            var install_Family = new FontCollection().Install(
                System.IO.Path.Combine(Directory.GetCurrentDirectory(), "wwwroot/bak", "STKAITI.TTF")
                //@"C:\\Windows\\Fonts\\STKAITI.TTF"   //字体文件
                );
            var font = new Font(install_Family, 50);  //字体
            using (Image<Rgba32> image = Image.Load($"{path}/8.png"))
            {
                image.Mutate(x => x
                     .DrawText(
                        "你们好,我是神牛",   //文字内容
                         font,
                         Rgba32.HotPink,
                         new Vector2(50, 150),
                         TextGraphicsOptions.Default)
                     );
                image.Save($"{path}/8-2.png");
            }
这里用ImageSharp在图片上画字的时候需要注意:字体,因为windows系统自带了字体问题这里以STKAITI.TTF字体文件为例,它存储于 C:\\Windows\\Fonts\\STKAITI.TTF 目录,当然您可以直接把它拷贝到我们项目中如下我这里的例子一样做法(这里只测试了windows下可用,尚未测试linux下直接使用该字体文件是否可行);
制作一个验证码图片
下面我们将用她来画一个验证码类型的图片,通常验证码都有一些点和线来干扰,上面已经有画线例子了,这里展示怎么画点:
//画点(规则的点,其他的各位自行写算法)
            var dianWith = 1; //点宽度
            var xx = 300;  //图片宽度
            var yy = 200;  //图片高度

            var xx_space = 10;  //点与点之间x坐标间隔
            var yy_space = 5;    //y坐标间隔

            var listPath = new List<IPath>();
            for (int i = 0; i < xx / xx_space; i++)
            {
                for (int j = 0; j < yy / yy_space; j++)
                {
                    var position = new Vector2(i * xx_space, j * yy_space);
                    var linerLine = new LinearLineSegment(position, position);
                    var shapesPath = new SixLabors.Shapes.Path(linerLine);
                    listPath.Add(shapesPath);
                }
            }

            using (Image<Rgba32> image = new Image<Rgba32>(xx, yy))   //画布大小
            {
                image.Mutate(x => x.
                        BackgroundColor(Rgba32.WhiteSmoke).   //画布背景
                            Draw(
                            Pens.Dot(Rgba32.HotPink, dianWith),   //大小
                            new SixLabors.Shapes.PathCollection(listPath)  //坐标集合
                        )
                    );
                image.Save($"{path}/9.png"); //保存
            }
这里直接利用IImageProcessingContext<TPixel>扩展方法Draw来绘制有规则的点,如图所示:
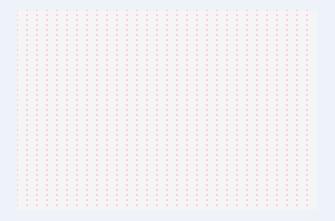
比较单调,或许您们能做的更好看些;下面来做验证码图片,主要由:画点+画字=验证码图片,这里我封装了一个方法直接生成验证码图片:
/// <summary>
        /// 画点+画字=验证码图片
        /// </summary>
        /// <param name="content">验证码</param>
        /// <param name="outImgPath">输出图片路径</param>
        /// <param name="fontFilePath">字体文件</param>
        /// <param name="x">图片宽度</param>
        /// <param name="y">图片高度</param>
        public void GetValidCode(
                    string content = "我是神牛",
                    string outImgPath = "D:/F/学习/vs2017/netcore/Study.AspNetCore/WebApp02-1/wwwroot/images/10.png",
                    string fontFilePath = @"D:\\F\\学习\\vs2017\\netcore\\Study.AspNetCore\\WebApp02-1\\wwwroot\\bak\\STKAITI.TTF",
                    int xx = 150, int yy = 25)
        {
            var dianWith = 1; //点宽度
            var xx_space = 10;  //点与点之间x坐标间隔
            var yy_space = 5;    //y坐标间隔
            var wenZiLen = content.Length;  //文字长度
            var maxX = xx / wenZiLen; //每个文字最大x宽度
            var prevWenZiX = 0; //前面一个文字的x坐标
            var size = 16;//字体大小

            //字体
            var install_Family = new FontCollection().Install(
              fontFilePath
              //@"C:\\Windows\\Fonts\\STKAITI.TTF"   //windows系统下字体文件
              );
            var font = new Font(install_Family, size);  //字体

            //点坐标
            var listPath = new List<IPath>();
            for (int i = 0; i < xx / xx_space; i++)
            {
                for (int j = 0; j < yy / yy_space; j++)
                {
                    var position = new Vector2(i * xx_space, j * yy_space);
                    var linerLine = new LinearLineSegment(position, position);
                    var shapesPath = new SixLabors.Shapes.Path(linerLine);
                    listPath.Add(shapesPath);
                }
            }

            //画图
            using (Image<Rgba32> image = new Image<Rgba32>(xx, yy))   //画布大小
            {
                image.Mutate(x =>
                {
                    //画点
                    var imgProc = x.BackgroundColor(Rgba32.WhiteSmoke).   //画布背景
                              Draw(
                              Pens.Dot(Rgba32.HotPink, dianWith),   //大小
                              new SixLabors.Shapes.PathCollection(listPath)  //坐标集合
                          );

                    //逐个画字
                    for (int i = 0; i < wenZiLen; i++)
                    {
                        //当前的要输出的字
                        var nowWenZi = content.Substring(i, 1);

                        //文字坐标
                        var wenXY = new Vector2();
                        var maxXX = prevWenZiX + (maxX - size);
                        wenXY.X = new Random().Next(prevWenZiX, maxXX);
                        wenXY.Y = new Random().Next(0, yy - size);

                        prevWenZiX = Convert.ToInt32(Math.Floor(wenXY.X)) + size;

                        //画字
                        imgProc.DrawText(
                           nowWenZi,   //文字内容
                           font,
                           i % 2 > 0 ? Rgba32.HotPink : Rgba32.Red,
                           wenXY,
                           TextGraphicsOptions.Default);
                    }
                });
                //保存到图片
                image.Save(outImgPath);
            }
        }
通过简单的调用 GetValidCode("我是神牛");return Page(); 能得到如图验证码图片的效果:

文字看起来好像在点的前面,不过没关系只需要把画点和画字的先后顺序修改下就行了,这里不贴图了;
结合RazorPage模板,展示验证码图片
上面一节是生成了验证码图片,当然实际场景中我们是不需要生成验证码物理图片的,只需要返回一个流或base64等方式输出到web界面上就行了,我们可以来看看 Image<TPixel> 保存时候的扩展方法:
 View Code
好吧有点多,我们只需要明白她能转base64,stream,保存为图片等就行了;这里我们将用到 SaveAsPng(Stream) 方法,然后获取他的byte[],如下代码:
/// <summary>
        /// 画点+画字=验证码byte[]
        /// </summary>
        /// <param name="content">验证码</param>
        /// <param name="outImgPath">输出图片路径</param>
        /// <param name="fontFilePath">字体文件</param>
        /// <param name="x">图片宽度</param>
        /// <param name="y">图片高度</param>
        public byte[] GetValidCodeByte(
                    string content = "我是神牛",
                    string fontFilePath = @"D:\\F\\学习\\vs2017\\netcore\\Study.AspNetCore\\WebApp02-1\\wwwroot\\bak\\STKAITI.TTF",
                    int xx = 150, int yy = 25)
        {
            var bb = default(byte[]);
            try
            {
                var dianWith = 1; //点宽度
                var xx_space = 10;  //点与点之间x坐标间隔
                var yy_space = 5;    //y坐标间隔
                var wenZiLen = content.Length;  //文字长度
                var maxX = xx / wenZiLen; //每个文字最大x宽度
                var prevWenZiX = 0; //前面一个文字的x坐标
                var size = 16;//字体大小

                //字体
                var install_Family = new FontCollection().Install(
                  fontFilePath
                  //@"C:\\Windows\\Fonts\\STKAITI.TTF"   //windows系统下字体文件
                  );
                var font = new Font(install_Family, size);  //字体

                //点坐标
                var listPath = new List<IPath>();
                for (int i = 0; i < xx / xx_space; i++)
                {
                    for (int j = 0; j < yy / yy_space; j++)
                    {
                        var position = new Vector2(i * xx_space, j * yy_space);
                        var linerLine = new LinearLineSegment(position, position);
                        var shapesPath = new SixLabors.Shapes.Path(linerLine);
                        listPath.Add(shapesPath);
                    }
                }

                //画图
                using (Image<Rgba32> image = new Image<Rgba32>(xx, yy))   //画布大小
                {
                    image.Mutate(x =>
                    {
                        var imgProc = x;

                        //逐个画字
                        for (int i = 0; i < wenZiLen; i++)
                        {
                            //当前的要输出的字
                            var nowWenZi = content.Substring(i, 1);

                            //文字坐标
                            var wenXY = new Vector2();
                            var maxXX = prevWenZiX + (maxX - size);
                            wenXY.X = new Random().Next(prevWenZiX, maxXX);
                            wenXY.Y = new Random().Next(0, yy - size);

                            prevWenZiX = Convert.ToInt32(Math.Floor(wenXY.X)) + size;

                            //画字
                            imgProc.DrawText(
                                   nowWenZi,   //文字内容
                                   font,
                                   i % 2 > 0 ? Rgba32.HotPink : Rgba32.Red,
                                   wenXY,
                                   TextGraphicsOptions.Default);
                        }

                        //画点
                        imgProc.BackgroundColor(Rgba32.WhiteSmoke).   //画布背景
                                     Draw(
                                     Pens.Dot(Rgba32.HotPink, dianWith),   //大小
                                     new SixLabors.Shapes.PathCollection(listPath)  //坐标集合
                                 );
                    });
                    using (MemoryStream stream = new MemoryStream())
                    {
                        image.SaveAsPng(stream);
                        bb = stream.GetBuffer();
                    }
                }
            }
            catch (Exception ex)
            {
            }
            return bb;
        }
该方法返回了一个byte[]数组,然后通过HttpGet方式请求Razor接口,前端就能够获取到这个验证码图片byte[]了;
/// <summary>
        /// Get获取验证码图片byte[]
        /// </summary>
        /// <returns></returns>
        public FileResult OnGetValidCode()
        {
            var codebb = GetValidCodeByte(DateTime.Now.ToString("mmssfff"));
            return File(codebb, "image/png");
        }
我们通过get请求获取验证码: http://localhost:1120/login?handler=ValidCode ,然后得到如图效果:

本篇内容到此就结束了,如果对您有好的帮助,不妨点个“赞”;一起努力推动NetCore发展吧,谢谢。
本文转自:http://www.cnblogs.com/wangrudong003/p/7656842.html
以上是关于ImageSharp一个专注于NetCore平台图像处理的开源项目的主要内容,如果未能解决你的问题,请参考以下文章
