consul 1.0 server cluster集群配置全解密
Posted
tags:
篇首语:本文由小常识网(cha138.com)小编为大家整理,主要介绍了consul 1.0 server cluster集群配置全解密相关的知识,希望对你有一定的参考价值。
一、背景故事:上周四听了美的mysql数据库利用consul实现高可用,还有redis 集群模式,让我对consul产生了浓厚的兴趣,特花了三四天的时间研究consul集群,consul的特点是什么呢?
1、 使用 Raft 算法来保证一致性, 比复杂的 Paxos 算法更直接. 相比较而言, zookeeper 采用的是Paxos, 而 etcd 使用的则是 Raft.
2、支持多数据中心,内外网的服务采用不同的端口进行监听。 多数据中心集群可以避免单数据中心的单点故障,而其部署则需要考虑网络延迟, 分片等情况等. zookeeper和 etcd 均不提供多数据中心功能的支持. 满足多数据中心架构
3、支持健康检查. etcd 不提供此功能.
4、支持 http 和 dns 协议接口. zookeeper 的集成较为复杂,etcd 只支持 http 协议. 有DNS功能,支持REST API
5、官方提供web管理界面, etcd 无此功能.
6、部署简单,运维友好,无依赖,go的二进制程序copy过来就能用了,一个程序搞定,可以结合ansible来推送。
废话不多说直接上部署教程
二、consul cluster go环境设置
1.0版本的consul 需go1.9版本及以上
安装golang1.4
cd /root
wget https://storage.googleapis.com/golang/go1.4-bootstrap-20170531.tar.gz
tar -xf go1.4-bootstrap-20170531.tar.gz
cd go/src
./make.bash

成功后信息
Installed Go for linux/amd64 in /home/test/go
Installed commands in /home/test/go/bin
cd  /root
mv go go1.4

安装golang1.9
wget https://storage.googleapis.com/golang/go1.9.src.tar.gz
tar -xf go1.9.src.tar.gz
cd go/src
./all.bash

cd /root
mv go /usr/local/go1.9
vim /etc/profile
source /etc/profile
export PATH=$PATH:/usr/local/go1.9/bin
go version
三、consul cluster 集群部署
假设我们要创建3个节点的集群,IP为:
创建consul配置文件consul节点默认的名字就是本机的hostname,所以尽量起一个含义清晰的名字。
当然也可以在配置文件中使用node指定
mha120: 192.168.56.120
tomcat102: 192.168.56.121
tomcat103: 192.168.56.122
unzip consul_1.0.0_linux_amd64.zip
cp consul  /usr/local/bin
which consul
/usr/local/bin/consul
mkdir -p /etc/consul
mkdir /data/consul/data -p
三个服务器都做以上操作
在120上创建配置文件
cat >/etc/consul/consul_config.json <<EOF
{
    "advertise_addr": "192.168.56.120",
    "bind_addr": "192.168.56.120",
    "domain": "consul",
    "bootstrap_expect": 3,
    "server": true,
    "datacenter": "consul-cluster",
    "data_dir": "/data/consul/data",
    "enable_syslog": true,
    "performance": {
      "raft_multiplier": 1
    },
    "dns_config": {
        "allow_stale": true,
        "max_stale": "15s"
    },
    "retry_join": [
        "192.168.56.121",
        "192.168.56.122"
    ],
    "retry_interval": "10s",
    "skip_leave_on_interrupt": true,
    "leave_on_terminate": false,
    "ports": {
        "dns": 53,
        "http": 80
    },
    "recursors": [
        "114.114.114.114"
    ],
    "rejoin_after_leave": true,
    "addresses": {
        "http": "0.0.0.0",
        "dns": "0.0.0.0"
    }
}
EOF

chown -R  consul:consul  /data/consul/data
=========================================================================================
                    192.168.56.121 配置文件
=========================================================================================
cat >/etc/consul/consul_config.json <<EOF
{
    "advertise_addr": "192.168.56.121",
    "bind_addr": "192.168.56.121",
    "domain": "consul",
    "bootstrap_expect": 3,
    "server": true,
    "datacenter": "consul-cluster",
    "data_dir": "/data/consul/data",
    "enable_syslog": true,
    "performance": {
      "raft_multiplier": 1
    },
    "dns_config": {
        "allow_stale": true,
        "max_stale": "15s"
    },
    "retry_join": [
        "192.168.56.120",
        "192.168.56.122"
    ],
    "retry_interval": "10s",
    "skip_leave_on_interrupt": true,
    "leave_on_terminate": false,
    "ports": {
        "dns": 53,
        "http": 80
    },
    "recursors": [
        "114.114.114.114"
    ],
    "rejoin_after_leave": true,
    "addresses": {
        "http": "0.0.0.0",
        "dns": "0.0.0.0"
    }
}
EOF
==============================================================================
                         192.168.56.122 配置文件
===============================================================================
cat >/etc/consul/consul_config.json <<EOF
{
    "advertise_addr": "192.168.56.122",
    "bind_addr": "192.168.56.122",
    "domain": "consul",
    "bootstrap_expect": 3,
    "server": true,
    "datacenter": "consul-cluster",
    "data_dir": "/data/consul/data",
    "enable_syslog": true,
    "performance": {
      "raft_multiplier": 1
    },
    "dns_config": {
        "allow_stale": true,
        "max_stale": "15s"
    },
    "retry_join": [
        "192.168.56.120",
        "192.168.56.121"
    ],
    "retry_interval": "10s",
    "skip_leave_on_interrupt": true,
    "leave_on_terminate": false,
    "ports": {
        "dns": 53,
        "http": 80
    },
    "recursors": [
        "114.114.114.114"
    ],
    "rejoin_after_leave": true,
    "addresses": {
        "http": "0.0.0.0",
        "dns": "0.0.0.0"
    }
}
EOF
分别在120-122服务器执行
nohup /usr/local/bin/consul agent   -config-dir=/etc/consul/consul_config.json  -rejoin &
查看节点成员
[email protected]:~$ consul members -http-addr=127.0.0.1:80
Node       Address              Status  Type    Build  Protocol  DC              Segment
mha120     192.168.56.120:8301  alive   server  1.0.0  2         consul-cluster  <all>
tomcat102  192.168.56.121:8301  alive   server  1.0.0  2         consul-cluster  <all>
tomcat103  192.168.56.122:8301  alive   server  1.0.0  2         consul-cluster  <all>
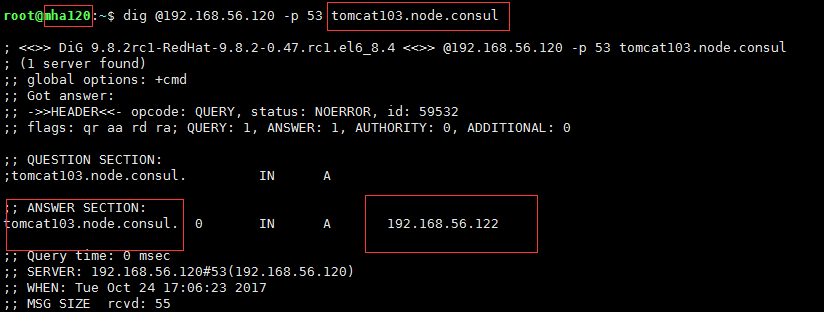
1、解析域名
[email protected]:~$dig @192.168.56.120 -p 53 tomcat103.node.consul
2、查看主服务 http://192.168.56.120/v1/status/leader
3、域名解析服务的一致性检测接口
http://192.168.56.120/v1/catalog/nodes
4、配置客户端集群域名解析服务
在192.168.56.0/32网段的任一ip设置
echo ‘nameserver 192.168.56.121‘ >>/etc/resolv.conf
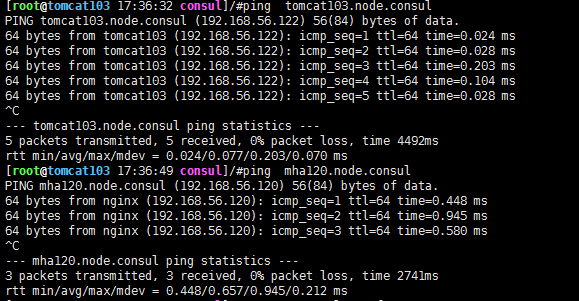
4、测试解析
ping tomcat103.node.consul
ping mha120.node.consul
至此consul cluster三节点集群搭建完成。
本文出自 “linux-letian” 博客,转载请与作者联系!
以上是关于consul 1.0 server cluster集群配置全解密的主要内容,如果未能解决你的问题,请参考以下文章


