通过ldap验证svn服务
Posted 花豆豆
tags:
篇首语:本文由小常识网(cha138.com)小编为大家整理,主要介绍了通过ldap验证svn服务相关的知识,希望对你有一定的参考价值。
1、简单介绍:
这里需要介绍一点的就是svn服务器的验证是需要通过SASL机制的,那么SASL全称为(Simple Authentication and security Layer),是一种用来扩充C/S模式验证能力的机制。
SASL是一个胶合库,通过这个库把应用层与形式多样的认证系统整合在一起,这有点类似于PAM,但是后者是认证方式,决定什么人可以访问什么服务,而SASL是认证过程,侧重于信任建立过程,这个过程可以调用PAM来建立信任关系。
1.1、安装:
[root@ldap-server ~]# yum -y install sasl*  #安装sasl

[root@ldap-server ~]# rpm -qa |grep sasl   #查看安装的软件
saslwrapper-0.14-1.el6.x86_64
cyrus-sasl-lib-2.1.23-13.el6_3.1.x86_64
cyrus-sasl-2.1.23-13.el6_3.1.x86_64
cyrus-sasl-devel-2.1.23-13.el6_3.1.x86_64
saslwrapper-devel-0.14-1.el6.x86_64
cyrus-sasl-plain-2.1.23-13.el6_3.1.x86_64

[root@ldap-server ~]# saslauthd -v  #查看sasl支持的东西
saslauthd 2.1.23
authentication mechanisms: getpwent kerberos5 pam rimap shadow ldap

[root@ldap-server ~]# grep -i mech /etc/sysconfig/saslauthd  #过滤需要修改 的内容
# Mechanism to use when checking passwords.  Run "saslauthd -v" to get a list
# of which mechanism your installation was compiled with the ablity to use.
MECH=pam
# Options sent to the saslauthd. If the MECH is other than "pam" uncomment the next line.

[root@ldap-server ~]# sed -i "s#MECH=pam#MECH=shadow#g"  /etc/sysconfig/saslauthd   #修改需要的内容

[root@ldap-server ~]# grep -i mech /etc/sysconfig/saslauthd   #查看修改后的 结果
# Mechanism to use when checking passwords.  Run "saslauthd -v" to get a list
# of which mechanism your installation was compiled with the ablity to use.
MECH=shadow
# Options sent to the saslauthd. If the MECH is other than "pam" uncomment the next line.

[root@ldap-server ~]# /etc/init.d/saslauthd start   #启动sasl
Starting saslauthd:                      [  OK  ]

[root@ldap-server ~]# ps -ef|grep sasl   #查看启动后的进程
root      20549      1  0 09:35 ?        00:00:00 /usr/sbin/saslauthd -m /var/run/saslauthd -a shadow
root      20551  20549  0 09:35 ?        00:00:00 /usr/sbin/saslauthd -m /var/run/saslauthd -a shadow
root      20552  20549  0 09:35 ?        00:00:00 /usr/sbin/saslauthd -m /var/run/saslauthd -a shadow
root      20553  20549  0 09:35 ?        00:00:00 /usr/sbin/saslauthd -m /var/run/saslauthd -a shadow
root      20554  20549  0 09:35 ?        00:00:00 /usr/sbin/saslauthd -m /var/run/saslauthd -a shadow
1.2、测试认证系统用户(可以不用操作):
[root@ldap-server ~]# useradd xyyp  #创建系统用户

[root@ldap-server ~]# passwd xyyp   #设置密码

[root@ldap-server ~]# testsaslauthd -uxyyp -p123123   #认证用户
0: NO "authentication failed"   #这里明明创建了系统用户并且/etc/sysconfig/saslauthd里面的pam也改成了shadow,但还是认证失败,这里需要使用命令:setsebool -P allow_saslauthd_read_shadow 1

[root@ldap-server ~]# testsaslauthd -uxyyp -p123123  #再次认证用户
0: OK "Success."
1.3、切换成ldap认证:
[root@ldap-server ~]# sed -i "s#MECH=shadow#MECH=ldap#g" /etc/sysconfig/saslauthd    #把shadow改为ldap

[root@ldap-server ~]# /etc/init.d/saslauthd restart   #重启服务
Stopping saslauthd:                         [  OK  ]
Starting saslauthd:                         [  OK  ]

[root@ldap-server ~]# grep -i mech /etc/sysconfig/saslauthd   #查看结果
# Mechanism to use when checking passwords.  Run "saslauthd -v" to get a list
# of which mechanism your installation was compiled with the ablity to use.
MECH=ldap
# Options sent to the saslauthd. If the MECH is other than "pam" uncomment the next line.

[root@ldap-server ~]# vim /etc/saslauthd.conf   #编辑配置文件添加下面内容
ldap_sercers: ldap://xyanp.org/
#ldap_uri: ldap://ldap.xyp.xyanp.org/
#ldap_version: 3
#ldap_start_tls: 0
ldap_bind_dn: cn=admin,dc=xyanp,dc=org
ldap_bind_pw: xyp
ldap_search_base: ou=People,dc=xyanp,dc=org
ldap_filter: uid=%U
#ldap_filter: mail=%U@xyanp.org
ldap_password_attr: userPassword
#ldap_sasl: 0
"/etc/saslauthd.conf" 12L, 327C written

[root@ldap-server ~]# /etc/init.d/saslauthd restart   #重启服务
Stopping saslauthd:                         [  OK  ]
Starting saslauthd:                         [  OK  ]
[root@ldap-server ~]# testsaslauthd -uxyp -p123456   #测试认证ldap的用户
0: OK "Success."
搭建svn服务器,并保证能正常运行(不在详细赘述)。
用ldap的用户对svn进行测试:
[root@ldap-server svndata]# svn up svn://10.10.10.90/asdoc ./ --username=xyp --password=123456   #将svn账户换成ldap里的用户和密码
svn: warning: cannot set LC_CTYPE locale
svn: warning: environment variable LANG is EN
svn: warning: please check that your locale name is correct
Skipped \'svn://10.10.10.90/asdoc\'
Authentication realm: <svn://10.10.10.90:3690> 5a20e44e-42c6-42cb-841a-590b02c4e94d
Username:    #会提示输入用户名和密码,证明ldap的用户是不好使的

[root@ldap-server svndata]# vim /etc/sasl2/svn.conf   #编辑一个配置文件,添加下面内容
pwcheck_method: saslauthd
mech_list: PLAIN LOGIN

[root@ldap-server asdoc]# cd /app/svndata/asdoc/conf/  #切换到svn的配置目录

[root@ldap-server conf]# sed -i "s/# use-sasl = true/use-sasl = true/g" svnserve.conf    #修改一个参数

[root@ldap-server conf]# grep use-sasl svnserve.conf   #查看修改结果
use-sasl = true

[root@ldap-server conf]# pkill svn  #杀掉svn

[root@ldap-server conf]# ps -ef|grep svn   #查看
root      20847   8217  0 11:03 pts/0    00:00:00 grep svn

[root@ldap-server conf]# svnserve -d -r /app/svndata/   #重新启动svn

[root@ldap-server conf]# ps -ef|grep svn   #查看结果
root      20849   1  0 11:03 ?   00:00:00 svnserve -d -r /app/svndata/
root      20851   8217  0 11:03 pts/0    00:00:00 grep svn

[root@ldap-server conf]# svn co svn://10.10.10.90/asdoc /svndata --username=xyp --password=123456    #使用ldap的用户名密码做同步
-----------------------------------------------------------------------
ATTENTION!  Your password for authentication realm:

   <svn://10.10.10.90:3690> 5a20e44e-42c6-42cb-841a-590b02c4e94d

can only be stored to disk unencrypted!  You are advised to configure
your system so that Subversion can store passwords encrypted, if
possible.  See the documentation for details.

You can avoid future appearances of this warning by setting the value
of the \'store-plaintext-passwords\' option to either \'yes\' or \'no\' in
\'/root/.subversion/servers\'.
-----------------------------------------------------------------------
Store password unencrypted (yes/no)? yes    #提示让保存密码,表示成功
1.4、windows客户端测试:
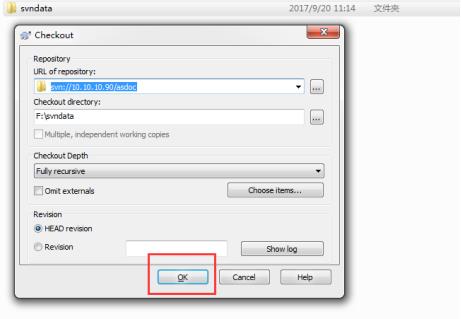
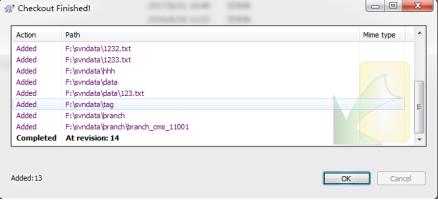
新建一个文件夹,右键进行checkout,弹出下面对话框:


=================================================================================到此ldap验 证svn完成
1.5、备注:
虽然ldap认证成功了,但是svn的用户管理还是要在authz这个文件里面进行管理的,比如权限,如果再ldap上创建了一个用户,则需要在authz文件里面进行授权r或w权限,如果多个用户的话,则可以建个组,直接给组授权。
以上是关于通过ldap验证svn服务的主要内容,如果未能解决你的问题,请参考以下文章
有人可以解释啥是 SVN 平分算法吗?理论上和通过代码片段[重复]
通过 Tomcat 的 Spring Boot LDAP 身份验证(预身份验证)
通过spring security进行的Active Directory身份验证会返回由LDAP引起的有效用户的错误凭据:错误代码49