编译安装Bind
Posted
tags:
篇首语:本文由小常识网(cha138.com)小编为大家整理,主要介绍了编译安装Bind相关的知识,希望对你有一定的参考价值。
1、下载bind:http://www.isc.org/products/BIND/
2、编译安装
[[email protected] ~]#tar xvf bind-9.11.2.tar.gz
[[email protected] ~]#cd bind-9.11.2/
[[email protected] bind-9.11.2]#groupadd -r -g 53 named //添加组
[[email protected] bind-9.11.2]#getent gshadow named
named:!::
[[email protected] bind-9.11.2]#useradd -r -u 53 -g 53 named //添加用户
[[email protected] bind-9.11.2]#getent passwd named
named:x:53:53::/home/named:/bin/bash
[[email protected] bind-9.11.2]#./configure --prefix=/usr/local/bind11 --sysconfdir=/etc/named --without-openssl
[[email protected] bind-9.11.2]#make -j 4&&make install
3、设置环境变量
[[email protected] bind-9.11.2]#vim /etc/profile.d/named.sh
PATH=/usr/local/bind11/bin:/usr/local/bind11/sbin:$PATH
4、设置库和文件
[[email protected] bind-9.11.2]#vim /etc/ld.so.conf.d/named.conf
/usr/local/bind11/lib
[[email protected] bind-9.11.2]#ls -sv /usr/local/bind11/include/ /usr/include/named
ls: cannot access /usr/include/named: No such file or directory
/usr/local/bind11/include/:
total 8
0 bind9 0 dst 4 isc 0 isccfg 0 pk11
4 dns 0 irs 0 isccc 0 lwres 0 pkcs11
5、设置man帮助
[[email protected] bind-9.11.2]#vim /etc/man_db.conf
MANDATORY_MANPATH /usr/local/bind11/share/man
[[email protected] bind-9.11.2]#man named
6、添加配置文件
[[email protected] bind-9.11.2]#vim /etc/named/named.conf
options {
directory "/var/named/";
};
zone "." IN {
type hint;
file "named.ca";
};
zone "test.com" IN {
type master;
file "test.com.zone";
};
zone "localhost" IN {
type master;
file "named.localhost";
allow-update {none;};
};
zone "1.0.0.127.in-addr.arpa" IN {
type master;
file "named.loopback";
allow-update {none;};
};
7、创建区域数据库
[[email protected] ~]#mkdir /var/named
[[email protected] ~]#named-checkconf
[[email protected] ~]#. /etc/profile.d/named.sh
[[email protected] ~]#which dig
[[email protected] ~]#dig > /var/named/named.ca
[[email protected] ~]#named-checkconf
[[email protected] ~]#vim /var/named/named.localhost
$TTL 1d
@ IN SOA localhost.admin.localhost. (
00
1h
5m
7d
1d)
IN NS localhost.
localhost. IN A 127.0.0.1
[[email protected] ~]#vim /var/named/named.loopback
$TTL 1d
@ IN SOA localhost.admin.localhost. (
00
1h
5m
7d
1d)
NS @
A 127.0.0.1
PTR localhost.
[[email protected] ~]#vim /var/named/test.com.zone
$TTL 1D
@ IN SOA dns1 mail.com. (
00 ; serial
1D ; refresh
1H ; retry
1W ; expire
3H ) ; minimum
@ NS dns1
@ NS dns2
dns1 A 172.17.254.76
dns2 A 172.17.252.6
www CNAME websrv
websrv A 172.17.37.106
8、设置权限
[[email protected] ~]#chmod 640 /var/named/*
[[email protected] ~]#chmod 640 /etc/named/named.conf
[[email protected] ~]#chgrp -R named /var/named/
[[email protected] ~]#chgrp named /etc/named/named.conf
9、启动服务和测试
named -u named -f -g -d 3 前端级别3方式运行
named -u named 后台运行
killall named
ss -tuln
tail /var/log/message
named -u named
10、设置文件以支持rndc
rndc reload 观察错误提示
rndc-confgen -r /dev/urandom >/etc/named/rndc.conf 生成key
tail /etc/named/rndc.conf >>/etc/named/named.conf
killall -SIGHUP named
rndc status
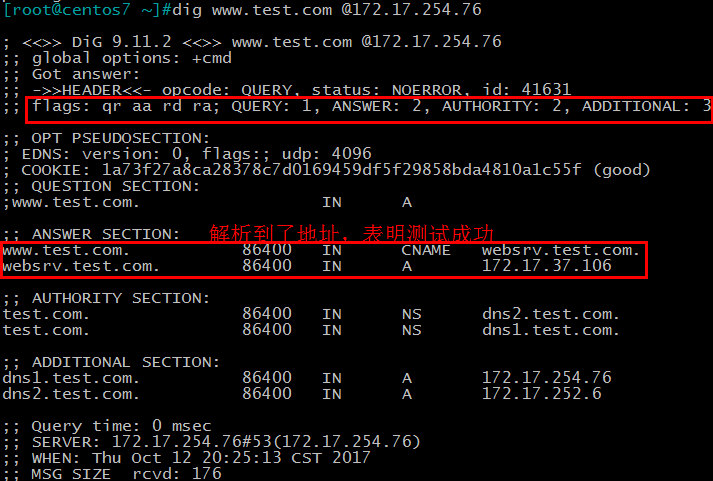
测试:dig www.test.com @172.17.254.76
以上是关于编译安装Bind的主要内容,如果未能解决你的问题,请参考以下文章
