CenOS 7 rpm包安装lamp
Posted
tags:
篇首语:本文由小常识网(cha138.com)小编为大家整理,主要介绍了CenOS 7 rpm包安装lamp相关的知识,希望对你有一定的参考价值。
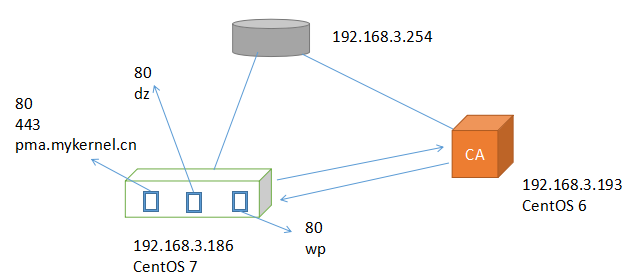
CentOS 7 LAMP
vhost1: phpMyadmin 布署pma.mykernel.cn https
vhost2: wordpress 布署wp.mykernel.cn
vhost3: Discuz 布署dz.mykernel.cn
实验环境

关闭防火墙: iptables -F
搭建LAMP环境
准备虚拟主机的DocumentRoot
  # mkdir -pv /web/vhosts
  # chcon -t httpd_sys_content_t /web/vhosts
  # mkdir /web/vhosts/{pma,wp,dz}
准备虚拟主机
安装程序包和备份配置文件
  # yum -y install apr apr-util httpd
  # cp -v /etc/httpd/conf/httpd.conf{,.bak}
在主配置文件中,注释中心主机
  配置文件: /etc/httpd/conf/httpd.conf
  #DocumentRoot "/var/www/html"
在conf.d/*.conf添加虚拟主机
  # vim /etc/httpd/conf.d/virtualhost.conf
      #phpMyadmin
      <VirtualHost *:80>
        DocumentRoot /web/vhosts/pma
        ServerName pma.mykernel.cn
        CustomLog logs/pma_access.log combined
        ErrorLog  logs/pma_error.log
        <Directory "/web/vhosts/pma">
          Options FollowSymLinks
          AllowOverride None
          Require all granted
        </Directory>
      </VirtualHost>
      #wordpress
      <VirtualHost *:80>
        DocumentRoot /web/vhosts/wp
        ServerName wp.mykernel.cn
        CustomLog logs/wp_access.log combined
        ErrorLog  logs/wp_error.log
        <Directory "/web/vhosts/wp">
           Options FollowSymLinks
          AllowOverride None
          Require all granted
        </Directory>
      </VirtualHost>
      #disscuzz
      <VirtualHost *:80>
        DocumentRoot /web/vhosts/dz
        ServerName dz.mykernel.cn
        CustomLog logs/dz_access.log combined
        ErrorLog  logs/dz_error.log
        <Directory "/web/vhosts/dz">
          Options FollowSymLinks
          AllowOverride None
          Require all granted
        </Directory>
      </VirtualHost>
测试语法
# httpd -t
启动web服务
# systemctl start httpd.service
测试是否能访问
  1.windows
      在C:\Windows\System32\drivers\etc\hosts文件中添加如下内容(用于解析域名)
          192.168.3.186           pma.mykernel.cn
          192.168.3.186           wp.mykernel.cn
          192.168.3.186           dz.mykernel.cn
      打开Google浏览器,分别输入: pma.mykernel.cn wp.mykernel.cn dz.mykernel.cn,都将显示: Testing 123..

  2.linux
      在/etc/hosts文件中添加如下内容(用于解析域名)
          192.168.3.186           pma.mykernel.cn
          192.168.3.186           wp.mykernel.cn
          192.168.3.186           dz.mykernel.cn
      安装可访问文件协议的客户端工具
          # yum -y install telnet curl elinks
      测试访问
          # curl http://192.168.3.186
          # elinks --dump http://192.168.3.186

          # telnet 192.168.3.186 80
          Escape character is ‘^]‘.
          HEAD / HTTP/1.1
          Host:192.168.3.186
安装php作为httpd的模块而存在: libphp5.so(prefork) libphp5-zts.so(work, event)
  # yum -y install php
  # rpm -ql php
  /etc/httpd/conf.d/php.conf               //为libphp5.so提供的配置
  /etc/httpd/conf.modules.d/10-php.conf    //装载此模块
  /usr/lib64/httpd/modules/libphp5.so      //提供给httpd的php模块,仅能用于prefork模型
  # systemctl restart httpd                //基于module需要重启web读取php配置
查看当前mpm
# httpd -M
测试能否运行php程序
# for i in wp dz pma; do echo -e "<?php\nphpinfo();\n?>" > /web/vhosts/$i/index.php ; done
在windows浏览器中测试
安装php-mysql和mariadb-server用于提供应用程序服务器中运行中的程序需要用到后端mysql提供的数据时,php-mysql用于封装和解析请求,mariadb-server用于存储数据.
# yum -y install php-mysql mariadb-server
启动mariadb(mysql分支的开源实现)
  # systemctl start mariadb.service
  # ss -tunl                          //观察3306端口
  # systemctl reload httpd.service    //重载web服务
测试连接MariaDB
# mysql
在各个虚拟主机中添加以下内容,并在windows主机中测试用php-mysql的函数库连接mysql
  <?php
    $link=mysql_connect(‘localhost‘,‘root‘,‘‘);
    if($link)
      echo ok;
    else
      echo failure;
    mysql_close();
    phpinfo();
  ?>
一、布署phpMyadmin(MariaDB webGUI)
安装依赖:
  # yum -y install php-mbstring
  # systemctl restart httpd.service
下载phpMyadmin
https://files.phpmyadmin.net/phpMyAdmin/4.0.10.20/phpMyAdmin-4.0.10.20-all-languages.zip
展开至DocumentRoot
  # cd /web/vhosts/pma
  # unzip ~/phpMyAdmin-4.0.10.20-all-languages.zip
  # ln -sv phpMyAdmin-4.0.10.20-all-languages pma   //便于版本升级
配置
  # cp pma/config.sample.inc.php pma/config.inc.php
  # openssl rand -base64 32
  ZAN6DZ6ov68hG0PIKIiXUukwWaoqPYvmzOQ1UnlqQcQ=
  # vim pma/config.inc.php  //在YOU MUST FILL IN THIS FOR COOKIE AUTH! */ 前修改随机数为生成的随机数
  $cfg[‘Servers‘][$i][‘AllowNoPassword‘] = false;  //表示不能空密码登入phpMyadmin
给root用户添加密码
  # mysql
  MariaDB [(none)]> set password for ‘root‘@‘127.0.0.1‘=PASSWORD(‘123‘);
  MariaDB [(none)]> set password for ‘root‘@‘localhost‘=PASSWORD(‘123‘);
  MariaDB [(none)]> FLUSH PRIVILEGES;
  MariaDB [(none)]> quit
  # mysql -uroot -p123
在windows主机上测试连接phpMyadmin
http://pma.mykernel.cn/pma
配置https
建立ca <192.168.3.193>
  # openssl version
  # dir=/etc/pki/CA
  # touch $dir/index.txt
  # echo "01" > $dir/serial
  # (umask 077;openssl genrsa -out $dir/private/cakey.pem 4096)
  # openssl req -new -x509 -key $dir/private/cakey.pem -out $dir/cacert.pem -days 7300
      (SC, ChengDu, ChengDu, MageEdu Ltd, Ops, ca.mykernel.cn, [email protected])
申请请求 <192.168.3.186>
  # install -d /etc/httpd/ssl
  # cd /etc/httpd/ssl
  # (umask 077;openssl genrsa -out httpd.key 4096)
  # openssl req -new -key httpd.key -out httpd.csr -days 7300
      (SC, ChengDu, ChengDu, MageEdu Ltd, Ops, pma.mykernel.cn, [email protected])
提交请求 <192.168.3.186>
# scp httpd.csr [email protected]:/tmp
签证 <192.168.3.193>
# openssl ca -in /tmp/httpd.csr -out $dir/certs/pma.mykernel.cn.crt -days 365
获取证书 <192.168.3.193>
# scp $dir/certs/pma.mykernel.cn.crt [email protected]:/etc/httpd/ssl
安装mod_ssl (SSL/TLS module for the Apache HTTP Server) <192.168.3.186>
# yum -y install mod_ssl
配置使用ssl <192.168.3.186>
  # rpm -qc mod_ssl
  /etc/httpd/conf.d/ssl.conf
  /etc/httpd/conf.modules.d/00-ssl.conf
  # cp -v /etc/httpd/conf.d/ssl.conf{,.bak}
  # vim /etc/httpd/conf.d/ssl.conf
      <VirtualHost *:443>
      DocumentRoot "/web/vhosts/pma/"
      ServerName pma.mykernel.cn
      SSLEngine on
      SSLCertificateFile /etc/httpd/ssl/pma.mykernel.cn.crt
      SSLCertificateKeyFile /etc/httpd/ssl/httpd.key
      <Directory "/web/vhosts/pma">
        Options None
        AllowOverride FollowSymLinks
        Require all granted
      </Directory>
  # systemctl restart httpd.service      //需要重新监听更多的端口
  # ss -tnl
二、布署wordpress
下载wordpress
https://cn.wordpress.org/wordpress-4.8.1-zh_CN.zip
展开至DocumentRoot
   # cd /web/vhosts/pma
  # unzip ~/wordpress-4.8.1-zh_CN.zip
  # ln -sv wordpress wp
配置
  # cp wp/wp-config-sample.php wp/wp-config.php
  /** WordPress数据库的名称 */
  define(‘DB_NAME‘, ‘wpdb‘);
  /** MySQL数据库用户名 */
  define(‘DB_USER‘, ‘wpuser‘);
  /** MySQL数据库密码 */
  define(‘DB_PASSWORD‘, ‘[email protected]‘);
添加一个管理wordpress数据库"wpdb"的用户"wpuser"
  # mysql -uroot -p123
  MariaDB [(none)]> CREATE DATABASE wpdb;
  MariaDB [(none)]> GRANT ALL ON wpdb.* TO ‘wpuser‘@‘localhost‘ IDENTIFIED BY ‘[email protected]‘;
  MariaDB [(none)]> GRANT ALL ON wpdb.* TO ‘wpuser‘@‘127.0.0.1‘ IDENTIFIED BY ‘[email protected]‘;
  MariaDB [(none)]> FLUSH PRIVILEGES;
  MariaDB [(none)]> quit
  # mysql -uwpuser [email protected]
在windows主机上测试连接wordpress
http://wp.mykernel.cn/wp
三、布署disscuzz
下载disscuzz
http://download.comsenz.com/DiscuzX/2.5/Discuz_X2.5_SC_UTF8.zip
展开至DocumentRoot
  # cd /web/vhosts/dz
  # unzip ~/Discuz_X2.5_SC_UTF8.zip
配置
  # setenforce 0
  # cd upload
  # setfacl -R -m u:apache:rwx config data uc_client uc_server
添加一个管理disscuzz数据库"dzdb"的用户"dzuser"
  # mysql -uroot -p123
  MariaDB [(none)]> CREATE DATABASE dzdb;
  MariaDB [(none)]> GRANT ALL ON dzdb.* TO ‘dzuser‘@‘localhost‘ IDENTIFIED BY ‘[email protected]‘;
  MariaDB [(none)]> GRANT ALL ON dzdb.* TO ‘dzuser‘@‘127.0.0.1‘ IDENTIFIED BY ‘[email protected]‘;
  MariaDB [(none)]> FLUSH PRIVILEGES;
  MariaDB [(none)]> quit
  # mysql -udzuser [email protected]
在windows主机上测试连接disscuzz
http://dz.mykernel.cn/upload
感激
QQ: 2580259468

本文出自 “Reading” 博客,请务必保留此出处http://sonlich.blog.51cto.com/12825953/1970609
以上是关于CenOS 7 rpm包安装lamp的主要内容,如果未能解决你的问题,请参考以下文章