opencv学习之路(36)运动物体检测
Posted 进击的小猴子
tags:
篇首语:本文由小常识网(cha138.com)小编为大家整理,主要介绍了opencv学习之路(36)运动物体检测相关的知识,希望对你有一定的参考价值。
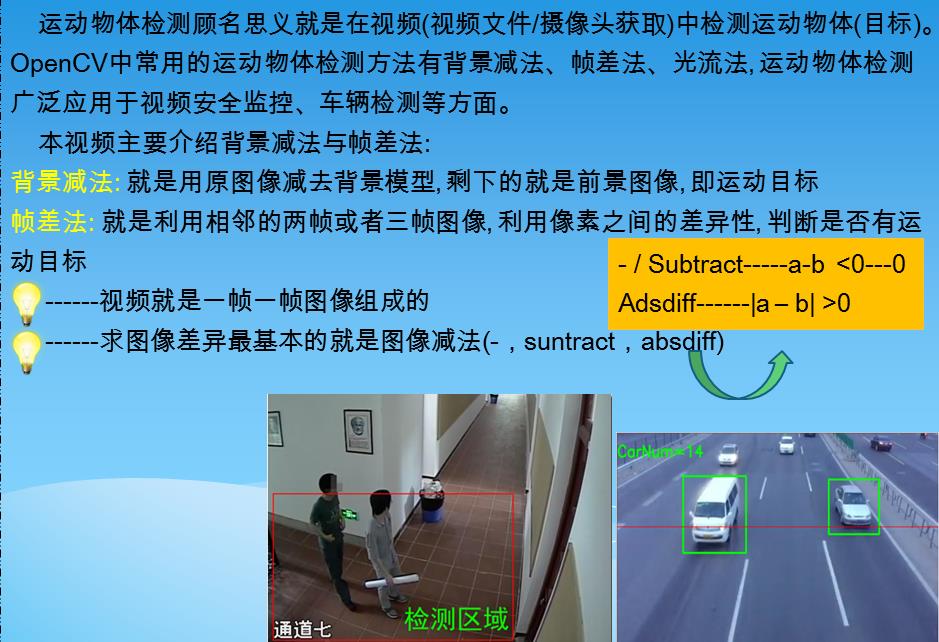
一、简介
二、背景减法
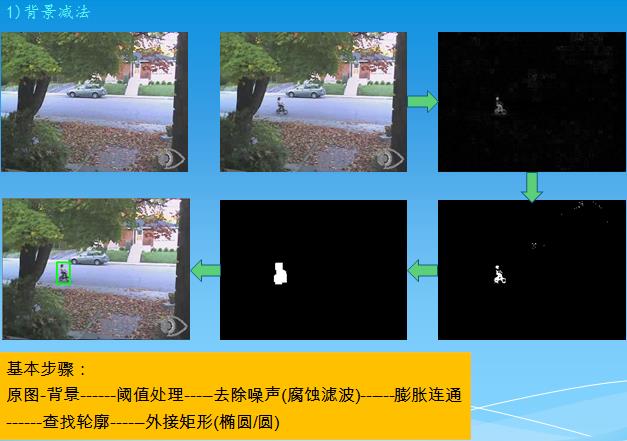
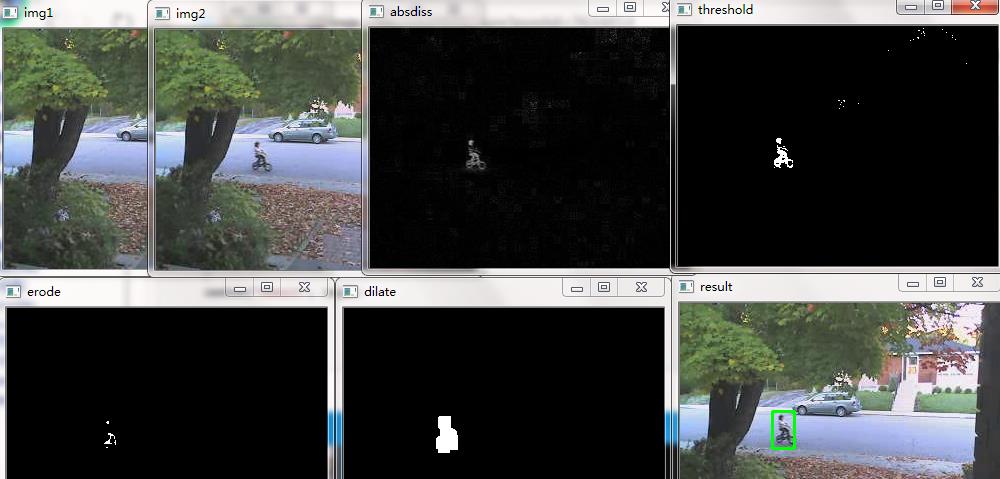
图片说明
#include "opencv2/opencv.hpp"using namespace cv;

void main()
{
    Mat img1 = imread("E:\\\\pic\\\\1.bmp");
    Mat img2 = imread("E:\\\\pic\\\\55.bmp");
    imshow("img1", img1);
    imshow("img2", img2);

    Mat gray1, gray2;
    cvtColor(img1, gray1, CV_BGR2GRAY);
    cvtColor(img2, gray2, CV_BGR2GRAY);

    Mat diff;
    absdiff(gray1, gray2, diff);
    imshow("absdiss", diff);
    threshold(diff, diff, 45, 255, CV_THRESH_BINARY);
    imshow("threshold", diff);

    Mat element = getStructuringElement(MORPH_RECT, Size(3, 3));
    Mat element2 = getStructuringElement(MORPH_RECT, Size(11, 11));
    erode(diff, diff, element);
    imshow("erode", diff);
    dilate(diff, diff, element2);
    imshow("dilate", diff);

    vector<vector<Point>> contours;
    vector<Vec4i> hierarcy;
    findContours(diff, contours, hierarcy, CV_RETR_EXTERNAL, CHAIN_APPROX_NONE); //查找轮廓
    vector<Rect> boundRect(contours.size()); //定义外接矩形集合
    //drawContours(img2, contours, -1, Scalar(0, 0, 255), 1, 8);  //绘制轮廓
    int x0=0, y0=0, w0=0, h0=0;
    for(int i=0; i<contours.size(); i++)
    {
        boundRect[i] = boundingRect((Mat)contours[i]); //查找每个轮廓的外接矩形
        x0 = boundRect[i].x;  //获得第i个外接矩形的左上角的x坐标
        y0 = boundRect[i].y; //获得第i个外接矩形的左上角的y坐标
        w0 = boundRect[i].width; //获得第i个外接矩形的宽度
        h0 = boundRect[i].height; //获得第i个外接矩形的高度
        rectangle(img2, Point(x0, y0), Point(x0+w0, y0+h0), Scalar(0, 255, 0), 2, 8); //绘制第i个外接矩形
    }
    imshow("result", img2);

    waitKey(0);
}
视频处理
#include "opencv2/opencv.hpp"
#include<iostream>
using namespace std;
using namespace cv;

Mat MoveDetect(Mat background, Mat img)
{
    Mat result = img.clone();
    Mat gray1, gray2;
    cvtColor(background, gray1, CV_BGR2GRAY);
    cvtColor(img, gray2, CV_BGR2GRAY);

    Mat diff;
    absdiff(gray1, gray2, diff);
    //imshow("absdiss", diff);
    threshold(diff, diff, 45, 255, CV_THRESH_BINARY);
    //imshow("threshold", diff);

    Mat element = getStructuringElement(MORPH_RECT, Size(3, 3));
    Mat element2 = getStructuringElement(MORPH_RECT, Size(15, 15));
    erode(diff, diff, element);
    //imshow("erode", diff);

    dilate(diff, diff, element2);
    //imshow("dilate", diff);

    vector<vector<Point>> contours;
    vector<Vec4i> hierarcy;
    findContours(diff, contours, hierarcy, CV_RETR_EXTERNAL, CHAIN_APPROX_NONE); //查找轮廓
    vector<Rect> boundRect(contours.size()); //定义外接矩形集合
    //drawContours(img2, contours, -1, Scalar(0, 0, 255), 1, 8);  //绘制轮廓
    int x0=0, y0=0, w0=0, h0=0;
    for(int i=0; i<contours.size(); i++)
    {
        boundRect[i] = boundingRect((Mat)contours[i]); //查找每个轮廓的外接矩形
        x0 = boundRect[i].x;  //获得第i个外接矩形的左上角的x坐标
        y0 = boundRect[i].y; //获得第i个外接矩形的左上角的y坐标
        w0 = boundRect[i].width; //获得第i个外接矩形的宽度
        h0 = boundRect[i].height; //获得第i个外接矩形的高度
        rectangle(result, Point(x0, y0), Point(x0+w0, y0+h0), Scalar(0, 255, 0), 2, 8); //绘制第i个外接矩形
    }
    return result;
}

void main()
{
    VideoCapture cap("E://bike.avi");
    if(!cap.isOpened()) //检查打开是否成功
         return;
    Mat frame;
    Mat background;
    Mat result;
    int count=0;
    while(1)
    {
        cap>>frame;
        if(!frame.empty())
        {
            count++;
            if(count==1)
                background = frame.clone(); //提取第一帧为背景帧
            imshow("video", frame);
            result = MoveDetect(background, frame);
            imshow("result", result);
            if(waitKey(50)==27)
               break;
        }
        else
            break;
    }
    cap.release();
}
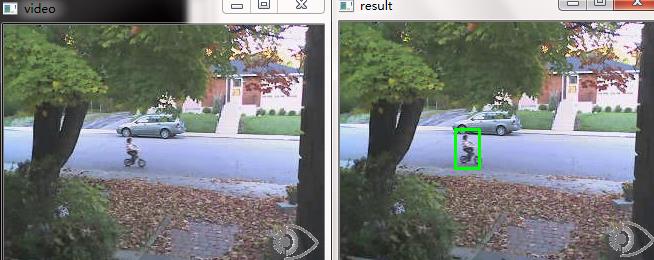

注意:针对不同场景不同目标,腐蚀膨胀等参数会有变化
三、帧差法
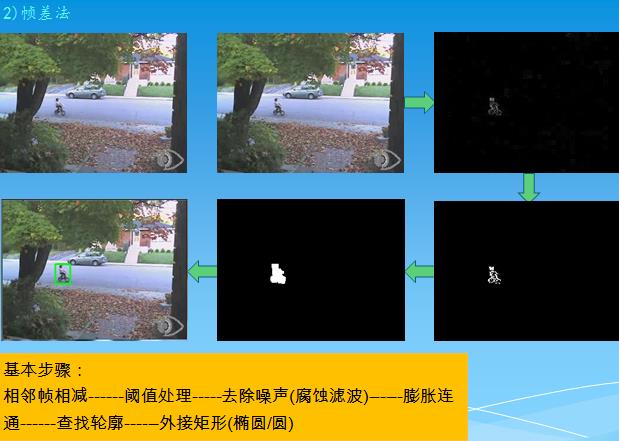
void main()
{
    VideoCapture cap("bike.avi");
    if(!cap.isOpened()) //检查打开是否成功
         return;
    Mat frame;
    Mat result;
    Mat temp;
    int count=0;
    while(1)
    {
        cap>>frame;
        if(!frame.empty())
        {
            count++;
            if(count==1)
                 result = MoveDetect(frame, frame);
            else
                 result = MoveDetect(temp, frame);
            imshow("video", frame);
            imshow("result", result);
            temp = frame.clone();
            if(waitKey(50)==27)
               break;
        }
        else
            break;
    }
    cap.release();
}
其余代码相同
以上是关于opencv学习之路(36)运动物体检测的主要内容,如果未能解决你的问题,请参考以下文章