浅析NRF51822之GPIOTE
Posted 陌鉎こ城sHi
tags:
篇首语:本文由小常识网(cha138.com)小编为大家整理,主要介绍了浅析NRF51822之GPIOTE相关的知识,希望对你有一定的参考价值。
- Note
- This library is obsolete and should not be used in new designs. Instead, you should use GPIOTE driver.
The general purpose Input/Output is organized in the nRF51 Series chips as one port with up to 32 I/Os (dependent on package) enabling access and control of up to 32 pins through one port. In most applications, the state of a GPIO or a change in state of a GPIO may trigger an application to take action or transition to another state.
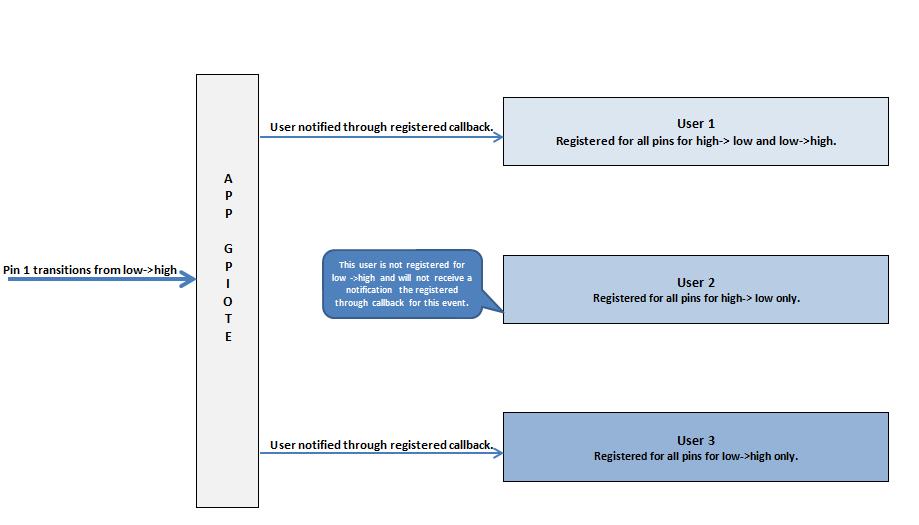
The GPIO Tasks and Events (GPIOTE) provides functionality for accessing GPIO pins using tasks and events. The GPIO Task & Events (GPIOTE) library referred to as the the ‘app_gpiote‘ in the SDK, facilitates application(s) to register for notification of change in state of one or more pins.
Since an application can consist of multiple independent modules, GPIOTE library allows several components to share the GPIOTE interrupt,each user defining a set of pins able to generate events to the user. When a GPIOTE interrupt occurs, the GPIOTE interrupt handler will identify pin transition(S) and notify each client registered for the transition.
- Note
- Components that register with the library are henceforth referred to as clients or users.
- This library uses GPIOTE driver, which must be enabled and properly configured in nrf_drv_config.h. You must specify GPIOTE_CONFIG_NUM_OF_LOW_POWER_EVENTS, which is the number of pins used for low power EVENTS_PORT including the pins used by this library.

The GPIOTE users are responsible for configuring all their corresponding pins, except the SENSE field, which should be initialized to GPIO_PIN_CNF_SENSE_Disabled.
The module specifies on which pins events should be generated if the pin(s) goes from low->high or high->low or both directions.
- Note
- Even if the application is using the Scheduler, the GPIOTE event handlers will be called directly from the GPIOTE interrupt handler.
Initializing GPIOTE module
The initialization procedure must be performed before using any of the other APIs of the module. It is recommended to use initialization macro APP_GPIOTE_INIT instead of the routine app_gpiote_init as the former takes care of reserving needed memory for the each user requested in the MAX_USERS parameter of the macro. This parameter indicates how may users are going to be registering with the library.
- Note
- Module initialization should be performed only once. Specifically when using the macro to avoid reserving memory for each module several times.
Registering with GPIOTE
Each user must register itself with the module to be notified of change in state of GPIO. During registry, the user must provide callback handler to notify of a transition event and pin transitions its is interested in. 32-bit bitmask is used to represent 32 GPIO pins as shown in Figure 2 below. User can register for transition from high to low and/or low to high.

On successful registration, the user is assigned a user id and the user is expected to remember this identifier for all subsequent requests made to the module. This identifier is provided in the out parameter p_user_id. A sample registration is shown below.
// GPIOTE user identifier for the example module.
static app_gpiote_user_id_t m_example_user_id;
// GPIOTE event handler.
static void example_gpiote_event_handler(uint32_t event_pins_low_to_high, uint32_t event_pins_high_to_low);
.
.
.
uint32_t low_to_high_bitmask = 0x0000000F; // Bitmask to be notified of transition from low to high for GPIO 0-3
uint32_t high_to_low_bitmask = 0x0000000E; // Bitmask to be notified of transition from high to low for GPIO 0-2
uint32_t retval;
retval = app_gpiote_user_register(&m_example_user_id,
low_to_high_bitmask,
high_to_low_bitmask,
example_gpiote_event_handler);
if (retval != NRF_SUCCESS)
{
// Failed to register with user with GPIO module!
}
- Note
- It is possible for more than one user to register for same set/subset of GPIO pins; each of the concerned users will be notified of pin transition events.
By default, the GPIOTE is disabled on initialization. Therefore the GPIOTE has to be enabled by one of the users to start receiving GPIOTE state events. app_gpiote_user_enable is used to enable GPIOTE.
The following is a sample of registered user callback handling pin transition events.
// GPIOTE event handler.
void example_gpiote_event_handler (uint32_t event_pins_low_to_high, uint32_t event_pins_high_to_low)
{
    .
    .
    .
    if (event_pins_low_to_high & 0x00000001)
    {
         // GPIO pin 0 transitioned from low to high.
         // Take necessary action.
    }
    if (event_pins_high_to_low & 0x00000004)
    {
         // GPIO pin 2 transitioned from high to low.
         // Take necessary action.
    }
    .
    .
    .
}
Enable/Disable GPIOTE
The GPIOTE module can be enabled or disabled by a registered user at any point of time. No state transition events are received when the GPIOTE is disabled. On initialization, by default, the GPIOTE is disabled.
The following code snippet disables and enables the GPIOTE.
uint32_t retval;
// Enable notifications for example user module which is already registered.
retval = app_gpiote_user_disable(m_example_user_id);
if (retval != NRF_SUCCESS)
{
// Enabling notifications failed. Take corrective/needed action.
.
.
}
.
.
.
// Enable notifications for example user module which is already registered.
retval = app_gpiote_user_enable(m_example_user_id);
if (retval != NRF_SUCCESS)
{
// Enabling notifications failed. Take corrective/needed action.
.
.
}
Reading GPIOTE State
A registered user can read the current state of GPios by reading the state information. The following code snippets demonstrates a module reading the state information.
uint32_t retval;
uint32_t gpio_pin_state;
retval = app_gpiote_pins_state_get(m_example_user_id,&gpio_pin_state);
if (retval != NRF_SUCCESS)
{
// Failed to read state information. Take corrective action.
}
else
{
.
.
if (gpio_pins_state & 0x00000006) // Checks if pin one and two are set
{
// Take necessary action
}
.
.
}
以上是关于浅析NRF51822之GPIOTE的主要内容,如果未能解决你的问题,请参考以下文章