Storage medium
Posted it芮菜鸟
tags:
篇首语:本文由小常识网(cha138.com)小编为大家整理,主要介绍了Storage medium相关的知识,希望对你有一定的参考价值。
In previous chapters we\'ve looked at manipulating data at the file level.In this chapter,we will consider data at the device level.Linux has amazing capabilities(能做某事的素质,能力) for handling storage devices,whether physical storage,such as hard disks,or network storage,or virtual storage devices like RAID(Redundant Array of Independent Disks)(独立磁盘冗余阵列) and LVM(Logical Volume Manager)(逻辑卷管理器)
However,since this is not a book about system administration,we wil not try to cover this entire topic in depth.What we will try to do is introduce some of the concepts(概念,观念,思想)and key commands that are used to manage storage devices.
To carry out the exercises in this chapter,we will see a USB flash drive,a CD-RW disk(for systems equipped with a CD-ROM burner(燃烧器,灯头,火炉)and a floppy(松软的,松弛)disk (again,if the system is so equipped.)
We will look at the following commands:
mount-Mount a file system
umount - Unmount a file system
fsck-Check and repair a file system
fdisk - Partition table manipulator(操作者,操纵者) 分区表控制器
mkfs - Create a file system
fdformat - Format a floppy disk
dd-Write block oriented(导向的) data directly to a device 把面向块的数据直接写入设备
genisoimage(mkisofs)-Create an ISO 9660 image file 创建一个ISO 9660的映像文件
wodim(cdrecord) - Write data to optical(光学的,眼睛的,视觉的) storage media 把数据写入光存储媒介
md5sum - Calculate an MD5 checksum 计算MD5检验码
Amount and Uninstall storage device
Recent advances in the Linux desktop have made storage device management extremely easy for desktop users.For the most part,we attach a device to our system and it "just works." Back in the old days(say,2004),this stuff had to be done manually.On non-desktop systems(i.e.,servers)this is still a largely manual procedure(程序,步骤) since servers often have extreme storage needs and complex configuration requirements.
The first step in managing a storage device is attaching the device to the file system tree.This process,called mounting,allows the device to participate with the operating system.As we recall from Chapter 3,Unix-like operating systems,like Linux,maintain a single file system tree with devices attached at various points.This contrasts(对比,对照) with other operating systems such as MS-DOS and Windows that maintain separate trees for each device (for example C:\\,D:\\,etc.).
There is a file named /etc/fstab that lists the devices(typically hard disk partitions) that are to be mounted at boot time.Here is an example /etc/fstab file from a Fedora 7 system:
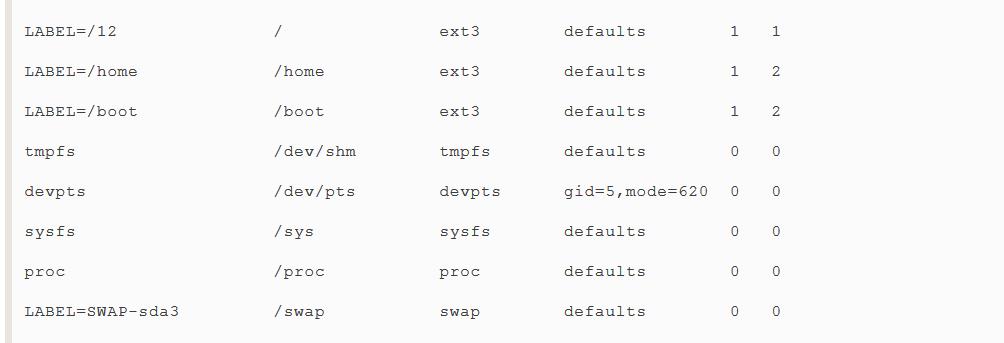
Most of the file systems listed in this example file are virtual and are not applicable(适当的,合适的) to our discussion.For our purpose,the interesting ones are the first three:

These are the hard disk partitions.Each line of the file consists of six fields,as follows:
Table 16-1:/etc/fstab Fields
| Field | Contents | Description |
| 1 | Device | Traditionally,this field contains the actual name of a device file associated(联合的,关联的) with the physical device,such as /dev/hda1(the first partition of the master device on the first IDE channel).But with today\'s computers,which have many devices that are hot pluggable(歌手拔)(like USB drivers),many modern Linux distributions associate a device with a text label instead.This label (which is added to the storage media when it is formatted) is read by the operating system when the device is attached to the system.That way,no matter which device file is assigned to the actual physcial device,it can still be correctly indentified. |
| 2 | Mount Point | The directory where the device is attached to the file system tree. |
| 3 | File System Type | Linux allows many file system types to be mounted.Most native Linux file systems are ext3,but many others supported,such as FAT16(msdos),FAT32(vfat),NTFS(ntfs),CD-ROM(iso9660),etc. |
| 4 | Options | File systems can be mounted with various options.It is possible,for example,to mount file systems as read-only,or prevent any programs from being executed from them (a useful security feature for removable media.) |
| 5 | Frequency | A single number that specifies if and when a file system is to be backed up with the dump command. |
| 6 | Order | A single number that specifies in what order file systems should be checked with the fsck command. |
View a list of mounted file system
The mount command is used to mount file systems.Entering the command without arguments will display a list of the file systems currently mounted:
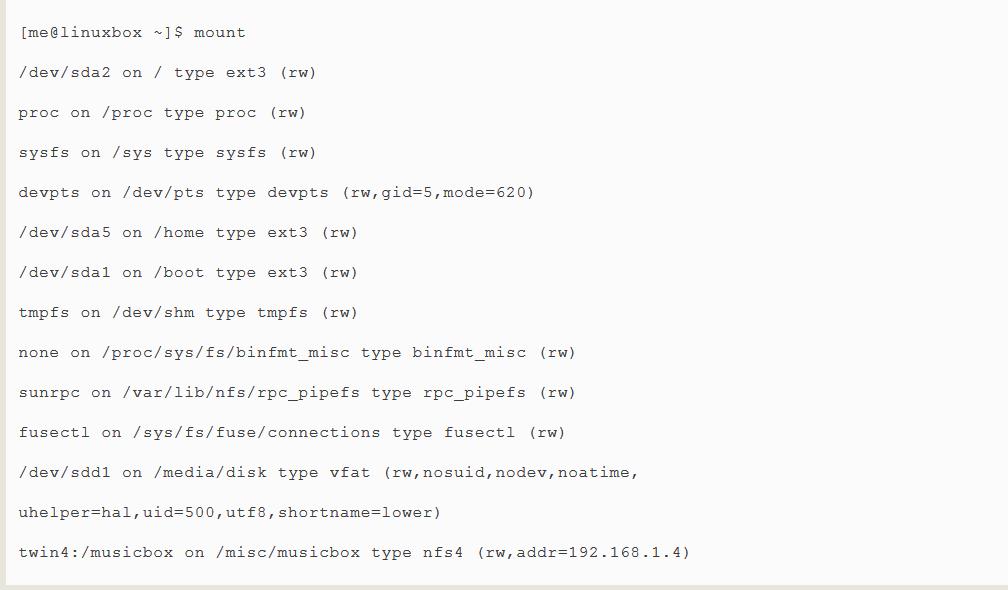
The format of the listing is :device on mount_point type file_system_type(options).
The format of the listing is:device on mount_point type file_system_type(options).For example,the first line shows that device /dev/sda2 is mounted as the root file system and it is of type ext3 and is both readable and writable(the option "rw").The listing also has two interesting entries at the bottom of the list.The next to last entry shows a 2 gigabyte SD memory card in a card reader mounted at /media/disk,and the last entry is a network drive mounted at /misc/musicbox.
For our first experiment,we will work with a CD-ROM.First,let\'s look at a system before a CD-ROM is inserted:
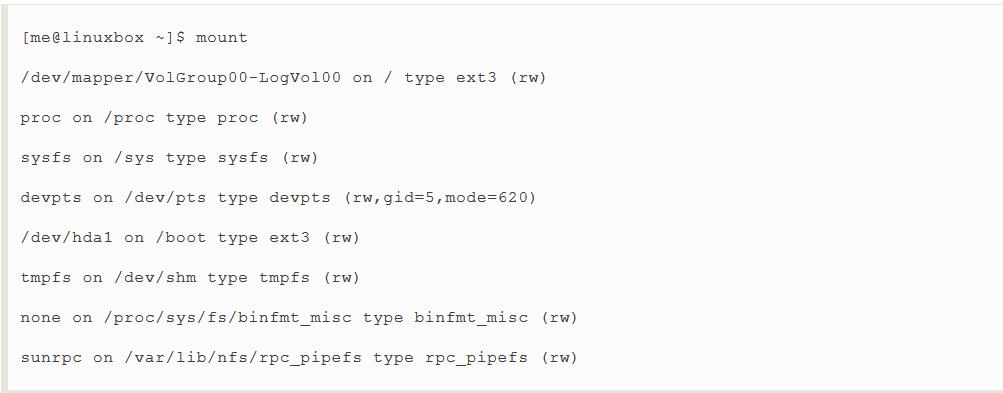
This listing is from a CentOS system,which is using LVM (Logical Volume Manager) to create its root file system.Like many modern Linux distributions,this system will attempt to automatically mount the CD-ROM after insertion(插入).After we insert the disk,we see the following:
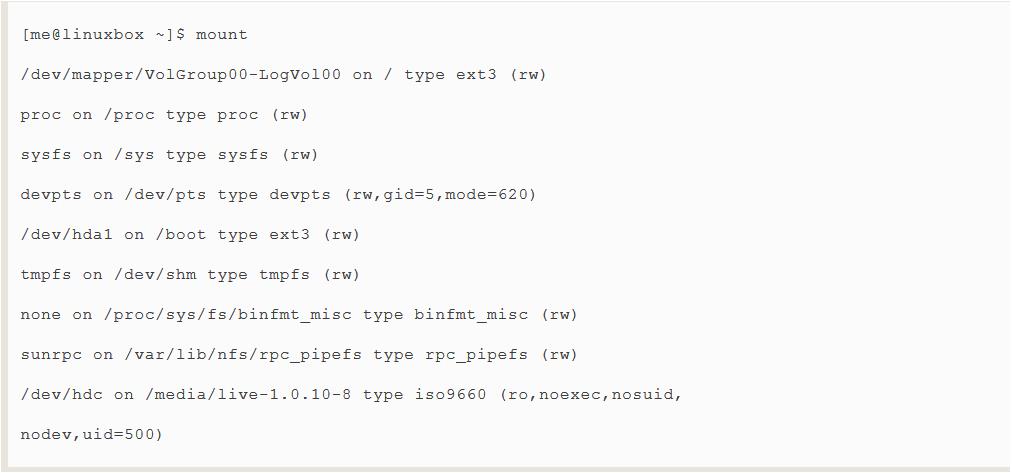
After we insert the disk,we see the same listing as before with one additional entry.At the end of the listing we see that the CD-ROM(which is device /dev/hdc on this system) has been mounted on /media/live-1.0.10-8,and is type iso9660(a CD-ROM).For purposes of our experiment,we\'re interested in the name of the name of the device.When you conduct this experiment yourself,the device name will most likely be different.
Warning:In the examples that follow,it is vitally important that you pay close attention to the actual device names in use on your system and do not use the names used in this text!
Also note that audio CDs are not the same as CD-ROMS.Audio CDs do not contain file systems and thus cannot be mounted in the usual sense.
Now that we have the device name of the CD-ROM drive,let\'s unmount the disk and remount it another location in the file system tree.To do this,we become the superuser(using the command appropriate(适当的,恰当的) for our system ) and unmount the disk with the umount (notice the spelling) command:

The next step is to create a new mount point for the disk.A mount point is simply a directory somewhere on the file system tree.Nothing special about it.It doesn\'t even have to be an empty directory,though if you mount a device on a non-empty directory,you will not be able to see the directory\'s previous contents until you unmount the device.For our purposes,we will create a new directory:

Finally,we mount the CD-ROM at the new mount point.The -t option is used to specify the file system type: 
Afterward,we can examine the contents of the CD-ROM via the new mount point:

Notice what happens when we try to unmount the CD-ROM:

Why is this?The reason is that we cannot unmount a device if the device is being used by someone or some process.In this case,we changed our working directory to the mount point for the CD-ROM,which causes the device to be busy.We can easily remedy(药品,补救方法,治疗方法) the issue by changing the working directory to something other than the mount point:

Now the device unmounts successfully.
Why Unmounting Is Important
If you look at the output of the free command,which displays statistics about memory usage,you will see a statistic called "buffers." Computer systems are designed to go as fast as possible.One of the impediments(妨碍、阻碍某事物进展或活动的人或物) to system speed is slow devices.Printers are a good example.Even the fastest printer is extremely slow by computer standards.A computer would be very slow indeed(真正地) if it had to stop and wait for a printer to finish printing a page.In the early days of PCs(before multi-tasking),this was a real problem.If you were working on a spreadsheet or text document,the computer would stop and become unavailable every time you printed.The computer would send the data to the printer as fast as the printer could accept it,but it was very slow since printers don\'t print very fast.This problem was the printer could accept it,but it was very slow since printers don\'t print very fast.This problem was solved by the advent(到来) of the printer buffer,a device containing some RAM memory that would sit between the computer and the printer.With the printer buffer in place,the computer would send the printer output to the buffer and it would quickly be stored in the fast RAM so the computer could go back to work without waiting.Meanwhile,the printer buffer would slowly spool the data to the printer from the buffer\'s memory at the speed at which the printer could accept it.
This idea of buffering is used extensively in computers to make them faster.Don\'t let the need to occasionally(偶尔) read or write data to/from slow devices impede(阻止,妨碍) the speed of the system.Operating systems store data read from,and to be written to storage devices in memory for as long as possible before actually having to interact with the slower device.On a Linux system for example,you will notice that the system seems to fill up (装满) memory the longer (多于) it is used.This does not mean is "using" all the memory,it means that Linux is taking advantage of all the available memory to do as much buffering as it can.
This buffering allows writing to storage devices to be done very quickly,because the writing to the physical device is being deferred(延期的,推迟的) to a future time.In the meantime(时不时地),the data destined(命定的,注定的) for the device is piling(堆,累积 ) up in memory.From time to time,the operating system will write this data to the physical device.
Unmonuting a device entails(需要) writing all the remaining data to the device so that it can be safely removed.If the device is removed without unmounting it first,the possibility exists that not all the data destined for the device has been transferred(转移的,调动的). In some cases,this data may include vital(极重要的) directory updates,which will lead to file system corruption(腐烂),one of the worst things that can happen on a computer.
Certain the name of the equipment
It\'s sometimes difficult to determine the name of a device.Back in the old days,it wasn\'t very hard.A device was always in the same place and it didn\'t change.Unix-like systems like it that way.Back when Unix was developed,"changing a disk drive" involved using a forklift(铲车) to remove a washing machine-sized device from the computer room.In recent years,the typical desktop hardware configuration has become quite dynamic and Linux has evolved(进化了的) to become more flexible(灵活的) than its ancestors(祖先,祖宗,先驱).In the example above we took advantage of the modern Linux desktop\'s ability to "automagically"(自动的) mount the device and then determine the name after the fact.But what if we are managing a server or some other environment where this does not occur?How can we figure it out?
First,let\'s look at how the system names devices.If we list the contents of the /dev directory(where all devices live),we can see that there are lots and lots of devices:

The contents of this listing reveal some patterns of device naming.Here are a few:
Table 16-2:Linux Storage Device Names
| Pattern | Device |
| /dev/fd* | Floppy disk drives |
| /dev/hd* | IDE(PATA)disks on older systems.Typical motherboards(底板) contain two IDE connectors,each with a cable with two attachment points for drives.The first drive on the cable is called the master device and the second is called the slave device.The device names are ordered such that /dev/hda refers to the master device on the first channel,/dev/hdb is the slave device on the first channel;/dev/hdc,the master device on the second channel,and so on.A trailing digit indicates the partition number on the device.For example,/dev/hda1 refers to the first partition on the first hard drive on the system while /dev/hda refers to the entire drive. |
| /dev/lp* | Printers |
| /dev/sd* | SCSI disks.On recent Linux systems,the kernel treats all disk-like devices(including PATA/SATA hard disks,flash drives,and USB mass(大量) storage devices,such as portable music players and digital cameras) as SCSI disks.The rest of the naming system is similar to the older /dev/hd*naming scheme described above. |
| /dev/sr* | Optical(光学的,视觉的)drives(CD/DVD readers and burners) 光盘(CD/DVD 读取器和烧写器) |
In addtition,we often see symbolic links such as /dev/cdrom,/dev/dvd and /dev/floppy,which point to the actual device files,provided as a convenience.If you are working on a system that does not automatically mount removable devices,you can use the following technique to determine how the removable device is named when it is attached.First,start a real-time view of the /var/log/messages file(you may require superuser privileges for this):

The last few lines of the file will be displayed and then pause.Next,plug in the removable device.In this example,we will use a 16 MB flash drive.Almost immediately,the kernel will notice the device and probe it:
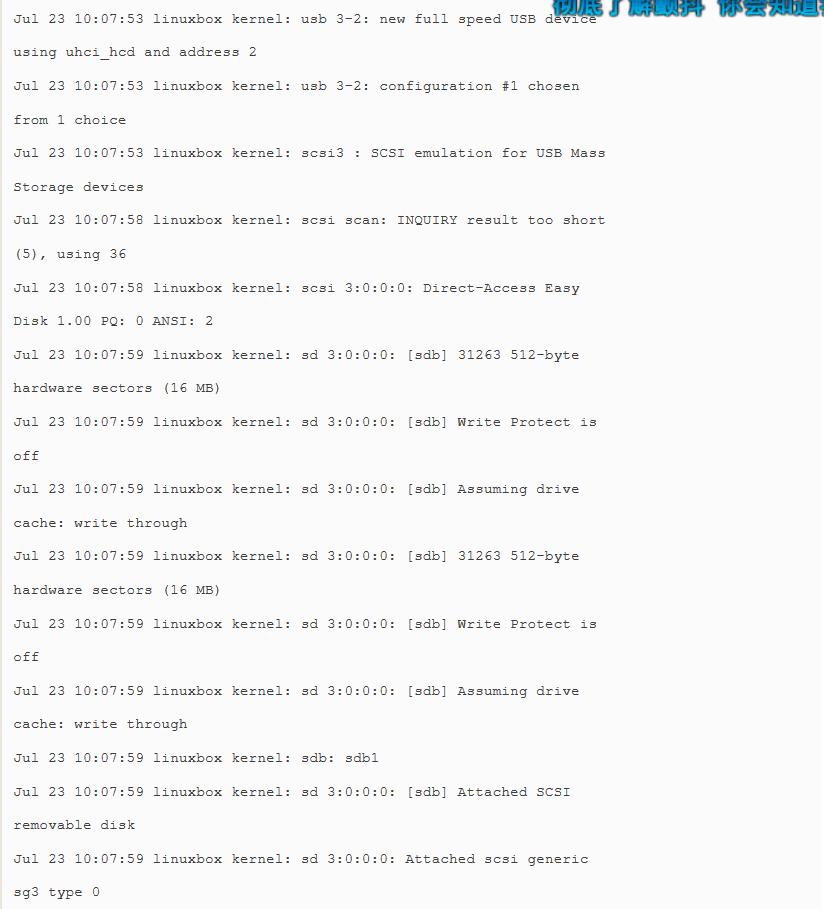
After the display pauses again,type Ctrl-c to get the prompt back.The interesting parts of the output are the repeated references to "[sdb]" which matches our expectation of a SCSI disk device name.Knowing this,two lines become particularly illuminating(富于启发的):

This tells us the device name is /dev/sdb for the entire device and /dev/sdb1 for the first partition on the device.As we have seen,working with Linux is full of interesting detective work!
Tip:Using the tail -f /var/log/messages technique is a great way to watch what the system is doing in near real-time.
With our device name in hand,we can now mount the flash drive:
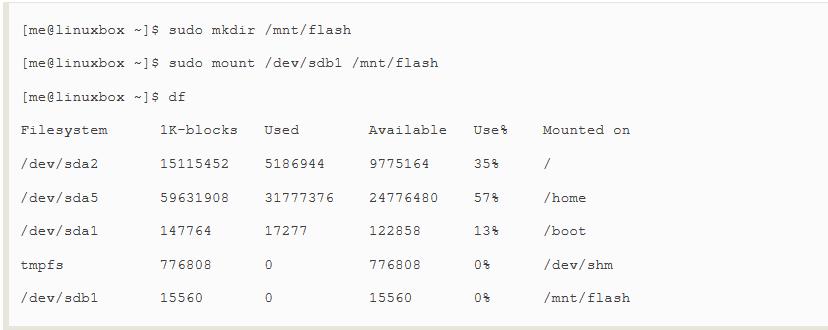
The device name will remain the same as long as it remains physically attached to the computer and the computer is not rebooted.
Create new file system
Let\'s say that we want to reformat the flash drive with a Linux native file system,rather than the FAT32 system it has now.This involves two steps:1.(optional) create a new partition layout if the existing one is not to our likiing,and 2. create a new,empty file system on the drive.
Warning!In the following exercise,we are going to format a flash drive.Use a drive that contains nothing you care about because it will be erased!Again,make absolutely sure you are specifying the correct device name for your system,not the one shown in the text.Failure to heed(注意,留心) this warning could result in you formatting(i.e..,erasing) the wrong drive!
Operation partitions with the fdisk command
The fdisk program allows us to interact(相互作用,互相影响) directly with disk-like devices(such as hard disk drives and flash drives)at a very low level. With this tool we can edit,delete,and create partitions on the device.To work with our flash drive,we must first unmount it (if needed) and then invoke(调用) the fdisk program as follows:

Notice that we must specify the device in terms of the entire device,not by partition number.After the program starts up,we will see the following prompt:

Entering an "m" will display the program menu:

The first thing we want to do is examine the existing partition layout..We do this by entering "p" to print the partition table for the device:
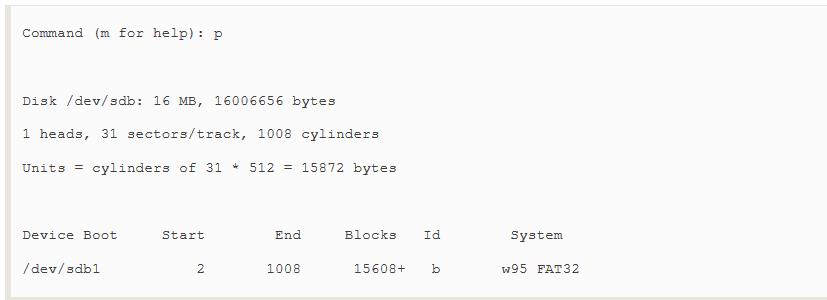
In this example,we see a 16MB device with a single partition (1) that uses 1006 of the available 1008 cylinders(圆筒,圆柱体) on the device.The partition is identified as Windows 95 FAT32 partition.Some programs will use this identifier to limit the kinds of operation that can be done to the disk,but most of the time it is not critical(批评的,爱挑剔的) to change it.However,in the interested of demonstration(表明,证明,示范) ,we will change it to indicate a Linux partition.To do this,we must first find out what ID is used to identify a Linux partition.In the listing above,we see that the ID "b" is used to specify the exiting partition.To see a list of the available partition types,we refer back to the program menu.There we can see the following choice:

If we enter "l" at the prompt,a large list of possible type is displayed.Among them we see "b" for our existing partition type and "83" for Linux.
Going back to the menu,we see this choice to change a partition ID:

We enter "t" at the prompt enter the new ID:

This completes all the changes that we need to make.Up to this point,the device has been untouched(all the changes have benn stored in memory,not on the physical device),so we will write the modified partition table to the device and exit.To do this,we enter "w" prompt:
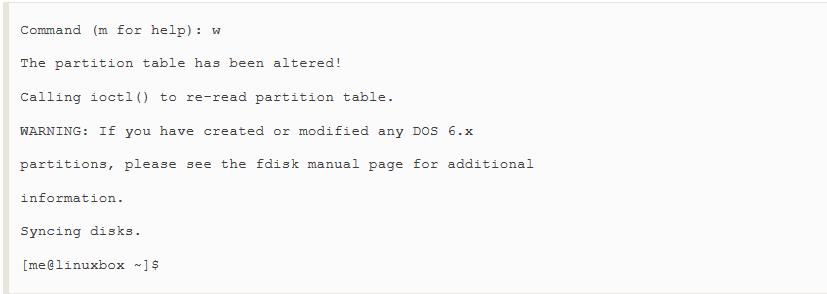
If we had decided to leave the device unaltered(未改变的),we could have entered "q" at the prompt,which would have exited the program without the changes.We can safely ignore the ominous(预兆的,不吉利的) sounding warning message.
Create a new file system by mkfs command
With our partition editing done (lightweight though it might have been) it\'s time to create a new file system on our flash drive.To do this,we will use mkfs(short for "make file system"),which can create file systems in a variety of formats.To create an ext3 file system on the device,we use the "-t" option to specify the "ext3" system type,followed by the name of device containing the partition we wish to format:
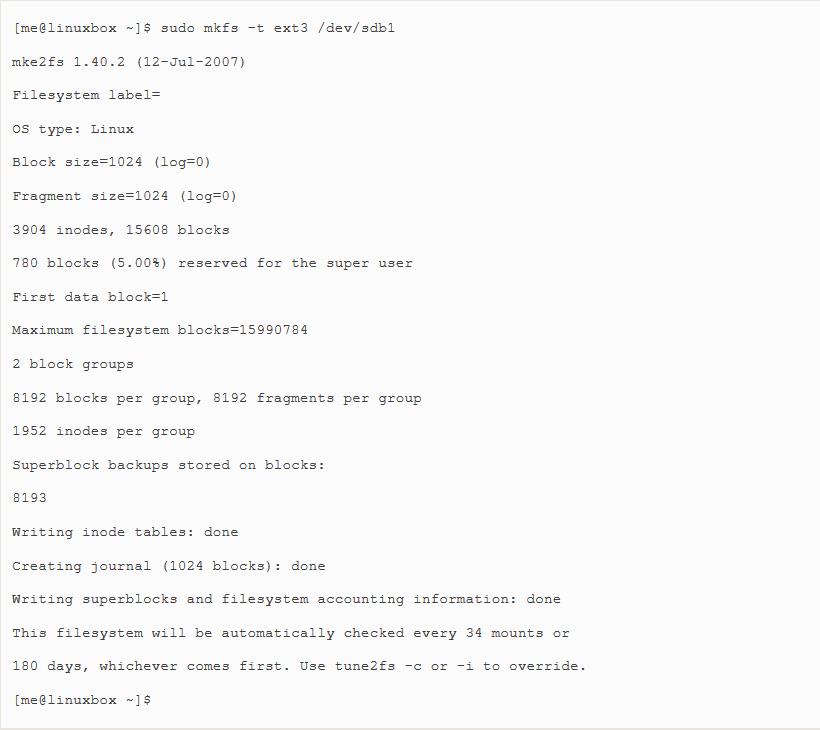
The program will display a lot of information when ext3 is the chosen file system type.To re-format the device to its original FAT32 file system,specify "vfat" as the file system type:

This process of partitioning and formatting can be used anytime additional storage devices are added to the system.While we worked with a tiny flash drive,the same process can be applied to internal hard disks and other removable storage devices like USB hard drives.
Test and repair file systems
In our earlier discussion of the /etc/fstab file,we saw some mysterious digits at the end of each line.Each time the system boots,it routinely checks the integrity(正直,诚实,完整) of the file systems before mounting them.This is done by the fsck program(short for "file system check").The last number in each fstab entry specifies the order the devices are to be checked.In our example above,we see that the root file system is checked first,followed by the home and boot file systems.Devices with a zero as the last digit are not routinely checked.
In addition to checking the integrity of file systems,fsck can also repair corrupt(腐败的,贪污的) file systems with varying degrees of success,depending on the command of damage.On Unix-like systems,recovered portions of files are placed in the lost+found directory,located in the root of each file system.
To check our flash drive(which should be unmounted first),we could do the following:

In my experience,file system corruption is quite rare unless there is a hardware problem,such as a failing disk drive.On most systems,file system corruption detected at boot time will cause the system to stop and direct you to run fsck before continuing.
What The fsck?
In Unix culture,the word "fsck" is often used in place of a popular word with which it shares three letters.This is especially appropriate(适当的,恰当的),given that you will probably be uttering(以口发出声音,说,讲) the aforementioned(前面提到的,上述的) word if you find yourself in a situation where you are forced to run fsck.
Formatted floppy disk
For those of us still using computers old enough to be equipped with floppy diskette drives,we can manage those devices,too.Preparing a blank(空白的,空着的) floppy for use is a two step process.First,we perform a low-format on the diskette,then create a file system.To accomplish the formating,we use the fdformat program specifying the name of the floppy device(usually /dev/fdo):

Next,we apply a FAT file system to the diskette with mkfs

Notice that we use the "msdos" file system type to get the older(and smaller) sytle file allocation tables.After a diskette is prepared,it may be mounted like other devices.
Direct data move in/out device
While we usually think of data on our computers as being organized into files,it is also possible to think of the data in "raw"(生的,未加工的)form.If we look at a disk drive,for example,we see that it consists of a large number of "blocks" of data that the operating system sees as directories and files.However,if we could treat a disk drive as simply a large collection of data blocks,we could perform useful tasks,such as cloning devices.
The dd program performs this task. It copies blocks of data from one place to another.It uses a unique syntax(for historical reasons) and is usually used this way:

Let\'s say we had two USB flash drives of the same size and we wanted to exactly copy the first drive to the second.If we attached both drives to the computer and they are assigned to devices /dev/sdb and /dev/sdc respectively(各自地,各个的),we could copy everything on the first drive to the second drive with the following:

Alternately,if only the first device were attached to the computer,we could copy its contents to an ordinary file for later restoration or copying:

Warning! The dd command is very powerful.Though its name derives(得到,源于) from "data defination," it is sometimes called "destroy disk" because users often mistype either the if or of specifications.Always double check your input and output specifications before pressing enter!
Create CD-ROM image
Writing a recordable CD-ROM(either a CD-R or CD-RW) consists of two steps;first ,constructing an iso image file that is the exact file system image of the CD-ROM and second,writing the image file onto the CD-ROM media.
Create a copy of the CD-ROM image
If we want to make an iso image of an existing CD-ROM,we can use dd to read all the data blocks off the CD-ROM and copy them to a local file.Say we had an Ubuntu CD and we wanted to make an iso file that we could later use to make more copies.After inserting the CD and determing its device name(we\'ll assume /dev/cdrom),we can make the iso file like so:

This technique works for data DVDs as well,but will not work for audio CDs,as they do not use a file system for storage.For audio CDs,look at the cdrdao command.
Creates an image from the file collection
To create an iso image file containing the contents of a directory,we use the genisoimage program.To do this,we first create a directory containing all the files we wish to include in the image and then execute the genisoimage command to create the image file.For example,if we had created a directory call ~/cd-rom-files and filled it with files for our CD-ROM,we could create an image file named cd-rom.iso with the following command:

The "-R" option adds metadata for the Rock Ridge extensions,which allows the use of long filenames and POSIX style file permissions.Likewise,the "-J" option enables the Joliet extensions,which permit long filenames for Windows.
A Program By Any Other Name...
If you look at on-line tutorials(家庭教师,指导老师的,指导的) for creating and burning optical media like CD-ROMs and DVDs,you will frequently encouter two programs called mkisofs and cdrecord.These programs were part of a popular package called"cdrtools" authored by Jorg Schilling.In the summer of 2006,Mr,Schilling made a license change to a portion of the cdrtools package which,in the opinion of many in the Linux community,created a license incompatibility with the GNU GPL.As a result,a fork of the cdrtools project was started that now includes replacement programs for cdrecord and mkisofs named wodim and genisoimage,respectively.
Write to CD-ROM
After we have an image file,we can burn it onto our optical media.Most of the commands we will discuss below can be applied to both recordable CD-ROM and DVD media.
mount an ISO image directly
There is a trick that we can use to mount an iso image while it is still on our hard disk and treat it as though it was already on optical media. By adding the "-o loop" option to mount(along with the required "-t iso09660" file system type),we can mount the image file as though it were a device and attach it to the file system tree:

In the example above,we created a mount point name /mnt/iso_image and then mounted the image file image.iso at that mount point.After the image is mounted,it can be treated just as though it were a real CD-ROM or DVD.Remember to unmount the image when it is no longer needed.
Clear a rewritable CD-ROM
Rewritable CD-RW media needs to be erased or blanked before it can be reused.To do this,we can use wodim,specifying the device name for the CD writer and the type of blanking to be performed.The wodim program offers several types.The most minial(and fastest) is the "fast" type:

Write to image
To write an image,we again use wodim,specifying the name of the optical media writer device and the name of the image file:
In addition to the device name and image file,wodim supports a very large set of options.Two common ones are "-v" for verbose output,and "-dao"which writes the disk in disk-at-once mode.This mode should be used if you are preparing a disk for commercial(商业的,商务的) reproduction(繁殖,复制).The default mode for wodim is track-at-once,which is useful for recording music tracks.
Extended reading
We have just touched on the many ways that the command line can be used to manage storage media.Take a look at the man pages of the commands we have covered.Some of them support huge numbers of options and operations.Also,look for on-line tutorials for adding hard drives to your Linux system(there are many)and working with optical media.
Friendship tips
It\'s often useful to verify(核实,查证) the integrity(正直,诚实) of an iso image that we have downloaded.In most cases,a distributor of an iso image will also supply a checksum file.A checksum is the result of an exotic(从国外引进的,奇异的,吸引人的) mathematical calculation resulting in a number that represents the content of the target file.If the contents of the file change by even one bit,the resulting checksum will be much different.The most common method of checksum generation(同时代的人,一代人,产生,发生) uses the md5sum program.When you use md5sum,it produces a unique hexadecimal(十六进制) number:

After you download an image,you should run md5sum against it and compare the results with the md5sum value supplied by the publisher.
In addition to checking the integrity of a download file,we can use md5sum to verify newly written optical media.To do this,we first calculate the checksum of the image file and then calculate a checksum for the media.The trick to verifying the media is to limit the calculation to only the portion of the optical media that contains the image.We do this by determining the number of 2048 byte blocks the images contains(optical media is always written in 2048 byte blocks) and reading that many blocks from the media.On some type of media,this is not required.A CD-R written in disk-at-once mode can be checked this way:

Many types of media,such as DVDs require a precise(精确的) calculation of the number of blocks.In the example below,we check the integrity of the image file dvd-image.iso and the disk in the DVD reader /dev/dvd. Can you figure out how this works?

以上是关于Storage medium的主要内容,如果未能解决你的问题,请参考以下文章