tensorflow 学习1——tensorflow 做线性回归
Posted 哈哈哈
tags:
篇首语:本文由小常识网(cha138.com)小编为大家整理,主要介绍了tensorflow 学习1——tensorflow 做线性回归相关的知识,希望对你有一定的参考价值。
1. 首先 Numpy:

Numpy是Python的科学计算库,提供矩阵运算. 想想list已经提供了矩阵的形式,为啥要用Numpy,因为numpy提供了更多的函数。
使用numpy,首先要导入numpy:  import numpy as np
使用numpy创建数组以list 或tuple作为参数:    np.array([1,2,3,4])   np.array((1.2,2,3,4))
使用numpy可以指定数据类型: numpy.int32, numpy.int16, numpy.float64
np.array((1,2,3,4),dtype=np.int32)

使用numpy.arange方法: np.arange(10)  [0 1 2 3 4 5 6 7 8 9 ]
                                        np.arange(10).reshape(2,5)  [[0 1 2 3 4 ][5 6 7 8 9]]
使用numpy.linspace方法:np.linspace(1,3,9)  在1到3之间产生9个数[1. 1.25. 1.5. 1.75. 2. 2.25. 2.5. 2.75. 3.]

还可以使用 numpy.zeros, numpy.ones, numpy.eye 等方法
查询属性: .ndim 维数, .shape 大小, dtype 元素类型、、、
操作: sum,  a.sum(), a.sum(axis=0) 计算每一列的和,
           min,  a.min(), a.max(), np.sin(a), np.floor(a), np.exp(a)
合并: np.vstack((a,b))  竖拼
          np.hstack((a,b)) 横拼


数组索引
索引数组中的一个值:   a[1,2]
索引数组中的一行:      a[1,:]
索引数组中的一个范围:a[1,1:3]

scipy: 包括统计,优化,整合,线性代数。。。
scikit-learn: 机器学习

matplotlib: 绘图系统
import tensorflow as tf
import numpy
import matplotlib.pyplot as plt
rng = numpy.random

# Parameters
learning_rate = 0.01
training_epochs = 2000
display_step = 50

# Training Data
train_X = numpy.asarray([3.3,4.4,5.5,6.71,6.93,4.168,9.779,6.182,7.59,2.167,7.042,10.791,5.313,7.997,5.654,9.27,3.1])
train_Y = numpy.asarray([1.7,2.76,2.09,3.19,1.694,1.573,3.366,2.596,2.53,1.221,2.827,3.465,1.65,2.904,2.42,2.94,1.3])
n_samples = train_X.shape[0]

# tf Graph Input
X = tf.placeholder("float")
Y = tf.placeholder("float")

# Create Model

# Set model weights
W = tf.Variable(rng.randn(), name="weight")
b = tf.Variable(rng.randn(), name="bias")

# Construct a linear model
activation = tf.add(tf.mul(X, W), b)

# Minimize the squared errors
cost = tf.reduce_sum(tf.pow(activation-Y, 2))/(2*n_samples) #L2 loss
optimizer = tf.train.GradientDescentOptimizer(learning_rate).minimize(cost) #Gradient descent

# Initializing the variables
init = tf.initialize_all_variables()

# Launch the graph
with tf.Session() as sess:
    sess.run(init)

    # Fit all training data
    for epoch in range(training_epochs):
        for (x, y) in zip(train_X, train_Y):
            sess.run(optimizer, feed_dict={X: x, Y: y})

        #Display logs per epoch step
        if epoch % display_step == 0:
            print "Epoch:", \'%04d\' % (epoch+1), "cost=", \\
                "{:.9f}".format(sess.run(cost, feed_dict={X: train_X, Y:train_Y})), \\
                "W=", sess.run(W), "b=", sess.run(b)

    print "Optimization Finished!"
    print "cost=", sess.run(cost, feed_dict={X: train_X, Y: train_Y}), \\
          "W=", sess.run(W), "b=", sess.run(b)

    #Graphic display
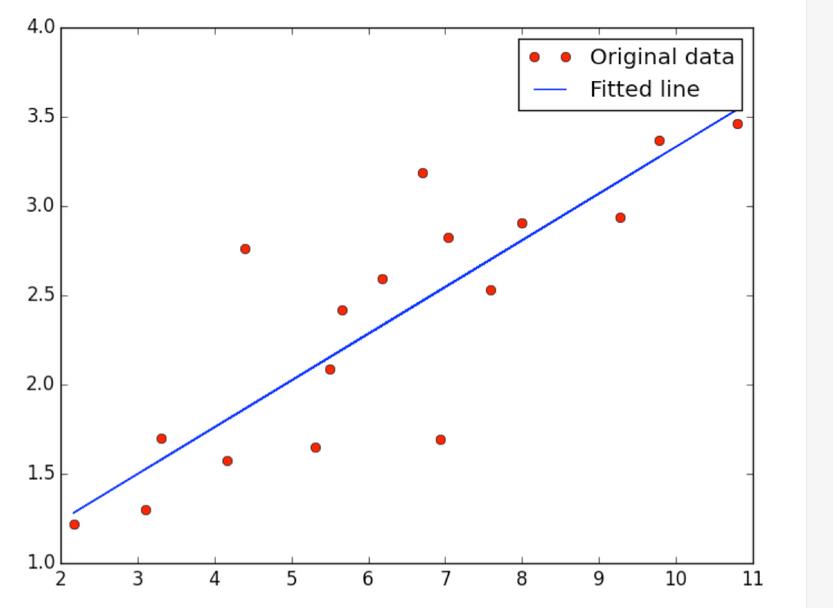
    plt.plot(train_X, train_Y, \'ro\', label=\'Original data\')
    plt.plot(train_X, sess.run(W) * train_X + sess.run(b), label=\'Fitted line\')
    plt.legend()
    plt.show()
输出:

以上是关于tensorflow 学习1——tensorflow 做线性回归的主要内容,如果未能解决你的问题,请参考以下文章