Centos6.5安装Elasticsearch
Posted hoojjack
tags:
篇首语:本文由小常识网(cha138.com)小编为大家整理,主要介绍了Centos6.5安装Elasticsearch相关的知识,希望对你有一定的参考价值。
一、可以在网上下载对饮的版本:https://github.com/elastic/elasticsearch,本次安装的是5.5.3。
首先保证虚拟机上安装了jdk,jdk的版本只是是1.7或以上
查看本地虚拟机是否已经安装了jdk:yum list installed java*; (yum list install java* 查看库中可以安装的软件),然后用yum 命令安装 yum install java-1.8.0-openjdk* ,用yum命令安装的好处就是不用配置path。感兴趣的可以用安装包安装。
1 [root@localhost elasticsearch]# ls
2 elasticsearch-5.5.3         elasticsearch-analysis-ik-5.5.3
3 elasticsearch-5.5.3.tar.gz  elasticsearch-analysis-ik-5.5.3.zip
二、将下载的.tar.gz解压,然后进入elasticsearch-5.5.3/config/目录下配置elasticsearch.yml。
三、因为我先暂时配的是单节点,所有就采用默认的方式,如果想自定义,将#号去掉就行。
 1 # ---------------------------------- Cluster -----------------------------------
 2 #
 3 # Use a descriptive name for your cluster:
 4 #
 5 #cluster.name: my-application
 6 #
 7 # ------------------------------------ Node ------------------------------------
 8 #
 9 # Use a descriptive name for the node:
10 #
11 #node.name: node-1
12 #
13 # Add custom attributes to the node:
如果elasticsearch启动报错,这里需要修改,具体问后面再贴出
 1 #bootstrap.memory_lock: true
 2 bootstrap.memory_lock: false
 3 bootstrap.system_call_filter: false
 4 #
 5 # Make sure that the heap size is set to about half the memory available
 6 # on the system and that the owner of the process is allowed to use this
 7 # limit.
 8 #
 9 # Elasticsearch performs poorly when the system is swapping the memory.
10 #
11 # ---------------------------------- Network -----------------------------------
12 #
13 # Set the bind address to a specific IP (IPv4 or IPv6):
14 #
15 #network.host: 192.168.0.1
16 network.host: 0.0.0.0
注意如果不修network.host,默认使用的是localhost,如http://localhost:9200,9200是elasticsearch的默认端口,如果想通过外网访问,则需要将network.host 设置成 0.0.0.0或者部署该elasticsearch服务器的ip地址。
1 # Set a custom port for HTTP:
2 #
3 #http.port: 9200
4 #transport.tcp.port:9301
这个跟集群节点布置有关系,如果同一台服务器布置了多个节点,则需要修改 http.port,如 http.port:9201, transport.tcp.port:9301。
四、启动 elasticsearch.
1 [hoojjack@localhost elasticsearch-5.5.3]$ bin/elasticsearch
2 [2017-09-29T10:48:15,620][INFO ][o.e.n.Node               ] [] initializing ...
3 ......
五、出现的问题:
1、
bin/elasticsearch-plugin install x-pack
7、
ERROR: bootstrap checks failed。system call filters failed to install; check the logs and fix your configuration or disable system call filters at your own risk
解决:
在elasticsearch.yml中配置bootstrap.system_call_filter为false,注意要在Memory下面:
bootstrap.memory_lock: false
bootstrap.system_call_filter: false
8、
head主控页面是可以显示的,但是显示连接失败,或者在url无法外网访问。在elasticsearch 中的elasticsearch.yml中添加以下属性。
Cross-origin resource sharing (CORS) is a mechanism that allows restricted resources ,即跨域访问。这个字段默认为false,在Elasticsearch安装集群之外的一台机上用Sense、Head等监控插件访问Elasticsearch是不允许的。这个字段最早可以追溯到1.4.x版本,而非5.x特有。具体这个http.cors.x字段还有哪些用途和用法:
http.cors.enabled --------- (是否支持跨域,默认为false 。一般设置这两个参数就可以实现跨域:http.cors.enabled : true, http.cors.allow-origin : " *" )
http.cors.allow-origin --------- (当设置允许跨域,默认为*,表示支持所有域名,如果我们只是允许某些网站能访问,那么可以使用正则表达式。比如只允许本地地址。 /https?:\\/\\/localhost(:[0-9]+)?/)
http.cors.max-age --------- (浏览器发送一个“预检”OPTIONS请求,以确定CORS设置。最大年龄定义多久的结果应该缓存。默认为1728000(20天))
http.cors.allow-methods --------- (允许跨域的请求方式,默认OPTIONS,HEAD,GET,POST,PUT,DELETE)
http.cors.allow-headers --------- (跨域允许设置的头信息,默认为X-Requested-With,Content-Type,Content-Length)
http.cors.allow-credentials --------- (是否返回设置的跨域Access-Control-Allow-Credentials头,如果设置为true,那么会返回给客户端)
六、Elasticsearch 安装插件:
1、head插件安装:
进入 /ES_HOME/elasticsearch/ 路径,在2.0版本以前用一下命令:
1 [root@localhost bin]# ./plugin install mobz/elasticsearch-head
2 -> Installing mobz/elasticsearch-head...
3 Trying https://github.com/mobz/elasticsearch-head/archive/master.zip...
4 Downloading ...................................................................................................................................................................................................................................................................................................................................................................................................................................................................................................................................................................................................................................DONE
5 Installed mobz/elasticsearch-head into /opt/elasticsearch-1.4.2/plugins/head
2.0以上版本安装:
首先 安装nodejs,npm环境。(安装es-head依赖node npm)
1 yum -y install nodejs npm
2 node -v
3 npm -v
如果yum命令不能安装,则下载nodejs编译后的源码安装。如v5.10版:
https://nodejs.org/dist/v5.10.1/
红色部分是编译好的源码,直接解压就行
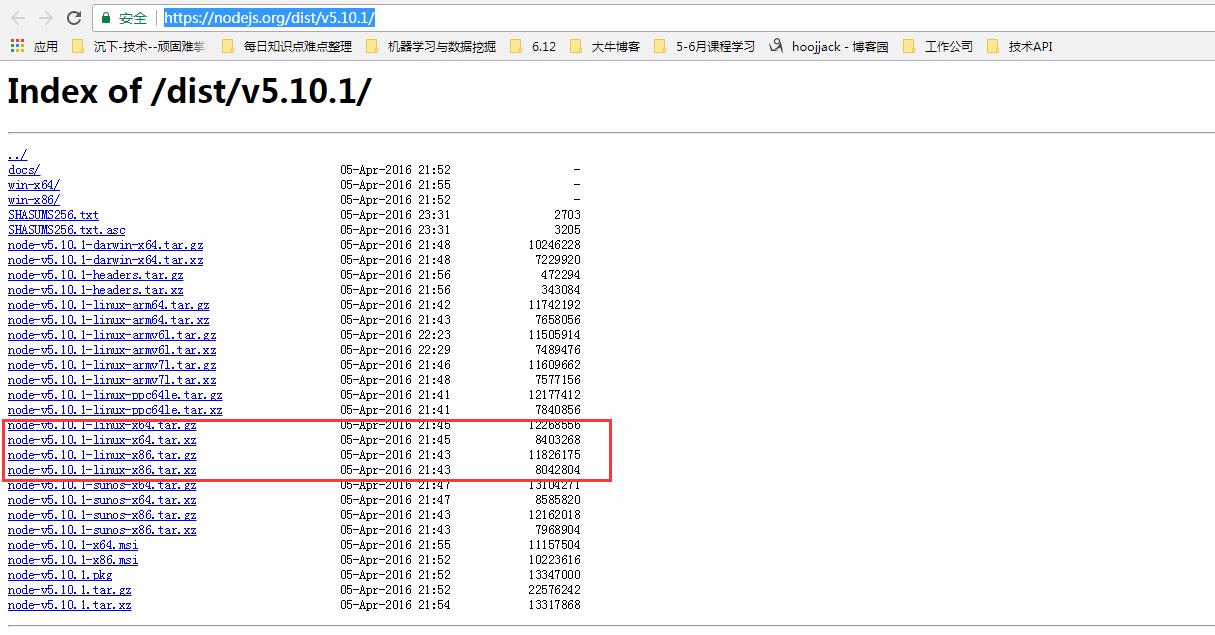
1 tar  -xzvf node-v5.10.1-linux-x64.tar.gz -C /opt/hoojjack/
2 cd /opt/hoojjack/
3 mv node-v5.10.1-linux-x64/ nodejs
4 ln -s /opt/hoojjack/nodejs/bin/node /usr/local/bin
5 ln -s /opt/hoojjack/nodejs/bin/npm /usr/local/bin
简单说就是解压后,在bin文件夹中已经存在node以及npm,如果你进入到对应文件的中执行命令行一点问题都没有,不过不是全局的,所以通过建立软链接的方式将这个设置为全局就好了
然后,就是下在elasticsearch-head
1 git clone git://github.com/mobz/elasticsearch-head.git
2 cd elasticsearch-head
3 npm install
4 npm run start
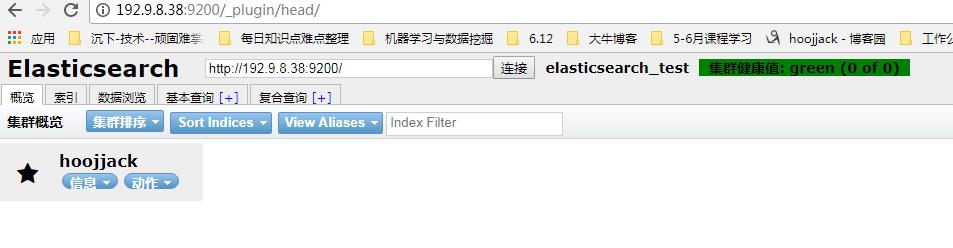
最后,在url中输入:http://localhost:9100/ 就可以看到界面了。
[Reference] https://github.com/mobz/elasticsearch-head
5.0以上的版本,head作为独立服务安装
for Elasticsearch 5.x: site plugins are not supported. Run as a standalone server
安装成功后可以查看效果:
2、ik分词安装:
下一节有专门讲述
【Reference】
[1] http://blog.csdn.net/sinat_28224453/article/details/51134978
[2] http://www.dajiangtai.com/community/18136.do?origin=csdn-geek&dt=1214
[3] http://www.cnblogs.com/ShawnYuki/p/6818677.html
以上是关于Centos6.5安装Elasticsearch的主要内容,如果未能解决你的问题,请参考以下文章