WPF 10天修炼 第九天 - 几何图形
Posted Wǒ々啊申々
tags:
篇首语:本文由小常识网(cha138.com)小编为大家整理,主要介绍了WPF 10天修炼 第九天 - 几何图形相关的知识,希望对你有一定的参考价值。
几何图形
使用LineGeometry、RectangleGeometry、EllipseGeometry对象分别绘制直线、矩形、椭圆。
使用GeometryGroup可以绘制组合图形。
<Window x:Class="WPFDemo.GeometryDemo"
        xmlns="http://schemas.microsoft.com/winfx/2006/xaml/presentation"
        xmlns:x="http://schemas.microsoft.com/winfx/2006/xaml"
        xmlns:d="http://schemas.microsoft.com/expression/blend/2008"
        xmlns:mc="http://schemas.openxmlformats.org/markup-compatibility/2006"
        xmlns:local="clr-namespace:WPFDemo"
        mc:Ignorable="d"
       WindowStartupLocation="CenterScreen"
        Title="GeometryDemo" Height="500" Width="800">
   <Canvas>
        <StackPanel Canvas.Top="10" >
            <TextBlock Text="绘制无相交组合图形"></TextBlock>
            <Path StrokeThickness="1" Fill="Yellow"  Stroke="Black" Margin="5" >
                <Path.Data  >
                    <!--使用GeometryGroup组合集合图形-->
                    <GeometryGroup >
                        <!--绘制直线-->
                        <LineGeometry StartPoint="10,20" EndPoint="100,20" />
                        <!--绘制矩形-->
                        <RectangleGeometry Rect="10,50,100,50" />
                        <!--绘制椭圆-->
                        <EllipseGeometry RadiusX="50" RadiusY="25" Center="60,160"/>
                    </GeometryGroup>
                </Path.Data>
            </Path>
        </StackPanel>
        <StackPanel Canvas.Top="10" Canvas.Left="150">
            <TextBlock Text="Nonzero方式填充图形"></TextBlock>
            <Path StrokeThickness="1" Fill="Yellow"  Stroke="Black" Margin="5">
                <Path.Data  >
                    <!--使用GeometryGroup组合集合图形-->
                    <GeometryGroup FillRule="Nonzero">
                        <!--绘制直线-->
                        <LineGeometry StartPoint="10,20" EndPoint="100,20" />
                        <!--绘制矩形-->
                        <RectangleGeometry Rect="10,50,100,50" />
                        <!--绘制椭圆-->
                        <EllipseGeometry RadiusX="50" RadiusY="25" Center="60,50"/>
                    </GeometryGroup>
                </Path.Data>
            </Path>
        </StackPanel>
        <StackPanel Canvas.Top="10" Canvas.Left="300">
            <TextBlock Text="EvenOdd方式填充图形"></TextBlock>
            <Path StrokeThickness="1" Fill="Yellow"  Stroke="Black" Margin="5" >
                <Path.Data  >
                    <!--使用GeometryGroup组合集合图形-->
                    <GeometryGroup FillRule="EvenOdd">
                        <!--绘制直线-->
                        <LineGeometry StartPoint="10,20" EndPoint="100,20" />
                        <!--绘制矩形-->
                        <RectangleGeometry Rect="10,50,100,50" />
                        <!--绘制椭圆-->
                        <EllipseGeometry RadiusX="50" RadiusY="25" Center="60,50"/>
                    </GeometryGroup>
                </Path.Data>
            </Path>
        </StackPanel>
    </Canvas>
</Window>

使用CombinedGeometry结合形状
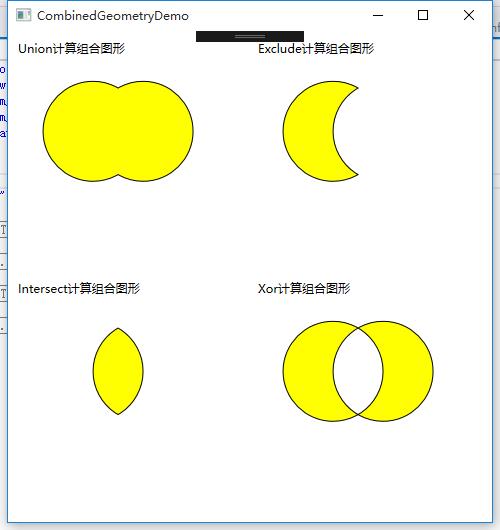
使用GeometryCombineMode的枚举属性可以为组合图形应用一些布尔运算。
Union:通过采用两个区域的并集合并两个区域。新的图形为两个图形。
Inntersect:通过采用两个区域的交集合并两个区域。新的图形为两个图形相交部分。
Xor:将在第一个图形中但不在第二个图形中的区域,和在第二个图形但不在第一个图形的区域进行合并。新的区域为(A-B)+(B-A)组成。
Exclude:从第一个图形总除去第二个图形。
<Window x:Class="WPFDemo.CombinedGeometryDemo"
        xmlns="http://schemas.microsoft.com/winfx/2006/xaml/presentation"
        xmlns:x="http://schemas.microsoft.com/winfx/2006/xaml"
        xmlns:d="http://schemas.microsoft.com/expression/blend/2008"
        xmlns:mc="http://schemas.openxmlformats.org/markup-compatibility/2006"
        xmlns:local="clr-namespace:WPFDemo"
        mc:Ignorable="d"
        WindowStartupLocation="CenterScreen"
        Title="CombinedGeometryDemo" Height="530" Width="500">
    <Canvas>
        <StackPanel Canvas.Left="10" Canvas.Top="10">
            <TextBlock Text="Union计算组合图形" />
            <Path Stroke="Black" StrokeThickness="1" Fill="Yellow" >
                <Path.Data>
                    <!---使用Union组合多个图形-->
                    <CombinedGeometry GeometryCombineMode="Union">
                        <CombinedGeometry.Geometry1>
                            <EllipseGeometry  RadiusX="50" RadiusY="50" Center="75,75"/>
                        </CombinedGeometry.Geometry1>
                        <CombinedGeometry.Geometry2>
                            <EllipseGeometry  RadiusX="50" RadiusY="50" Center="125,75"/>
                        </CombinedGeometry.Geometry2>
                    </CombinedGeometry>
                </Path.Data>
            </Path>
        </StackPanel>
        <StackPanel Canvas.Left="250" Canvas.Top="10">
            <TextBlock Text="Exclude计算组合图形" />
            <Path Stroke="Black" StrokeThickness="1" Fill="Yellow" >
                <Path.Data>
                    <!---使用Exclude组合多个图形-->
                    <CombinedGeometry GeometryCombineMode="Exclude">
                        <CombinedGeometry.Geometry1>
                            <EllipseGeometry  RadiusX="50" RadiusY="50" Center="75,75"/>
                        </CombinedGeometry.Geometry1>
                        <CombinedGeometry.Geometry2>
                            <EllipseGeometry  RadiusX="50" RadiusY="50" Center="125,75"/>
                        </CombinedGeometry.Geometry2>
                    </CombinedGeometry>
                </Path.Data>
            </Path>
        </StackPanel>
        <StackPanel Canvas.Left="10" Canvas.Top="250">
            <TextBlock Text="Intersect计算组合图形" />
            <Path Stroke="Black" StrokeThickness="1" Fill="Yellow" >
                <Path.Data>
                    <!---使用Intersect组合多个图形-->
                    <CombinedGeometry GeometryCombineMode="Intersect">
                        <CombinedGeometry.Geometry1>
                            <EllipseGeometry  RadiusX="50" RadiusY="50" Center="75,75"/>
                        </CombinedGeometry.Geometry1>
                        <CombinedGeometry.Geometry2>
                            <EllipseGeometry  RadiusX="50" RadiusY="50" Center="125,75"/>
                        </CombinedGeometry.Geometry2>
                    </CombinedGeometry>
                </Path.Data>
           </Path>
        </StackPanel>

       <StackPanel Canvas.Left="250" Canvas.Top="250">
            <TextBlock Text="Xor计算组合图形" />
            <Path Stroke="Black" StrokeThickness="1" Fill="Yellow" >
                <Path.Data>
                    <!---使用Xor组合多个图形-->
                    <CombinedGeometry GeometryCombineMode="Xor">
                        <CombinedGeometry.Geometry1>
                            <EllipseGeometry  RadiusX="50" RadiusY="50" Center="75,75"/>
                        </CombinedGeometry.Geometry1>
                        <CombinedGeometry.Geometry2>
                            <EllipseGeometry  RadiusX="50" RadiusY="50" Center="125,75"/>
                        </CombinedGeometry.Geometry2>
                    </CombinedGeometry>
                </Path.Data>
            </Path>
        </StackPanel>
    </Canvas>
</Window>

PathGeometry对象
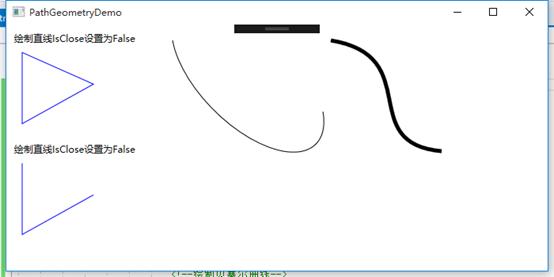
PathGeometry对象是集合图形中最强大的元素,使用该对象可以绘制弧形、曲线、椭圆、直线和矩形等组成的复杂图形。每个PathGeomery对象都使用一个和多个PathFigure对象,该对象存储在PathGeometry.Figures集合中。每个PathFigure对象都可以由一个或多个PathSegment对象组成。每个PathGeomery对象都使用一个和多个PathFigure对象,该对象存在PaathGeometryFigures集合中。每个PathFigure对象都有一个或多个PathSegment对象组成。
PathFigure的重要属性:
StartPoint:指定线段的起点
Segments:一个PathSegment对象的集合,用于绘制图形。
IsClosed:如果设置为true,将添加一个直线连接起点和终点。
IsFilled:如果设置为true,图形的内部区域将使用Path.Fill画刷填充。
PathSegment派生类:
LineSegment:在两个点之间创建直线。
ArcSegment:在两个点之间创建圆弧。
BezierSegment:在两个点之间创建贝塞尔曲线。
QuadraticBezierSegment:在PathFigure的两点之间创建一条二次赛贝尔曲线。
PolyLineSegment:创建一系列直线,可以使用多个LineSegment对象获得同样的效果,但是使用polyLineSegment更简单。
PolyBeeierSegment:创建一条或多条三次贝塞尔曲线。
PolyQuadraticBezierSegment:创建一系列二次贝塞尔线段。
使用PathGeeometry绘制图形
<Window x:Class="WPFDemo.PathGeometryDemo"
        xmlns="http://schemas.microsoft.com/winfx/2006/xaml/presentation"
        xmlns:x="http://schemas.microsoft.com/winfx/2006/xaml"
        xmlns:d="http://schemas.microsoft.com/expression/blend/2008"
        xmlns:mc="http://schemas.openxmlformats.org/markup-compatibility/2006"
        xmlns:local="clr-namespace:WPFDemo"
        mc:Ignorable="d"
        Title="PathGeometryDemo" Height="350" Width="700">
    <Canvas>
        <!--绘制直线-->
        <StackPanel Canvas.Top="10" Canvas.Left="10">
            <TextBlock Text="绘制直线IsClose设置为False"/>
            <Path Stroke="Blue">
                <Path.Data>
                    <PathGeometry>
                        <PathFigure IsClosed="True" StartPoint="10,10" >
                            <!--使用LineSegment绘制直线-->
                            <LineSegment  Point="10,100"/>
                            <LineSegment  Point="100,50"/>
                        </PathFigure>
                    </PathGeometry>
                </Path.Data>
            </Path>
        </StackPanel>
        <StackPanel Canvas.Top="150" Canvas.Left="10">
            <TextBlock Text="绘制直线IsClose设置为False"/>
            <Path Stroke="Blue">
                <Path.Data>
                    <PathGeometry>
                        <PathFigure IsClosed="False" StartPoint="10,10" >
                            <!--使用LineSegment绘制直线-->
                            <LineSegment  Point="10,100"/>
                            <LineSegment  Point="100,50"/>
                        </PathFigure>
                    </PathGeometry>
                </Path.Data>
            </Path>
        </StackPanel>

        <!--绘制弧线-->
        <StackPanel Canvas.Left="200" Canvas.Top="10">
            <Path Stroke="Black" StrokeThickness="1">
              <Path.Data>
                    <PathGeometry>
                        <PathGeometry.Figures>
                            <PathFigureCollection>
                                <PathFigure StartPoint="10,10">
                                    <PathFigure.Segments>
                                        <PathSegmentCollection>
                                            <!--绘制弧线-->
                                            <ArcSegment Size="100,50" RotationAngle="45" IsLargeArc="True" SweepDirection="Counterclockwise" Point="200,100"></ArcSegment>
                                        </PathSegmentCollection>
                                    </PathFigure.Segments>
                                </PathFigure>
                            </PathFigureCollection>
                        </PathGeometry.Figures>
                    </PathGeometry>
                </Path.Data>
            </Path>
        </StackPanel>

       <!--绘制贝塞尔曲线-->
        <StackPanel Canvas.Top="10" Canvas.Left="400">
            <Path Stroke="Black" StrokeThickness="5" >
                <Path.Data>
                    <PathGeometry>
                        <PathFigure StartPoint="10,10">
                            <!--绘制贝塞尔曲线-->
                            <BezierSegment Point1="130,30" Point2="40,140" Point3="150,150" />
                        </PathFigure>
                    </PathGeometry>
                </Path.Data>
            </Path>
        </StackPanel>
    </Canvas>
</Window>

以上是关于WPF 10天修炼 第九天 - 几何图形的主要内容,如果未能解决你的问题,请参考以下文章