centos7.x搭建disconf
Posted
tags:
篇首语:本文由小常识网(cha138.com)小编为大家整理,主要介绍了centos7.x搭建disconf相关的知识,希望对你有一定的参考价值。
### 分布式配置管理平台 - Disconf web管理端安装
##安装依赖软件
#配置java、maven环境
#安装mysql(Ver 14.12 Distrib 5.0.45, for unknown-linux-gnu (x86_64) using EditLine wrapper)
#安装Tomcat(apache-tomcat-7.0.50)
#安装nginx(nginx/1.5.3)
#安装 zookeeeper (zookeeper-3.3.0)  port:8581
#安装 Redis (2.4.5)	port:6379
本人安装的软件版本和官方不一样,比他们的高。
以下只是部分记录
#安装Tomcat
yum install tomcat -y

tomcat version
Server version: Apache Tomcat/7.0.76
Server built:   Aug 7 2017 04:31:46 UTC
Server number:  7.0.76.0
OS Name:        Linux
OS Version:     3.10.0-327.el7.x86_64
Architecture:   amd64
JVM Version:    1.8.0_144-b01
JVM Vendor:     Oracle Corporation
#安装nginx
yum install nginx -y

nginx -v
nginx version: nginx/1.10.2
#安装zookeeper3.3.6 端口改为8581
这个直接解压即可
#安装redis
yum install redis -y

redis-server -v
Redis server v=3.2.3 sha=00000000:0 malloc=jemalloc-3.6.0 bits=64 build=672aed6eb816ad6c
#下载disconf
cd /usr/local/src/
wget -c -O disconf.zip https://github.com/knightliao/disconf/archive/master.zip
unzip disconf.zip
##disconf安装
#创建目录,将你的配置文件放到此地址目录online-resources下(以下地址可自行设定):
mkdir -p /data/disconf/online-resources
mkdir -p /data/disconf/war
#如果不确定如何配置,可以拷贝/disconf-web/profile/rd/目录下的文件,拷贝过去后修改即可。
cp /usr/local/src/disconf-master/disconf-web/profile/rd/* /data/disconf/online-resources/
#记得执行将application-demo.properties复制成application.properties:
cp /data/disconf/online-resources/application-demo.properties /data/disconf/online-resources/application.properties

*注意,即使只有一个redis,也应该配置两个redis client,否则将造成内部错误。*
#构建
ONLINE_CONFIG_PATH=/data/disconf/online-resources
WAR_ROOT_PATH=/data/disconf/war
export ONLINE_CONFIG_PATH
export WAR_ROOT_PATH
cd disconf-web
sh deploy/deploy.sh
#导入数据结构
mysql -h192.168.2.252  -uroot -p  <0-init_table.sql
mysql -h192.168.2.252  -uroot -p disconf < 1-init_data.sql
mysql -h192.168.2.252  -uroot -p disconf < 201512/20151225.sql
mysql -h192.168.2.252  -uroot -p disconf < 20160701/20160701.sql
#配置文件包括:
- jdbc-mysql.properties (数据库配置)
- redis-config.properties (Redis配置,主要用于web登录使用)
- zoo.properties (Zookeeper配置)
- application.properties (应用配置)
#部署war,修改server.xml文件,在Host结点下设定Context:
vim /etc/tomcat/server.xml
<Context path="" docBase="/data/disconf/war/"></Context>
并设置端口为 8015
启动Tomcat,即可。
#配置nginx
#添加include /etc/nginx/vhosts/*.conf;
vim /etc/nginx/nginx.conf
include /etc/nginx/vhosts/*.conf;

#编辑disconfi.conf
vim /etc/nginx/vhosts/disconf.conf

upstream disconf {
    server 127.0.0.1:8015;
}

server {

    listen   8081;
    server_name disconf.xxx.com;
    access_log /data/disconf/log/access.log;
    error_log /data/disconf/log/error.log;

    location / {
        root /data/disconf/war/html;
        if ($query_string) {
            expires max;
        }
    }
   location ~ ^/(api|export) {
        proxy_pass_header Server;
        proxy_set_header Host $http_host;
        proxy_redirect off;
        proxy_set_header X-Real-IP $remote_addr;
        proxy_set_header X-Scheme $scheme;
        proxy_pass http://disconf;
    }
}

#启动nginx
service nginx start

#访问8081地址即可
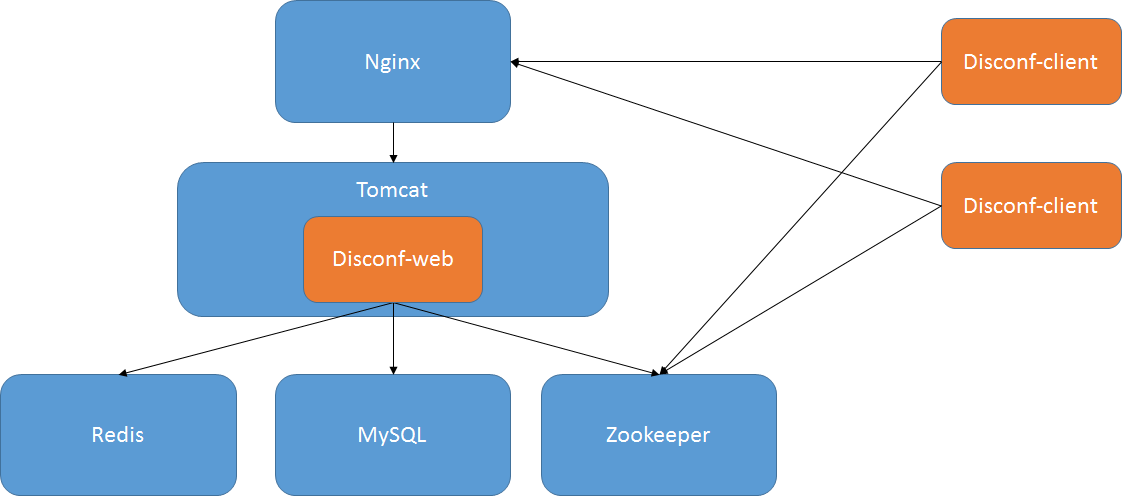
最后上一张部署架构图
本文出自 “禅剑一如” 博客,请务必保留此出处http://yanconggod.blog.51cto.com/1351649/1968019
以上是关于centos7.x搭建disconf的主要内容,如果未能解决你的问题,请参考以下文章
