Rabbitmq 相关介绍之双机镜像模式集群配置
Posted
tags:
篇首语:本文由小常识网(cha138.com)小编为大家整理,主要介绍了Rabbitmq 相关介绍之双机镜像模式集群配置相关的知识,希望对你有一定的参考价值。
一、环境介绍
系统: Centos 6.7  2.6.32-573.el6.x86_64
node1  172.16.60.187
node2  172.16.60.188
软件包 erlang-19.0.4-1.el6.x86_64.rpm   rabbitmq-server-3.6.12-1.el6.noarch.rpm
直接使用rpm包安装!
二、开始配置普通集群
1、设置hosts,是rabbitmq节点可以顺利的互通
在两台服务器上配置/etc/hosts,如下:
#cat /etc/hosts
172.16.60.187 node1
172.16.60.188 node2
2、启动2台rabbitmq
#service rabbitmq-server start
3、设置不同节点间同一认证的Erlang Cookie
采用从主节点copy的方式保持Cookie的一致性,这里将node1节点的cookie拷贝到node2
#scp /var/lib/rabbitmq/.erlang.cookie [email protected]:/var/lib/rabbitmq/
.erlang.cookie
4、查看Cookie情况
[[email protected] ~]# cat /var/lib/rabbitmq/.erlang.cookie
CLAPXRVVRHOJYFPTZVTB
[[email protected] ~]# cat /var/lib/rabbitmq/.erlang.cookie
CLAPXRVVRHOJYFPTZVTB
5、没有创建普通集群之前,查看集群状态
[[email protected] ~]# rabbitmqctl cluster_status
Cluster status of node [email protected]
[{nodes,[{disc,[[email protected]]}]},
 {running_nodes,[[email protected]]},
 {cluster_name,<<"[email protected]">>},
 {partitions,[]},
 {alarms,[{[email protected],[]}]}]
################################################################
[[email protected] ~]# rabbitmqctl cluster_status
Cluster status of node [email protected]
[{nodes,[{disc,[[email protected]]}]},
 {running_nodes,[[email protected]]},
 {cluster_name,<<"[email protected]">>},
 {partitions,[]},
 {alarms,[{[email protected],[]}]}]
6、创建并部署集群,以node2为例
[[email protected] rabbitmq]# rabbitmqctl stop_app
Stopping rabbit application on node [email protected]
[[email protected] rabbitmq]# rabbitmqctl join_cluster  [email protected]
Clustering node [email protected] with [email protected]
[[email protected] rabbitmq]# rabbitmqctl start_app
Starting node [email protected]
注:根据官方文档,如果有node3,继续加入集群那么就在node3操作,停止app--添加--启动app
#rabbitmqctl join_cluster  [email protected]
7、查看集群状态
#rabbitmqctl cluster_status
Cluster status of node [email protected]
[{nodes,[{disc,[[email protected],[email protected]]}]},
 {running_nodes,[[email protected],[email protected]]},
 {cluster_name,<<"[email protected]">>},
 {partitions,[]},
 {alarms,[{[email protected],[]},{ra[email protected],[]}]}]
 到这里2台服务器构成的普通集群就配置好了。
 8、启动管理界面
[[email protected] ~]# rabbitmq-plugins enable rabbitmq_management
The following plugins have been enabled:
  amqp_client
  cowlib
  cowboy
  rabbitmq_web_dispatch
  rabbitmq_management_agent
  rabbitmq_management

Applying plugin configuration to [email protected] started 6 plugins.
#########################################################################
[[email protected] rabbitmq]# rabbitmq-plugins enable rabbitmq_management
The following plugins have been enabled:
  amqp_client
  cowlib
  cowboy
  rabbitmq_web_dispatch
  rabbitmq_management_agent
  rabbitmq_management

Applying plugin configuration to [email protected] started 6 plugins.
9、配置用户名和密码
[[email protected] ~]# rabbitmqctl add_user admin admin123
Creating user "admin"
[[email protected] ~]# rabbitmqctl set_user_tags admin administrator
Setting tags for user "admin" to [administrator]
[[email protected] ~]# rabbitmqctl set_permissions -p / admin ".*" ".*" ".*"
Setting permissions for user "admin" in vhost "/"
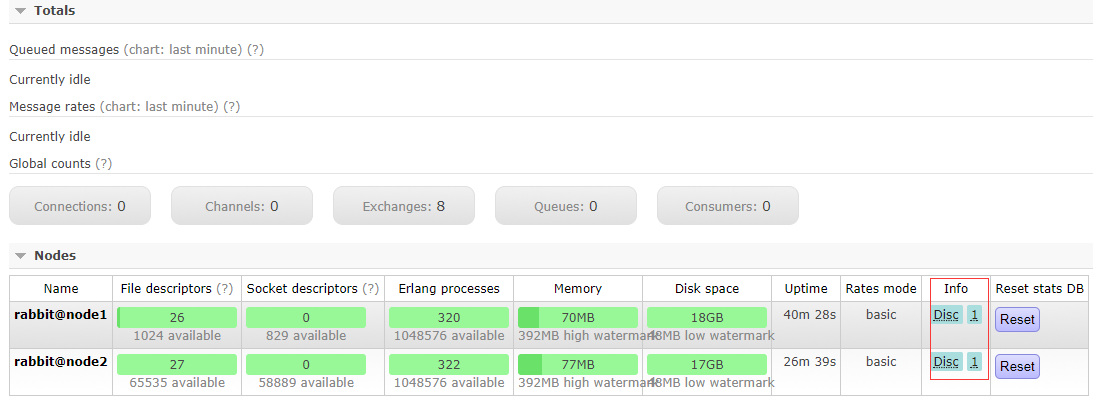
在浏览器访问,并查看建状态如下:
 一个集群需要至少有一个disc节点,一个RAM节点,那么我们将node2修改为RAM节点。
在node2节点上操作如下:
[[email protected] ~]# rabbitmqctl stop_app
Stopping rabbit application on node [email protected]
[[email protected] ~]# rabbitmqctl change_cluster_node_type ram
Turning [email protected] into a ram node
[[email protected] ~]# rabbitmqctl start_app
Starting node [email protected]
查看是否修改成功
[[email protected] ~]# rabbitmqctl cluster_status
Cluster status of node [email protected]
[{nodes,[{disc,[[email protected]]},{ram,[[email protected]]}]},   #修改成功
 {running_nodes,[[email protected],[email protected]]},
 {cluster_name,<<"[email protected]">>},
 {partitions,[]},
 {alarms,[{[email protected],[]},{[email protected],[]}]}]
########################################################
[[email protected] ~]# rabbitmqctl cluster_status
Cluster status of node [email protected]
[{nodes,[{disc,[[email protected]]},{ram,[[email protected]]}]},   #修改成功
 {running_nodes,[[email protected],[email protected]]},
 {cluster_name,<<"[email protected]">>},
 {partitions,[]},
 {alarms,[{[email protected],[]},{[email protected],[]}]}]
同事通过rabbitmq-magagement界面看到的也是一个Disc一个Ram。
三、配置镜像队列集群
[[email protected] ~]# rabbitmqctl set_policy mirror_queue1 "^" ‘{"ha-mode":"all","ha-sync-mode":"automatic","ha-promote-on-shutdown":"always"}‘
Setting policy "mirror_queue1" for pattern "^" to "{\"ha-mode\":\"all\",\"ha-sync-mode\":\"automatic\",\"ha-promote-on-shutdown\":\"always\"}" with priority "0"
查看
[[email protected] ~]# rabbitmqctl list_policies
Listing policies
/       mirror_queue1   all     ^       {"ha-mode":"all","ha-sync-mode":"automatic","ha-promote-on-shutdown":"always"}  0
#######################
[[email protected] ~]# rabbitmqctl list_policies
Listing policies
/       mirror_queue1   all     ^       {"ha-mode":"all","ha-sync-mode":"automatic","ha-promote-on-shutdown":"always"}  0
同样的,添加好镜像队列之后,也可以在rabbitmq-management界面看到。
本文出自 “知识体系” 博客,请务必保留此出处http://linuxg.blog.51cto.com/4410110/1967788
以上是关于Rabbitmq 相关介绍之双机镜像模式集群配置的主要内容,如果未能解决你的问题,请参考以下文章