Unity 编辑器学习之 全局光照(GI)
Posted Jason_c
tags:
篇首语:本文由小常识网(cha138.com)小编为大家整理,主要介绍了Unity 编辑器学习之 全局光照(GI)相关的知识,希望对你有一定的参考价值。
光影流年,花影阡陌。光与影交织的岁月教育我们,不会使用光照的程序员不是个好美术。
一、概述
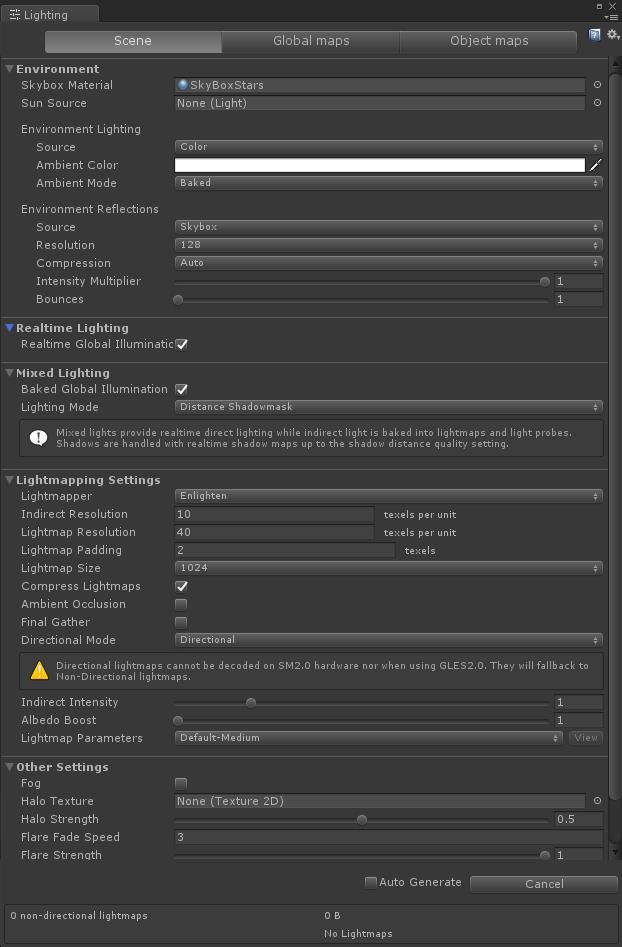
点击 Window > Lighting > Settings 会弹出Lighting窗口,这个就是设置全局光照的窗口。
这个Lighting窗口划分了三个区域:
1、Scene:设置适用于整个场景而不是单个GameObjects。这些设置控制灯光效果和优化选择。
2、Global maps:显示所有lightmap资产文件生成的GI照明过程。
3、Object maps:预览当前选中的GameObject的GI lightmap纹理(包括阴影遮罩)。
下方有一个Auto Generate,勾上它,unity就会自动更新Lightmap 数据,但更新的过程非常耗时,
因此不建议勾选 Auto Generate。可以手动点击Generate Lighting来烘焙。(注意,unity只会烘焙
勾选了Lightmap Static 的GameObject,so 烘焙之前,首先在Inspector 面板最上方的Static 选中Lightmap Static)

二、Scene tab
Scene 这一模块,包括以下六个部分:
- Environment
- Realtime Lighting
- Mixed Lighting
- Lightmapping Settings
- Other Settings
- Debug Settings
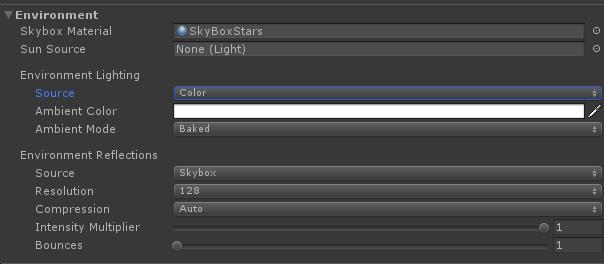
1、Environment
环境光部分包含设置天空盒,漫反射和镜面反射。
| Property: | Function: |
|---|---|
| Skybox Material | 天空盒材质 |
| Sun Source | 设置一个定向光(directional Light)作为场景里的太阳,如果设置为None,unity则将最亮的定向光作为太阳(太阳:不管你设置的多大远多,光都会照到场景里) |
| Environment Lighting | 环境光设置 |
| Source | 漫反射环境光(背景光),默认以天空盒作为环境光。 |
| Color | 以某种颜色作为环境光。 |
| Gradient //梯度 | sky, horizon and ground分别选择一种颜色,混合出一种环境光。 |
| Skybox | 天空盒作为环境光, |
| Intensity Multiplier//光照强度 | 环境光的亮度,范围是0-8,默认为1。 |
| Ambient Mode //微光模式 | 场景中GI的模式。 |
| Realtime | 实时更新。 |
| Baked | 烘焙(预先计算场景中的灯光)。 |
| Environment Reflections | 全局设置反射参数。 |
| Source | 反射源。 |
| Skybox | 天空盒作为反射源。 |
| Custom | 用一个cube map作为反射源。 |
| Compression//压缩 | 反射贴图是否被压缩。 |
| Auto | 如果适合压缩,那就压缩。 |
| Uncompressed | 不压缩。 |
| Compressed | 压缩 |
| Intensity Multiplier | 反射光的强度。 |
| Bounces//反弹 | 一束光的被反射的次数。 |

2、Realtime Lighting
| Property: | Function: |
|---|---|
| Realtime Global Illumination | 是否开启实时全景光照。 |

3、Mixed Lighting
| Property: | Function: |
|---|---|
| Baked Global Illumination | 是否采用烘焙的全局光照。 |
| Lighting Mode | 决定混合灯光和GameObject的阴影,修改了Light Mode需要重新烘焙。 |
| Realtime Shadow Color | 实时阴影的颜色。 |

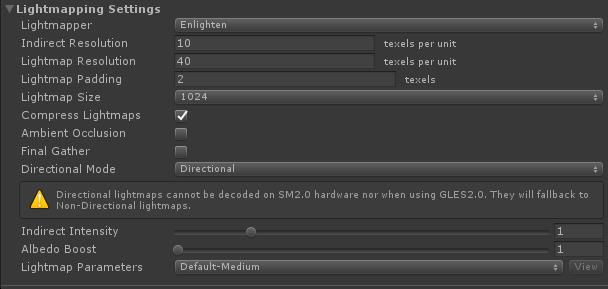
4、Lightmapping Settings
| Property: | Function: |
|---|---|
| Lightmapper | Use this to specify which internal lighting calculation software to use to calculate lightmaps in the Scene. The options are Enlighten and Progressive (experimental). The default value is Enlighten. See documentation on the Progressive Lightmapper for more information about the experimental Progressive Lightmapper feature. |
| Indirect Resolution | Use this value to specify the number of texels per unit to use for indirect lighting calculations. Increasing this value improves the visual quality of indirect light, but also increases the time it takes to bake lightmaps. The default value is 2. |
| Lightmap Resolution | Use this value to specify the number of texels per unit to use for lightmaps. Increasing this value improves lightmap quality, but also increases bake times. The default value is 40. |
| Lightmap Padding | Use this value to specify the separation (in texel units) between separate shapes in the baked lightmap. The default value is 2. |
| Lightmap Size | The size (in pixels) of the full lightmap texture, which incorporates separate regions for the individual object textures. The default value is 1024. |
| Compress Lightmaps | A compressed lightmap requires less storage space, but the compression process can introduce unwanted visual effects into the texture. Tick this checkbox to compress lightmaps, or untick it to keep them uncompressed. The checkbox is ticked by default. |
| Ambient Occlusion | When ticked, this opens a group of settings which allow you to control the relative brightness of surfaces in ambient occlusion. Higher values indicate a greater contrast between the occluded and fully lit areas. This is only applied to the indirect lighting calculated by the GI system. This setting is enabled by default. |
| Max Distance | Set a value to control how far rays are cast in order to determine whether an object is occluded or not. A larger value produces longer rays and contributes more shadows to the lightmap, while a smaller value produces shorter rays that contribute shadows only when objects are very close to one another. A value of 0 casts an infinitely long ray that has no maximum distance. The default value is 1. |
| Indirect Contribution | Use the slider to scale the brightness of indirect light as seen in the final lightmap (that is, ambient light, or light bounced and emitted from objects) from a value between 0 and 10. The default value is 1. Values less than 1 reduce the intensity, while values greater than 1 increase it. |
| Direct Contribution | Use the slider to scale the brightness of direct light from a value between 0 and 10. The default value is 0. The higher this value is, the greater the contrast applied to the direct lighting. |
| Final Gather | When Final Gather is enabled, the final light bounce in the GI calculation is calculated at the same resolution as the baked lightmap. This improves the visual quality of the lightmap, but at the cost of additional baking time in the editor. |
| Ray Count | Use this value to define the number of rays emitted for each final gather point. The default value is 256. |
| Denoising | Tick this checkbox to apply a denoising filter to the final gather output. This box is ticked by default. |
| Directional Mode | You can set the lightmap up to store information about the dominant incoming light at each point on the objects’ surfaces. See documentation on Directional Lightmapping for further details. The default mode is Directional. |
| Directional | In Directional mode, a second lightmap is generated to store the dominant direction of incoming light. This allows diffuse normal mapped materials to work with the GI. Directional mode requires about twice as much storage space for the additional lightmap data. |
| Non-directional | Non-directional mode switches both these options off. |
| Indirect Intensity | Use this slider to control the brightness of indirect light stored in realtime and baked lightmaps, from a value between 0 and 5. A value above 1 increases the intensity of indirect light while a value of less that 1 reduces indirect light intensity. The default value is 1. |
| Albedo Boost | Use this slider to control the amount of light bounced between surfaces by intensifying the albedo of materials in the Scene, from a value between 1 and 10. Increasing this draws the albedo value towards white for indirect light computation. The default value of 1 is physically accurate. |
| Lightmap Parameters | Unity uses a set of general parameters for the lightmapping in addition to properties of the Lighting window. A few defaults are available from the menu for this property but you can also create your own lightmap parameter file using the Create New option. See the Lightmap Parameters page for further details. The default value is Default-Medium. |

5、Other Settings
| Property: | Function: |
|---|---|
| Other Settings | Settings for fog, Halos, Flares and Cookies. |
| Fog | Enables or disables fog in the Scene. Note that fog is not available with the Deferred rendering path. For deferred rendering, the Global Fog effect may suit your needs. |
| Color | Set the color Unity uses to draw fog in the Scene. |
| Mode | Define the way in which the fogging accumulates with distance from the camera. |
| Linear | Fog density increases linearly with distance. |
| Start | Set the distance from the Camera at which the fog starts. |
| End | Set the distance from the Camera at which the fog completely obscures Scene GameObjects. |
| Exponential | Fog density increases exponentially with distance. |
| Density | Use this to control the density of the fog. The Fog appears more dense as the Density increases. |
| Exponential Squared | Fog density increases even faster than exponentially with distance (exponentially and squared). |
| Density | Use this to control the density of the fog. The Fog appears more dense as the Density increases. |
| Halo Texture | Set the Texture you want to use for drawing a Halo around lights. |
| Halo Strength | Define the visibility of halos around lights, from a value between 0 and 1. |
| Flare Fade Speed | Define the time (in seconds) over which lens flares fade from view after initially appearing. This is set to 3 by default. |
| Flare Strength | Define the visibility of lens flares from lights, from a value between 0 and 1. |
| Spot Cookie | Set the Cookie texture you want to use for spot lights. |

6、Debug settings
| Property: | Function: |
|---|---|
| Debug Settings | Settings that help you debug your Scene. |
| Update Statistics | If ticked, the statistics window at the bottom of the Lighting settings window is updated as the Scene changes. This can have an impact on performance during Play mode. For better performance in Play mode, untick this box. |
| Light Probe Visualization | Use this to filter which Light Probes are visualized in the Scene view. The default value is Only Probes Used By Selection. |
| Only Probes Used By Selection | Only Light Probes that affect the current selection are visualized in the Scene view. |
| All Probes No Cells | All Light Probes are visualized in the Scene view. |
| All Probes With Cells | All Light Probes are visualized in the Scene view, and the tetrahedrons that are used for interpolation of Light Probe data are also displayed. |
| None | No Light Probes are visualized in the Scene view. |
| Display Weights | When ticked, Unity draws a line from the Light Probe used for the active selection to the positions on the tetrahedra used for interpolation. This is a way to debug probe interpolation and placement problems. |
| Display Occlusion | When ticked, Unity displays occlusion data for Light Probes if the Mixed lighting mode is Distance Shadowmask or Shadowmask. |

三、Global maps tab
以上是关于Unity 编辑器学习之 全局光照(GI)的主要内容,如果未能解决你的问题,请参考以下文章