Keras之函数式(Functional)模型
Posted 起床oO
tags:
篇首语:本文由小常识网(cha138.com)小编为大家整理,主要介绍了Keras之函数式(Functional)模型相关的知识,希望对你有一定的参考价值。
函数式(Functional)模型
我们起初将Functional一词译作泛型,想要表达该类模型能够表达任意张量映射的含义,但表达的不是很精确,在Keras2里我们将这个词改移为“函数式”,函数式模型称作Functional,但它的类名是Model,因此有时候也用Model来代表函数式模型。
Keras函数式模型接口是用户定义多输出模型、非循环有向模型或具有共享层的模型等复杂模型的途径。一句话,只要你的模型不是类似VGG一样一条路走到黑的模型,或者你的模型需要多于一个的输出,那么你总应该选择函数式模型。函数式模型是最广泛的一类模型,序贯(Sequential)模型只是它的一种特殊情况。
第一个模型:全连接网络
Sequential当然是实现全连接网络的最好方式,但我们从简单的全连接网络开始,有助于我们学习这部分的内容。在开始前,有几个概念需要澄清:
- 层对象接受张量作为参数,返回一个张量。
- 输入是张量,输出也是张量的一个框架就是一个模型,通过Model定义。
- 这样的模型可以向Keras的Sequential一样被训练
from keras.layer import Input,Dense
from keras.models import Model

#This returns a tensor
inputs = Input(shape=(784,))

#a Layer instance is callable on a tensor , and returns a tensor
x = Dense(64 , activation=\'relu\')(inputs)
x = Dense(64,activation=\'relu\')(x)
predictions = Dense(10,activation=\'softmax\')(x)

#This creates a model that includes
#the Input layer and three Dense layers
model = Model(inputs=inputs,outputs=predictions)
model.compile(optimizer=\'rmsprop\',loss=\'categorical_crossentropy\',metrics=[\'accuracy\'])
model.fit(data,labels) #starts training
所有的模型都是可调用的,就像层一样
利用函数式模型的接口,我们可以很容易的重用已经训练好的模型:你可以把模型当做一个层一样,通过提供一个tensor来调用它。注意当你调用一个模型时,你不仅仅重用了它的结构,也重用了它的权重。
x = Input(shape=(784,))
#This works, and returns the 10-way softmax we defined above
y = model(x)
这种方式可以允许你快速的创建能处理序列信号的模型,你可以很快将一个图像分类的模型变为一个对视屏分类的模型,只需要一行代码:
from keras.layers import TimeDistributed

#Input tensor for sequences of 20 timesteps
#each containing a 784-dimensional vector

input_sequences = Input(shape=(20,784))

#This applies our previous model to every timestep in the input sequences.
#the output of the previous model was a 10-way softmax
#so the output of the layer below will be a sequence of 20 vectors of size 10.

processed_sequences = TimeDistributed(model)(input_sequences)
多输入和多输出模型
使用函数式模型的一个典型场景是搭建多输入、多输出的模型。
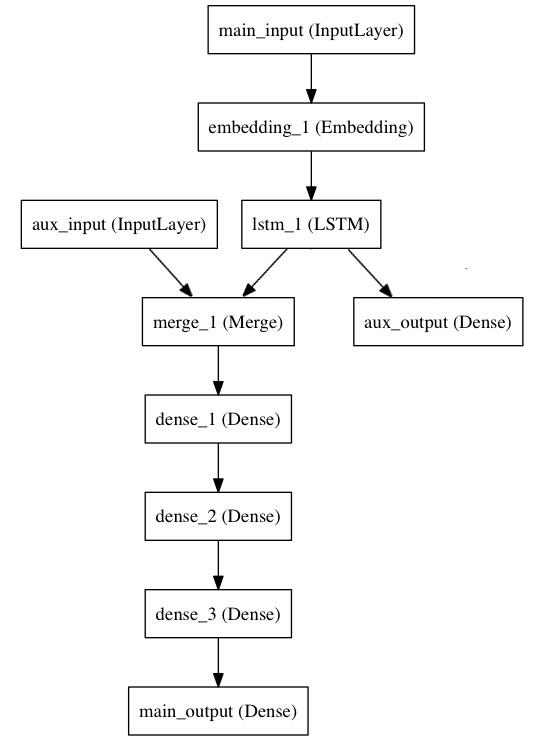
考虑这样一个模型。我们希望预测Twitter上一条新闻会被转发和点赞多少次。模型的主要输入是新闻本身,也就是一个词语的序列。但我们还可以拥有额外的输入,如新闻发布的日期等。这个模型的损失函数将有两部分组成,辅助的损失函数评估仅仅基于新闻本身做出预测的情况,主损失函数评估基于新闻的额外信息的预测的情况,即使来自主损失函数的梯度发生弥散,来自辅导损失函数的信息也能够训练Embedding和LSTM层。在模型中早点使用主要的损失函数是对于深度网络的一个良好的正则方法。总而言之,该模型的框图如下:

让我们用函数式模型来实现这个框图
主要的输入接收新闻本身,即一个整数的序列(每个整数编码了一个词)。这些整数位于1到10,000之间(即我们的字典有10,000)个词。
from keras.layer import Input , Embedding , LSTM , Dense
from keras.models import Model

#Headline input: meant to receive sequences of 100 integers ,between 1 and 10000.
#Note that we can name any layer by passing it a "name" argument.
main_input = Input(shape=(100,), dtype=\'int32\' , name=\'main_input\')

#This embedding layer will encode the input Sequence
#into a sequence of dense 512-dimensional vectors
x = Embedding(output_dim=512, input_dim=10000, input_length=100)(main_input)

#A LSTM will transform the vector sequence into a single vector,
#containing information about the entire sequence
lstm_out = LSTM(32)(x)
然后,我们插入一个额外的损失,使得即使在主损失很高的情况下,LSTM和Embedding层也可以平滑的训练。
auxiliary_output = Dense(1, activation=\'sigmoid\' name=\'aux_output\')(lstm_out)
再然后,我们将LSTM与额外的输入数据串联起来组成输入,送入模型中:
auxiliary_input  = Input(shape(5,),name=\'aux_input\')
x = keras.layers.concatenate([lstm_out, auxiliary_input])

#We stack a deep densely-connected network on top
x = Dense(64,activation=\'relu\')(x)
x = Dense(64,activation=\'relu\')(x)
x = Dense(64,activation=\'relu\')(x)

#And finally we add the main logistic regression layer
main_output = Dense(1,activation=\'sigmoid\', name=\'main_output\')(x)
最后,我们定义整个2输入,2输出的模型:
model = Model(inputs=[main_input,auxiliary_input], outputs=[main_output, auxiliary_output])
模型的定义完毕,下一步编译模型。我们给额外的损失赋0.2的权重。我们可以通过关键字参数loss_weights或loss来为不同的输出设置不同的损失函数或权值。这两个参数均可以为python的列表或字典。这里我们给loss传递单个损失函数,这个损失函数会被应用于所有输出上。
model.compile(optimizer=\'rmsprop\' , loss=\'binary_crossentropy\',loss_weights=[1.,0.2])
编译完成后,我们通过传递训练数据和目标值训练该模型:
model.fit([headline_data, additional_data],[labels,labels],epochs=50,batch_size=32)
因为我们的输入和输出时被命名过的(在定义时传递了“name”参数,我们也可以用下面的方式编译和训练模型)
model.compile(optimizer=\'rmsprop\',loss={\'main_output\': \'binary_crossentropy\',\'aux_output\':\'binary_crossentropy\'},loss_weights={\'main_output\':1.,\'aux_output\':0.2})

#And trained it via:
model.fit({\'main_input\': headline_data,\'aux_input\': addtional_data},{\'main_output\':labels,\'aux_output\':labels},epochs=50,batch_size=32)
共享层
另一个使用函数式模型的场合是使用共享层的时候。
考虑微博数据,我们希望建立模型来判别两条微博是否是来自同一个用户,这个需求同样可以用来判断一个用户的两条微博的相似性。
一种实现方式是,我们建立一个模型,它分别将两条微博的数据映射到两个特征向量上,然后将该特征向量串联并加一个logistic回归曾,输出她们来自同一个用户的概率。这种模型的训练数据是一度对的微博。
因为这个问题是对称的,所以处理第一条微博的模型当然也能冲用于处理第二条微博,所以这里我们使用一个共享LSTM层来进行映射。
首先,我们将微博的数据转为(140,256)的矩阵,即每条微博有140个字符,每个单词的特征由256维的词向量表示,向量的每个元素为1表示某个字符出现,为0表示不出现,这是一个one-hot编码。之所以是(140,256),是因为一条微博最多有140个字符,而扩展的ASCII码表编码了常见的256个字符。如果考虑中文字符,那一个单词的词向量就不止256了,此处的微博应为Twitter
import keras
from keras.layers import Input , LSTM,Dense
from keras.models import Model

tweet_a = Input(shape=(140,256))
tweet_b = Input(shape=(140,256))
若要对不同的输入共享同一层,就初始化该层一次,然后多次调用它
#This Layer can take as input a matrix
#and will return a vector of size 64
shared_lstm = LSTM(64)

#When we reuse the same layer instance
#multiple times, the weights of the layer
#are also being reused
#(it is effectively * the same * layer)
encode_a = shared_lstm(tweet_a)
encode_b = shared_lstm(tweet_b)

#we can then concatenate the two vectors:
merget_vector = keras.layers.cocatenate([encoded_a,encodd_b], axis=-1)

# And add a logistic regression on top
predictions = Dense(1, activation=\'sigmoid\')(merged_vector)

# We define a trainable model linking the
# tweet inputs to the predictions
model = Model(inputs=[tweet_a, tweet_b], outputs=predictions)

model.compile(optimizer=\'rmsprop\',
              loss=\'binary_crossentropy\',
              metrics=[\'accuracy\'])
model.fit([data_a, data_b], labels, epochs=10)
以上是关于Keras之函数式(Functional)模型的主要内容,如果未能解决你的问题,请参考以下文章