Asp.Net Web API 2第十课——使用OWIN自承载Web API
Posted 人海灬
tags:
篇首语:本文由小常识网(cha138.com)小编为大家整理,主要介绍了Asp.Net Web API 2第十课——使用OWIN自承载Web API相关的知识,希望对你有一定的参考价值。
前言
阅读本文之前,您也可以到Asp.Net Web API 2 系列导航进行查看 http://www.cnblogs.com/aehyok/p/3446289.html
本教程主要来展示在控制台应用程序中如何通过OWIN来承载Web API。
Open Web Interface for .NET (OWIN)在Web服务器和Web应用程序之间建立一个抽象层。OWIN将网页应用程序从网页服务器分离出来,然后将应用程序托管于OWIN的程序而离开IIS之外。
本文仍将使用VS2013。 本文的示例代码下载地址http://pan.baidu.com/s/1msXF9
使用OWIN自承载
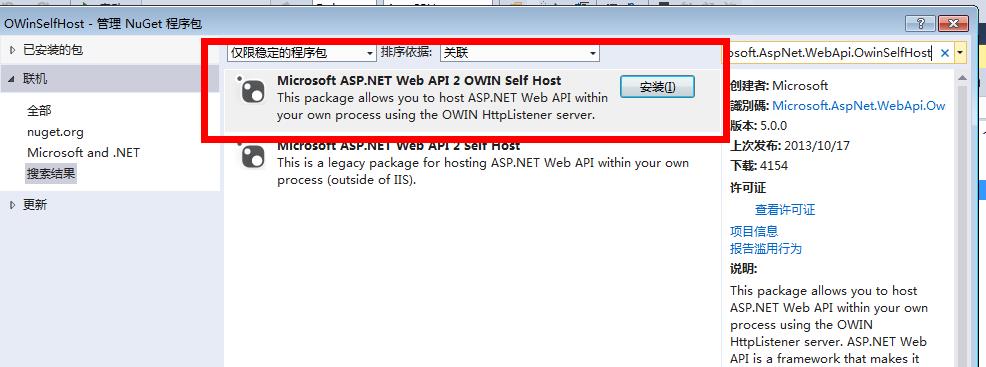
1.建立一个控制台应用程序,然后通过Nuget来安装Microsoft.AspNet.WebApi.OwinSelfHost。

2.配置Web API为自承载
添加一个名为Startup的类
using Owin; using System; using System.Collections.Generic; using System.Linq; using System.Text; using System.Threading.Tasks; using System.Web.Http; namespace OWinSelfHost
{ public class Startup
    { public void Configuration(IAppBuilder appBuilder)
        { // Configure Web API for self-host.  HttpConfiguration config = new HttpConfiguration();
            config.Routes.MapHttpRoute(
                name: "DefaultApi",
                routeTemplate: "api/{controller}/{id}",
                defaults: new { id = RouteParameter.Optional }
            );

            appBuilder.UseWebApi(config);
        }
    }
}
可以发现主要是为了配置路由。
3.添加一个Web API控制器
using System; using System.Collections.Generic; using System.Linq; using System.Text; using System.Threading.Tasks; using System.Web.Http; namespace OWinSelfHost
{ class ValuesController:ApiController
    { // GET api/values  public IEnumerable<string> Get()
        { return new string[] { "value1", "value2" };
        } // GET api/values/5  public string Get(int id)
        { return "value";
        } // POST api/values  public void Post([FromBody]string value)
        {
        } // PUT api/values/5  public void Put(int id, [FromBody]string value)
        {
        } // DELETE api/values/5  public void Delete(int id)
        {
        }
    }
}
控制器也没什么特别的地方,很简单。
4.启动OWIN,并且使用HttpClient发出请求,使用以下代码替换调Program.cs中文件的内容
using Microsoft.Owin.Hosting; using System; using System.Collections.Generic; using System.Linq; using System.Net.Http; using System.Text; using System.Threading.Tasks; namespace OWinSelfHost
{ class Program
    { static void Main(string[] args)
        { string baseAddress = "http://localhost:9000/"; // Start OWIN host  using (WebApp.Start<Startup>(url: baseAddress))
            { // Create HttpCient and make a request to api/values  HttpClient client = new HttpClient(); var response = client.GetAsync(baseAddress + "api/values").Result;

                Console.WriteLine(response);
                Console.WriteLine(response.Content.ReadAsStringAsync().Result);
            }

            Console.ReadLine();
        }
    }
}
定义一个基地址,主要是通过WebApp.Start来开启OWIN,来承载Web API,然后就可以通过HttpClient进行调用发出请求。
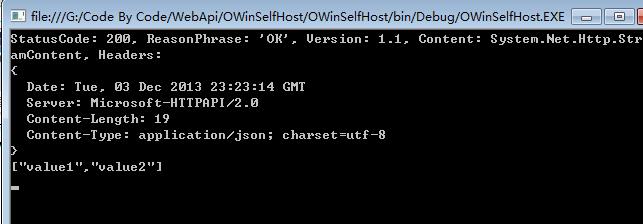
最终运行,查看效果

返回的结果是正确的。
总结
这感觉上去还是比较简单的,相对于上一节中http://www.cnblogs.com/aehyok/p/3456841.html更为简单吧。
本文已更新至Web API学习系列导航 http://www.cnblogs.com/aehyok/p/3446289.html
本文的参考链接http://www.asp.net/web-api/overview/hosting-aspnet-web-api/use-owin-to-self-host-web-api
本文的示例代码下载地址http://pan.baidu.com/s/1msXF9
以上是关于Asp.Net Web API 2第十课——使用OWIN自承载Web API的主要内容,如果未能解决你的问题,请参考以下文章