干货篇步步为营,带你轻松掌握jQuery!
Posted
tags:
篇首语:本文由小常识网(cha138.com)小编为大家整理,主要介绍了干货篇步步为营,带你轻松掌握jQuery!相关的知识,希望对你有一定的参考价值。
写在前面:经过系统的学习了原生JS之后,会发现其具有以下三个特点:
1、是一种解释性脚本语言(代码不进行预编译)。
2、主要用来向 html 页面添加交互行为。
3、可以直接嵌入 HTML 页面,但写成单独的js文件有利于结构和行为的分离。
而接下来要讲的jQuery 就对原生javascript的一个扩展,封装,就是让javascript更好用,更简单。
换而言之,jquery就是要用更少的代码,漂亮的完成更多的功能。{Write less, Do more!}
1. jQuery 作为 JavaScript 的代码库,自然是使用 JavaScript 语言编写的。
2. jQuery 的代码非常规范,执行效率也很高,是 JavaScript 编码的优秀范例。
3. 很多情只要使用 jQuery 的方法就可以实现大部分的 JavaScript 功能。
所以说,程序员作为一种极懒的物种存在,势必想着要减少不必要的代码劳动量,因此jQuery诞生了。
一、jQuery基础语法
1、适应JQuery、必须要先导入JQuery。x.x.x.js文件。
 $(document).ready(function() {
 //JQuery代码
 });
 简写形式如下:
 $(function(){});
[文档就绪函数&window.onload的区别]
 $("#p").click() √
 $("#p").onclick = function(){}; ×
解释:
 $("#p").get(0).onclick() = function () {}; √
 $("#p").[0].onclick() = function () {}; √
 !function ($) {
 $()//函数之中,就可以使用$代替JQuery对象。
 }(jQuery);
② [jQuery.noConflict();]
二、02-JQueryDOM操作及其他函数
将创建好的节点,插入到指定位置。
在#div1内部的最后,直接插入一个节点。
$("#div1").append("<p>这是被插入的p标签</p>");
$("<p>这是被插入的p标签</p>").appendTo("#div1");
$("#div1").prepend("<p>这是被插入的p标签</p>");
$("#div1").after("<p>这是被插入的p标签</p>");
$("<p>这是被插入的p标签</p>").insertBefore("#div1");
$("p").wrap("<div></div>");
$("p").wrapAll("<div></div>");
$("#div1").wrapInner("<div></div>");
删除元素的父标签
$("#p").unwrap();
$("p").replaceWith("<span>111</span>");
$("<span>111</span>").replaceAll("p");
$("#div1").empty();
$("#div1").remove();
$("#div1").detach();
2、 不同点:
$("#div1").click(function(){
alert(1);
})
var div1 = null;
$("button:eq(0)").click(function(){
div1 = $("#div1").remove();
})
$("button:eq(1)").click(function(){
div1 = $("#div1").detach();
})
$("button:eq(2)").click(function(){
$("button:eq(2)").after(div1);
});
重点 [JS中.cloneNode() 和 JQ中 .clone()区别]
两者都接受传入true/false的参数。
.cloneNode() 不传参数或传入参数false,表示只克隆当前节点,而不克隆子节点。 传入true表示可隆全部子节点。
$("#div1").clone(true).empty().insertBefore("button:eq(0)")
CSS和属性相关操作
使用attr()设置或者取到元素的某个属性。
//$("#div1").attr("class","cls1");

/*$("#div1").attr({ //使用attr一次性设置多个属性
"class" : "cls1",
"name" : "name1",
"style" : "color:red;"
});*/
console.log($(".p").attr("id"));

删除元素属性
$("#div1").removeAttr("class");
console.log($("button:eq(2)").attr("disabled"));
console.log($("button:eq(2)").prop("disabled"));
$("p").addClass("selected1 selected2");
$("p").removeClass("selected1");
$("p").toggleClass("selected1");
console.log($("#div1").html());
$("#div1").html("<h1>我是新的h1</h1>");
取到或设置元素里面的文字内容,相当于innerText
console.log($("#div1").text());
$("#div1").text("<h1>我是新的h1</h1>");
获取或设置 元素的Value值
console.log($("input[type=‘text‘]").val());
$("input[type=‘text‘]").val("啧啧啧!");
$("#div1").css({
"color":"red",
"user-select":"none",
"text-stroke":"0.5px blue"
});

var id = setInterval(function(){
$("#div1").css({
"width":function(index,value){
if(parseFloat(value)+10 >= 600){
clearInterval(id);
}
return parseFloat(value)+10+"px";
}
});
},500);
console.log($("#div1").height());
console.log($("#div1").width());
$("#div1").width("400px");
获取元素的内部宽度。 包括宽高和padding
console.log($("#div1").innerHeight());
console.log($("#div1").innerWidth());
获取元素的外部宽高。 包括宽高+padding+border
console.log($("#div1").outerHeight(true));
console.log($("#div1").outerWidth());
position():
三、JQuery 事件及动画
$("button").eq(0).click(function () {
alert("快捷绑定!");
})
缺点:绑定的事件无法取消!
$("button:eq(0)").on ("click",(function () {
alert("这是使用on绑定的事件!");
});
$("button:eq(0)").on ("click dbclick",(function () {
alert("这是使用on绑定的事件!");
});
$("button:eq(0)").on ({
"click":function () {
alert("执行了click事件!")
},
"mouseover":function () {
alert("执行了mouseover事件!")
}
});
$("button:eq(0)").on ("click",{name:"wq",age:23},(function (evn) {
alert(evn);
});
$("document").on("click","p",function(){});
$("p").off("click"):取消单事件绑定
$("p").off("click mouseover dbclick"):取消多事件绑定
$(document).off("click","p"):取消委派事件绑定
$("p").off()取消所有的事件绑定
eg:
$("button").one("click",function () {
alert("one做的 只能点一次!")
})
四、JQuery 高级 Ajax
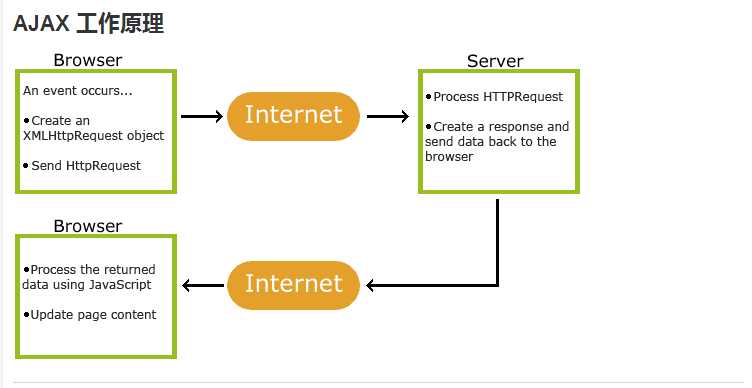
- XMLHttpRequest 对象 (异步的与服务器交换数据)
- JavaScript/DOM (信息显示/交互)
- CSS (给数据定义样式)
- XML (作为转换数据的格式,现在基本上被淘汰了,大多数情况下使用JSON数据格式
$(document).ajaxSend(function(){
alert("ajax请求发送")
});
$(document).ajaxStop(function(){
alert("ajax请求停止")
})
$(document).ajaxStart(function(){
alert("ajax请求开始")
})
$(document).ajaxSuccess(function(){
alert("ajax请求成功")
})
$(document).ajaxError(function(){
alert("ajax请求失败")
})
$(document).ajaxComplete(function(){
alert("ajax请求完成(不管成功失败,都会死乞白赖出来)")
})
$("#btn1").click(function(){
var str = $("#form1").serialize();
console.log(str);
//str = name=jianghao&password=123&email=1234123
var arr = str.split("&");
console.log(arr);
var obj = {};
for (var i=0; i<arr.length; i++) {
var arr1 = arr[i].split("=");
var keys = arr1[0];
var values = arr1[1];
obj[keys] = values;
}
console.log(obj);
$.get("01-JQuery基础.html?"+str,obj,function(){

})
})
$("#btn2").click(function(){
var arr = $("#form1").serializeArray();
console.log(arr);
var obj = {};
for (var i=0; i<arr.length; i++) {
var keys = arr[i].name;
var values = arr[i].value;
obj[keys] = values;
}
console.log(obj);
});
var str = ‘{"age":12}‘
var obj = $.parseJSON(str);
console.log(obj);
var str1 = " 123 ";
console.log(str1.trim());
var arr = [1,2,3,4,5,6,7];
var obj = {
name : "zhangsan",
age : 12,
sex : "nan"
}
$.each(obj,function(index,item){
console.log(index);
console.log(item);
});
五、JQuery插件 plugin
1、fullpage插件
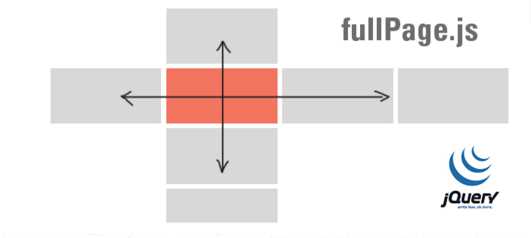
- 支持鼠标滚动
- 支持前进后退和键盘控制
- 多个回调函数
- 支持手机、平板触摸事件
- 支持 CSS3 动画
- 支持窗口缩放
- 窗口缩放时自动调整
- 可设置滚动宽度、背景颜色、滚动速度、循环选项、回调、文本对齐方式等等

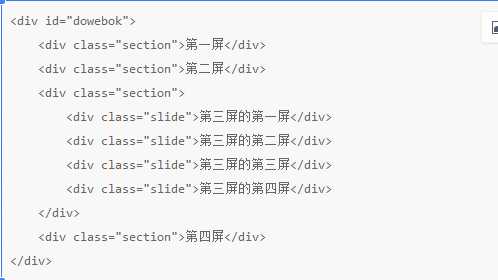

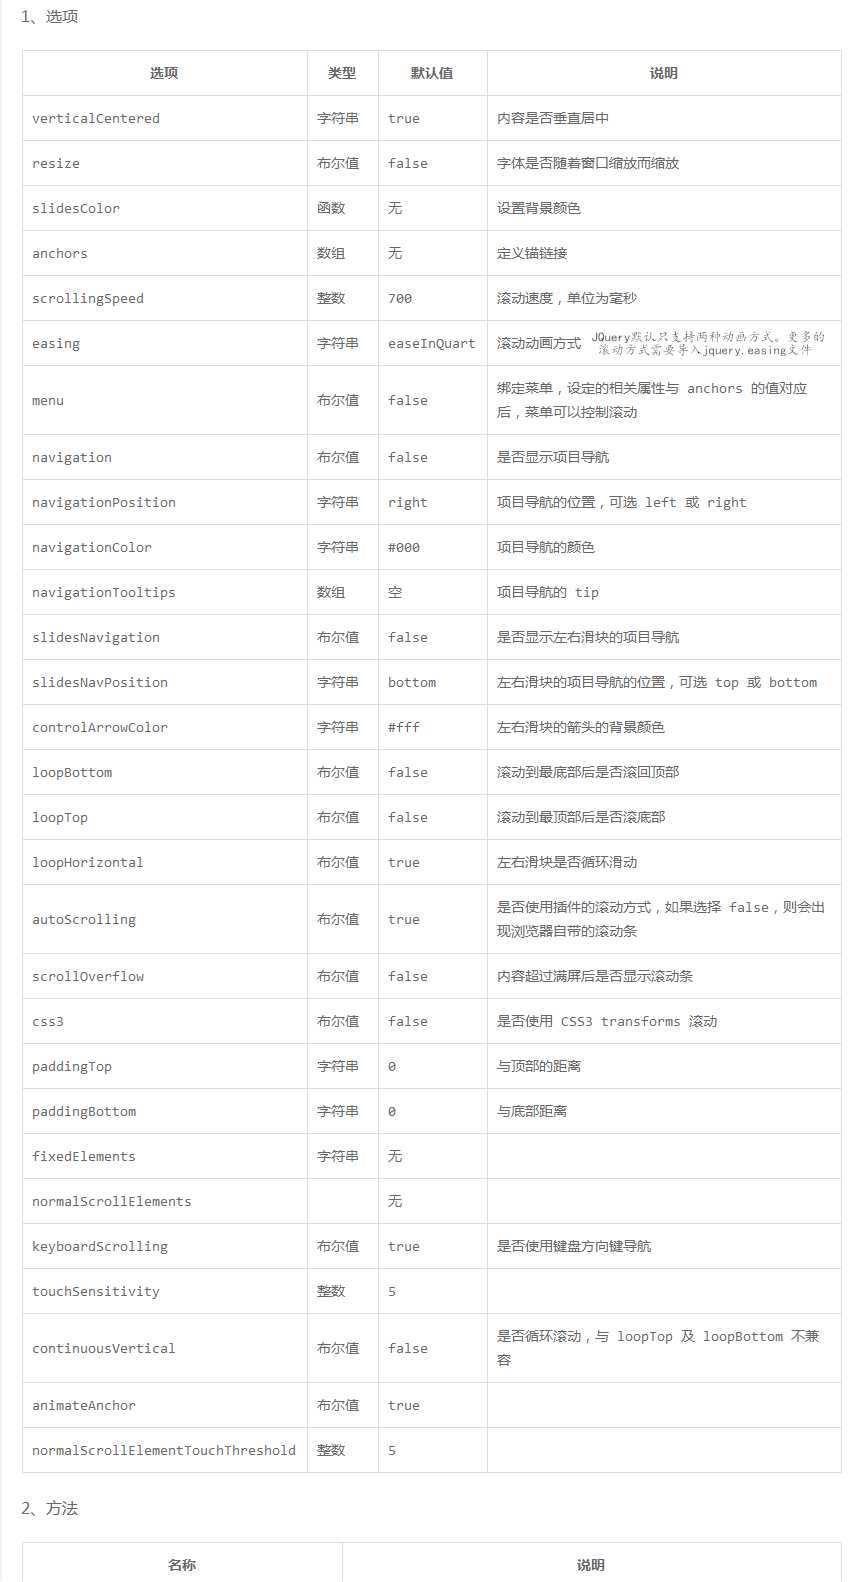
① afterLoad:当一个页面加载完成之后触发
传递参数:
anchorLink:当前页面的锚链接
index:当前页面的序号,从1开始。
afterLoad:function (anchorLink,index) {
console.log(anchorLink);
console.log(index);
},
//② onLeave:当页面离开时触发的函数:
/* 接收 index、nextIndex 和 direction 3个参数:
index 是离开的“页面”的序号,从1开始计算;
nextIndex 是滚动到的“页面”的序号,从1开始计算;
direction 判断往上滚动还是往下滚动,值是 up 或 down
*/
onLeave:function (index,nextIndex,direction) {
console.log(index);
console.log(nextIndex);
console.log(direction);
},
// afterRender 页面结构生成后的回调函数,或者说页面初始化完成后的回调函数,执行一次。
// 先执行afterRender 再执行afterLoad:
afterRender:function () {
console.log("页面初始化完成了!")
},

/* afterSlideLoad:当幻灯片加载完成时执行的函数,接收四个参数
* >>>anchorLink:幻灯片所在的section的锚点
* >>>index:幻灯片所在的section的序号
* >>>slideAnchor:幻灯片自身的锚点(如果没有显示slideIdex)
* >>>slideIdex:幻灯片自身的序号
*/

afterSlideLoad:function (anchorLink,index,slideIndex,direction) {
console.log(anchorLink);
console.log(index);
console.log(slideIndex);
console.log(direction);
}

onSlideLeave 左右移动幻灯片加载之前执行的回调函数,与 onLeave 类似,
// 接收 anchorLink、index、slideIndex、direction 4个参数
/* anchorLink:幻灯片所在的section的锚点
index:幻灯片所在的section的序号
slideIndex:当前幻灯片自身的index(从0开始)
direction:幻灯片移动的方向left和right
nextSlideIndex:即将显示的幻灯片的index
*/
onSlideLeave :function function_name () {

}
<script type="text/javascript" src="js/move.js"></script>
(move插件并不是JQ插件,是原生插件,无需链接jq文件。)
<script type="text/javascript">
document.getElementById(‘playButton‘).onclick = function() {
move(‘.box‘)

.set("margin-left","300px") //设置css样式
.set("margin-top","300px")

.add("margin-left", "200px")//add()方法用来增加其已经设置的属性值。该方法必须数值型值,以便用来增加。
//该方法必须有两个参数:属性值和其增量
.sub("margin-left", "200px") //sub()是add()的逆过程,他接受两个相同的参数,但其值将从属性值中减去。
.rotate(90)//该方法通过提供的数值作为参数来旋转元素。
//当方法被调用的时候通过附加到元素的 transform 属性上。

.skew(30, 40)//skew()用于调整一个相对于x和y轴的角度。
//该方法可以被分为skewX(deg)和skewY(deg)两个方法
.scale(3, 3) //该方法用于放大或压缩元素的大小,按照提供的每一个值,将调用transform的scale方法
// .then()//用于分割动画为两个集合,并按顺序执行。动画将被分为两步,通过then()方法实现分割
.x(300) //设置X轴位置
.y(300) //设置Y轴位置 和添加margin值效果一样。

.delay(1000) //延时多少毫秒之后执行动画
.duration(‘5s‘)//设置动画的播放时间。
.end(function() {
alert("Animation Over!");
}) //end()该方法用于Move.js代码片段的结束,他标识动画的结束。
//技术上,该方法触发动画的播放。该方法接受一个可选的callback回掉函数
};
</script>

3、
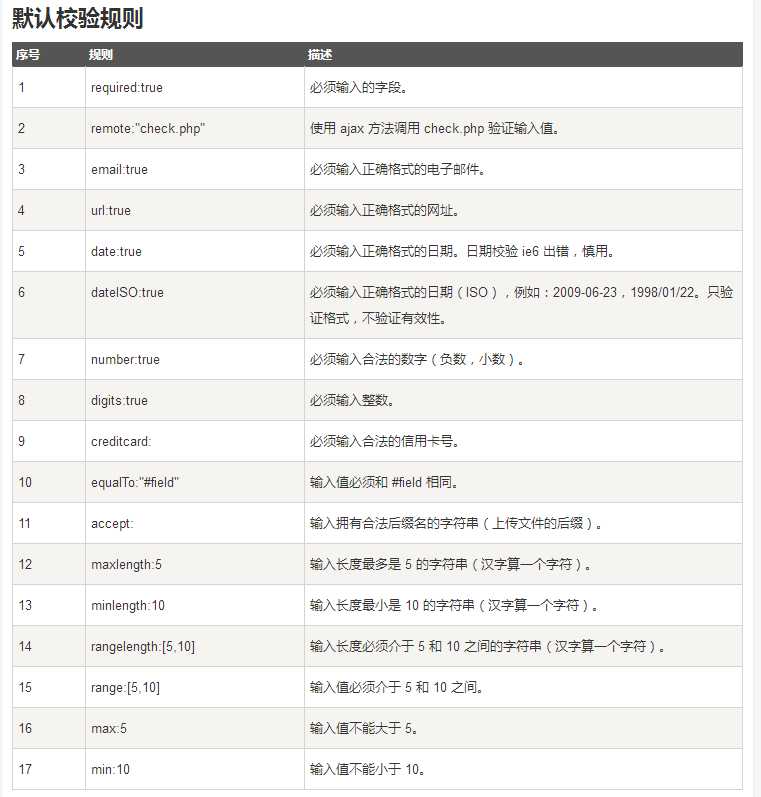
$(function () {
$("#commentForm").validate({
 //rules对象 用于声明各个input的验证规则;
rules:{
//选择每个input时需要先选中该input的name,并对应一个对象设置多条验证规则;
name:{
required:true,
minlength:2

},

email:{
required:true,
email:true
},
url:{

url:true,
}
},
 //messages对象 用于显示各个input验证不通过时的提示文字。
 //messages对应的各个规则都会有默认的提示,如果没有特殊需要,无需单独设置。
messages:{
name:{
required:"这个内容是必填项!",
minlength:"这里最少输入两个字符!"

},
email:{
required:"这个内容是必填项!",
email:"邮箱格式错误!"
},
url:{

url:"url格式错误!",
}
}
})
})
以上是关于干货篇步步为营,带你轻松掌握jQuery!的主要内容,如果未能解决你的问题,请参考以下文章