OMS开发:部署指南
Posted
tags:
篇首语:本文由小常识网(cha138.com)小编为大家整理,主要介绍了OMS开发:部署指南相关的知识,希望对你有一定的参考价值。
一、架构环境
1、系统架构
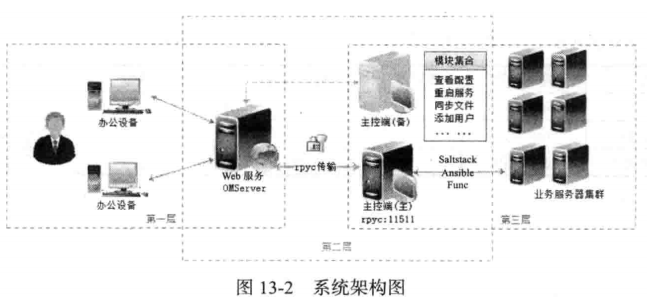
下图摘自《Python自动化运维 技术与最佳实践 刘天斯》
本项目OMS前台使用django+bootstrap+jquery搭建WEB服务,后台使用saltstack实现业务服务器集群的控制管理,两者间通过rpyc进行通讯。(正在计划参照saltstack官方WEBUI项目halite,在django中实现相同功能,调用saltapi,取消rpyc)
2、开发环境
(1)前台:笔记本,win7x64
Python、Pycharm、Django、mysql、MySQLdb、rpyc、bootstrap、jquery
Xshell 5(SSH远程工具)、Xftp 5(文件传输工具)
(2)后台:虚拟机,centos 6.5,10.188.1.40,saltmaster-40
Python、SaltStack(master+minion+api+ssh)、rpyc
(3)业务主机:虚拟机,centos 6.5,10.188.1.42,saltminion01-41.ewp.com、Salt-Minion
虚拟机,windows server 2008 r2 x64,saltminion02-42、Salt-Minion
3、生产环境
前台:centos 6.5,10.188.1.39,omswebserver-39
Python、Django、MySQL、MySQLdb、rpyc、nginx、uwsgi
后台和业务主机同上。
二、部署开发环境
参考上一编:OMS开发(二):技术选型
1、前台
Python:http://www.jetbrains.com/pycharm/
PyCharm:https://www.python.org/downloads/ (开发集成环境,可自选其他的)
Django:(CMD)pip install Django==1.8.7 (自带开发WEB服务器runserver)
MySQL:http://www.mysql.com/why-mysql/windows/
MySQLdb:https://sourceforge.net/projects/mysql-python/files/mysql-python/1.2.3/
rpyc:(CMD)pip install rpyc
bootstrap:http://v3.bootcss.com/getting-started/#download (项目源码中已有)
jquery:http://code.jquery.com/jquery-2.2.0.min.js (项目源码中已有)
2、后台
(1) Python
Centos 6.5 默认安装2.6.6版本,升级为2.7.11:
[[email protected] ~]# python -V
  Python 2.6.6
[[email protected] ~]# cd /usr/local/src
[[email protected] src]# wget https://www.python.org/ftp/python/2.7.11/Python-2.7.11.tgz
[[email protected] src]# tar -zxvf Python-2.7.11.tgz
[[email protected] src]# cd Python-2.7.11
[[email protected] Python-2.7.11]# ./configure --prefix=/usr/local/python27
[[email protected] Python-2.7.11]# make
[[email protected] Python-2.7.11]# make install
[[email protected] Python-2.7.11]# mv /usr/bin/python /usr/bin/python_old
[[email protected] Python-2.7.11]# ln -s /usr/local/python27/bin/python /usr/bin/
处理yum兼容问题,使用老版本bin文件
[[email protected] ~]# vi /usr/bin/yum
#!/usr/bin/python2.6
PIP包管理工具:
https://pip.pypa.io/en/latest/installing/#installing-with-get-pip-py
Python 2 >=2.7.9 or Python 3 >=3.4 已经默认安装PIP
(2) SaltStack
添加YUM源
[[email protected] ~]# rpm --import https://repo.saltstack.com/yum/redhat/6/x86_64/latest/SALTSTACK-GPG-KEY.pub
[[email protected] ~]# vi /etc/yum.repos.d/saltstack.repo
[saltstack-repo]
name=SaltStack repo for RHEL/CentOS $releasever
baseurl=https://repo.saltstack.com/yum/redhat/$releasever/$basearch/latest
enabled=1
gpgcheck=1
gpgkey=https://repo.saltstack.com/yum/redhat/$releasever/$basearch/latest/$releaseverSALTSTACK-GPG-KEY.pub
安装
[[email protected] ~]# yum install salt-master salt-minion salt-api salt-ssh
配置主控服务
[[email protected] ~]# vi /etc/salt/master
interface: 10.188.1.40
auto_accept: True
file_roots:
   base:
     - /srv/salt/
[[email protected] ~]# mkdir /srv/salt
配置被控服务
[[email protected] ~]# vi /etc/salt/minion
master: 10.188.1.40
nameid: saltmaster-40
启动服务
[[email protected] ~]# chkconfig salt-master on
[[email protected] ~]# service salt-master start
[[email protected] ~]# chkconfig salt-minion on
[[email protected] ~]# service salt-minion start
默认监听4505和4506两个端口
[[email protected] ~]# netstat -tnlp|grep 45
[[email protected] ~]# iptables -I INPUT -m multiport -p tcp --dports 4505,4506 -j ACCEPT
[[email protected] ~]# service iptables save
4505(publish_port)为saltstack的消息发布系统
4506(ret_port)为saltstack客户端与服务端通信的端口
(3) rpyc
[[email protected] ~]# yum install -y rpycserver
3、业务主机
(1) Windows系统
下载安装包:
Microsoft Visual C++ 2008 x64 SP1 (先安装上)
Salt-Minion-2015.8.3-AMD64-Setup.exe (CMD命令安装)
CMD静默安装:
cd /d D:\download
Salt-Minion-2015.8.3-AMD64-Setup.exe /S /master=10.188.1.40 /minion-name=saltminion-42 /start-service=0
修改配置文件:
C:\salt\conf\minion
    master: 10.188.1.40
    id: saltminion02-42
CMD启动服务:
net start salt-minion
(2) Linux系统
[[email protected] ~]# rpm --import https://repo.saltstack.com/yum/redhat/6/x86_64/latest/SALTSTACK-GPG-KEY.pub
[[email protected] ~]# vi /etc/yum.repos.d/saltstack.repo
[saltstack-repo]
name=SaltStack repo for RHEL/CentOS $releasever
baseurl=https://repo.saltstack.com/yum/redhat/$releasever/$basearch/latest
enabled=1
gpgcheck=1
gpgkey=https://repo.saltstack.com/yum/redhat/$releasever/$basearch/latest/$releaseverSALTSTACK-GPG-KEY.pub
[[email protected] ~]# yum install salt-minion
[[email protected] ~]# vi /etc/salt/minion
master: 10.188.1.40
nameid: saltminion01-41
[[email protected] ~]# chkconfig salt-minion on
[[email protected] ~]# service salt-minion start
三、部署生产环境
说明:生产环境还没有部署,这里是网上摘来的,有问题请反馈。
1、基础依赖包
[[email protected] ~]# yum install -y wget gcc zlib zlib-devel openssl openssl-devel
2、Python
参照上文
3、Django
[[email protected] ~]# pip install Django==1.8.7
4、MySQL
[[email protected] ~]# yum install -y mysql mysql-devel
[[email protected] ~]# service mysqld start
[[email protected] ~]# chkconfig mysqld on
[[email protected] ~]# mysql -u root
>set password for [email protected]=password(‘[email protected]‘);
>drop database test;
5、MySQLdb
[[email protected] ~]# yum install -y MySQL-python
6、rpyc
[[email protected] ~]# pip install rpyc
7、Nginx+uwsgi
安装pcre:
轻量级的正则表达式函数库,给nginx的rewrite模块使用
[[email protected] ~]# cd /usr/local/src
[[email protected] src]# wget ftp://ftp.csx.cam.ac.uk/pub/software/programming/pcre/pcre-8.34.tar.gz
[[email protected] src]# tar -zxvf pcre-8.34.tar.gz
[[email protected] src]# cd pcre-8.34
[[email protected] pcre-8.34]# ./configure
[[email protected] pcre-8.34]# make && make install && cd ..
安装nginx:
[[email protected] src]# wget http://nginx.org/download/nginx-1.5.9.tar.gz
[[email protected] src]# tar -zxvf nginx-1.5.9.tar.gz
[[email protected] src]# cd nginx-1.5.9
[[email protected] nginx-1.5.9]# ./configure --user=nobody --group=nobody --prefix=/usr/local/nginx --with-http_sutb_status_module --with-cc-opt=‘-O3‘ --with-cpu-opt=opteron
[[email protected] nginx-1.5.9]# make && make install && cd ..
安装uwsgi:
快速的、纯C语言开发的、自维护、对开发者友好的WSGI服务器,提供专业的PythonWeb应用发布和开发功能
[[email protected] src]# wget http://projects.unbit.it/downloads/uwsgi-2.0.4.tar.gz
[[email protected] src]# tar -zxvf uwsgi-2.0.4.tar.gz
[[email protected] src]# cd uwsgi-2.0.4
[[email protected] uwsgi-2.0.4]# make && cp uwsgi /usr/bin && cd ..
配置Nginx:
[[email protected] src]# vi /usr/local/nginx/conf/nginx.conf
server {
    listen 80;
    server_name oms.ewp.com;
    location / {
        uwsgi_pass 127.0.0.1:9000;
        include uwsgi_params;
        uwsgi_param UWSGI_CHDIR /data/www/OMS;
        uwsgi_param UWSGI_SCRIPT django_wsi;
        access_log off;
    }
    location ~* ^.+\.(mpg|avi|mp3|swf|zip|tgz|gz|rar|bz2|doc|xls|xe|ppt|txt|tar|mid|midi|wav|rtf|mpeg)$ {
        root /data/www/OMS/app/static;
        access_log off;
    }
}
配置uwsgi:
[[email protected] src]# vi /usr/local/nginx/conf/uwsgi.ini
[uwsgi]
socket = 0.0.0.0:9000
master = true
pidfile = /usr/local/nginx/uwsgi.pid
processes = 8
chdir = /data/www/OMS
pythonpath = /data/www
profiler = true
memory-report = true
enable-threads = true
logdate = true
limit-as = 6048
daemonize = /data/logs/django.log
启动:
[[email protected] src]# /usr/bin/uwsgi --ini /usr/local/nginx/conf/uwsgi.ini
[[email protected] src]# /usr/local/nginx/sbin/nginx
访问:
四、部署OMS项目
1、下载源码
https://github.com/ywzhou123/OMS
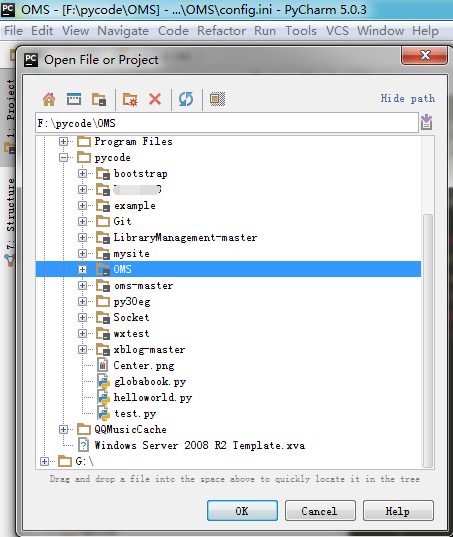
解压后将OMS目录放到你的项目目录,如F:\pycode\OMS
2、添加项目
3、导入数据库
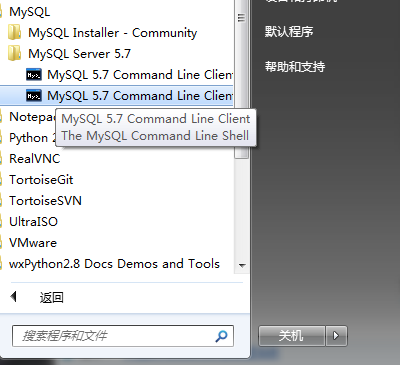
将OMS\SQL\oms.sql导入MySQL数据库,打开mysql命令行界面
mysql> create database oms character set utf8;
mysql> grant all on oms.* to ‘admin‘@‘localhost‘ identified by "[email protected]";
mysql> flush privileges;
mysql> use oms;
mysql> source f:\pycode\OMS\SQL\oms.sql;
mysql> quit
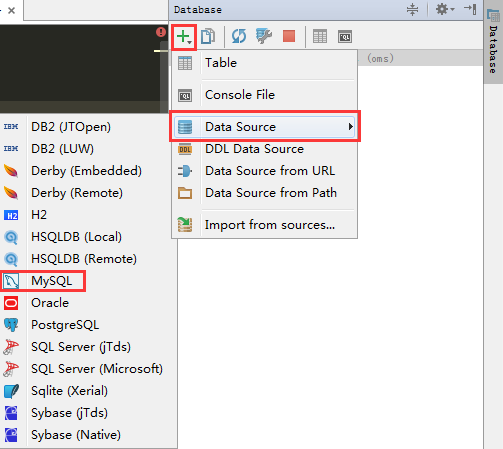
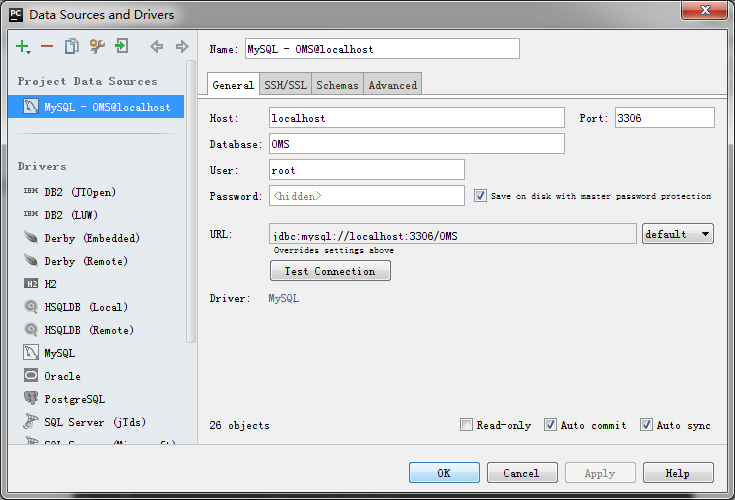
上面设置的数据库账号密码在PyCharm中连接数据源时填写:
修改项目配置文件OMS\OMS\config.ini中的数据库连接参数(其他参数暂时无用):
[db]
name = oms
host = localhost
port = 3306
user = admin
pass = [email protected]
注意:登陆http://127.0.0.1:8000/admin时默认账号为admin,密码为[email protected],这个不是数据库连接密码,只是设成了一样而已,存于OMS数据库的auth_user表中。
4、启动RPYC
前后台通过rpyc服务进行通讯,后台需要安装rpycserver服务进程。
使用Xftp 5工具将OMS\SaltstackServer\rpycserver.py上传到后台(saltmaster-40.ewp.com)的/home,如果放在其他目录,需要修改rpycserver.sh的第13行(cd /home)。
将rpycserver.sh上传到后台的/etc/init.d/rpycserver,注意这里最好将.sh后缀去掉。
[[email protected] ~]# chmod +x /home/rpycserver.py  /etc/init.d/rpycserver
[[email protected] ~]# chkconfig add rpycserver
[[email protected] ~]# chkconfig on rpycserver
[[email protected] ~]# service rpycserver start
[[email protected] ~]# iptables -I INPUT -p tcp --dports 11511 -j ACCEPT
[[email protected] ~]# service iptables save
测试RPYC,创建一个rpycclient.py脚本,用来测试rpyc传输命令及得到返回结果:
#!/usr/bin/python
#coding:utf-8
import rpyc
import json
def cmd_run(idc,hosts,cmd,args):
    try:
        conn=rpyc.connect(‘10.188.1.40‘,11511) #连接服务端
        conn.root.login(‘OMuser‘,‘KJS23o4ij09gHF734iuhsdfhkGYSihoiwhj38u4h‘) #登陆账号密码
    except Exception,e:
        return (‘connect rpyc server error:‘+str(e)) #返回错误
    d = {‘hosts‘:hosts,‘cmd‘:cmd,‘args‘:args}
    j = json.dumps(d)
    r=conn.root.cmd(j)
    if r == "{}":
        result = {‘ERROR‘:‘No minions matched the target. No command was sent, no jid was assigned.‘}
    else:
        result = json.loads(r,"gbk")
    return result
c=cmd_run(3,"saltminion01-41.ewp.com","test.ping","")
# c=cmd_run(3,u"saltminion01-41.ewp.com",u"service.get_all",u"")
# c=cmd_run(3,u"saltminion02-42",u"cmd.run",u"dir c:\\")
print type(c)
print c
说明:rpyc只能传输数字和字符串,不能传字典,因此这里做了JSON处理,这里要确保login()中的账号密码一致,项目中的rpyc会根据机房ID来连接同机房下的rpycserver,连接参数存于oms.app_salt_server表中。
本文出自 “月晴星飞” 博客,请务必保留此出处http://ywzhou.blog.51cto.com/2785388/1757490
以上是关于OMS开发:部署指南的主要内容,如果未能解决你的问题,请参考以下文章
