在uwp仿制WPF的Window
Posted
tags:
篇首语:本文由小常识网(cha138.com)小编为大家整理,主要介绍了在uwp仿制WPF的Window相关的知识,希望对你有一定的参考价值。
移植WPF软件到uwp时碰到用作对话框的Window有多种处理选择。我个人认为最省事的是用ContentDialog模拟Window。

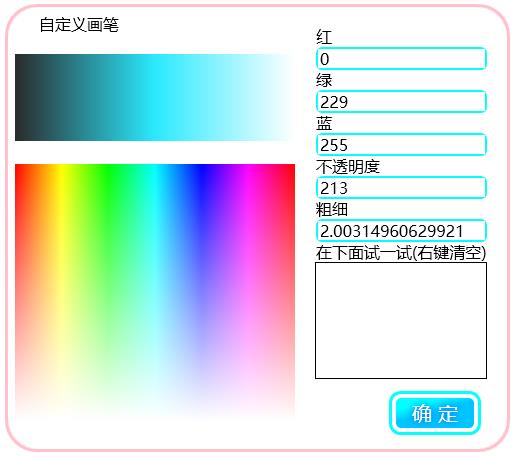
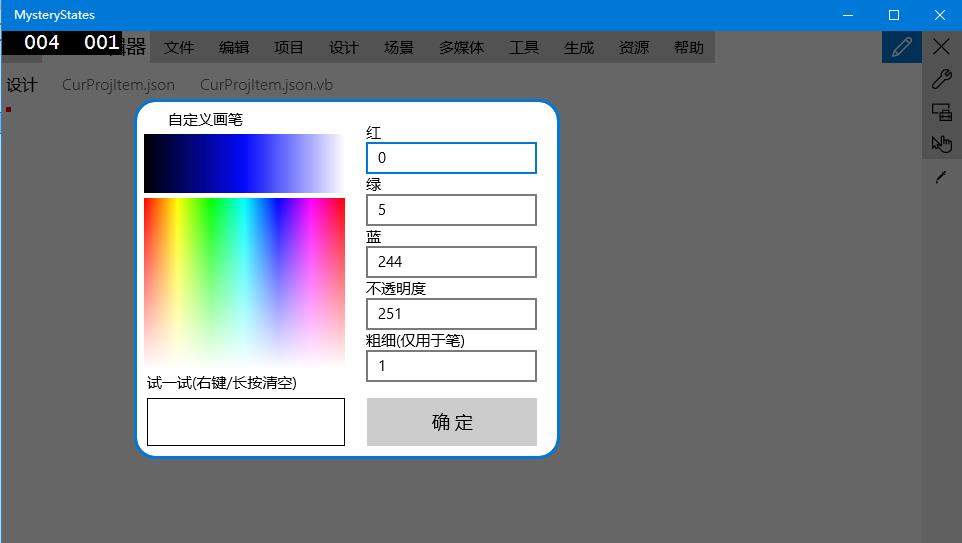
比如你想把上面这个WPF窗体弄到uwp里面去
1.修改ContentDialog的默认样式
新建一个模板化控件RoundCornerContentDialog
让它继承ContentDialog。
然后去Windows SDK里面翻默认样式(因为vs2015 update 1无法自动提取ContentDialog的默认样式到Xaml)。
我的电脑上默认样式在这个文件夹
C:\Program Files (x86)\Windows Kits\10\DesignTime\CommonConfiguration\Neutral\UAP\10.0.10586.0\Generic
找到之后打开刚才新建这个控件时的Themes\Generic.xaml
把ContentDialog的默认样式换进去。
由于要移植的对话框是圆角的,而且没有在底部放置额外的按钮,ContentDialog的样式需要修改。我把它改成了这样:
XAML
<Style TargetType="local:RoundCornerContentDialog" >
        <Setter Property="Foreground" Value="{ThemeResource SystemControlPageTextBaseHighBrush}" />
        <Setter Property="Background" Value="{ThemeResource SystemControlBackgroundChromeMediumLowBrush}" />
        <Setter Property="HorizontalAlignment" Value="Center" />
        <Setter Property="VerticalAlignment" Value="Top" />
        <Setter Property="BorderThickness" Value="3" />
        <Setter Property="IsTabStop" Value="False" />
        <Setter Property="BorderBrush" Value="{ThemeResource SystemControlForegroundAccentBrush}"/>
        <Setter Property="MaxHeight" Value="{ThemeResource ContentDialogMaxHeight}" />
        <Setter Property="MinHeight" Value="{ThemeResource ContentDialogMinHeight}" />
        <Setter Property="MaxWidth" Value="{ThemeResource ContentDialogMaxWidth}" />
        <Setter Property="MinWidth" Value="{ThemeResource ContentDialogMinWidth}" />
        <Setter Property="Template">
            <Setter.Value>
                <ControlTemplate TargetType="local:RoundCornerContentDialog">
                    <Border x:Name="Container">
                        <Grid x:Name="LayoutRoot">
                            <Grid.RowDefinitions>
                                <RowDefinition Height="Auto" />
                            </Grid.RowDefinitions>
                            <Grid.ColumnDefinitions>
                                <ColumnDefinition Width="Auto" />
                            </Grid.ColumnDefinitions>
                            <Border x:Name="BackgroundElement"
                                FlowDirection="{TemplateBinding FlowDirection}"
                                MaxWidth="{TemplateBinding MaxWidth}"
                                MaxHeight="{TemplateBinding MaxHeight}"
                                MinWidth="{TemplateBinding MinWidth}"
                                MinHeight="{TemplateBinding MinHeight}" >
                                <Grid x:Name="DialogSpace" VerticalAlignment="Stretch">
                                    <Grid.RowDefinitions>
                                        <RowDefinition Height="Auto" />
                                        <RowDefinition Height="*" />
                                        <RowDefinition Height="Auto" />
                                    </Grid.RowDefinitions>
                                    <ScrollViewer x:Name="ContentScrollViewer"
                                        HorizontalScrollBarVisibility="Disabled"
                                        VerticalScrollBarVisibility="Disabled"
                                        ZoomMode="Disabled"
                                        IsTabStop="False">
                                        <Grid>
                                            <Grid.RowDefinitions>
                                                <RowDefinition Height="Auto" />
                                                <RowDefinition Height="Auto" />
                                            </Grid.RowDefinitions>
                                            <ContentControl x:Name="Title"
                                                Margin="{ThemeResource ContentDialogTitleMargin}"
                                                Content="{TemplateBinding Title}"
                                                ContentTemplate="{TemplateBinding TitleTemplate}"
                                                FontSize="20"
                                                FontFamily="XamlAutoFontFamily"
                                                FontWeight="Normal"
                                                Foreground="{TemplateBinding Foreground}"
                                                HorizontalAlignment="Left"
                                                VerticalAlignment="Top"
                                                IsTabStop="False"
                                                MaxHeight="{ThemeResource ContentDialogTitleMaxHeight}" >
                                                <ContentControl.Template>
                                                    <ControlTemplate TargetType="ContentControl">
                                                        <ContentPresenter
                                                            Content="{TemplateBinding Content}"
                                                            MaxLines="2"
                                                            TextWrapping="Wrap"
                                                            ContentTemplate="{TemplateBinding ContentTemplate}"
                                                            Margin="{TemplateBinding Padding}"
                                                            ContentTransitions="{TemplateBinding ContentTransitions}"
                                                            HorizontalAlignment="{TemplateBinding HorizontalContentAlignment}"
                                                            VerticalAlignment="{TemplateBinding VerticalContentAlignment}" />
                                                    </ControlTemplate>
                                                </ContentControl.Template>
                                            </ContentControl>
                                            <ContentPresenter x:Name="Content"
                                                Background="{TemplateBinding Background}"
                                                BorderThickness="{TemplateBinding BorderThickness}"
                                                BorderBrush="{ThemeResource ContentDialogBorderThemeBrush}"
                                                CornerRadius="20"
                                                ContentTemplate="{TemplateBinding ContentTemplate}"
                                                Content="{TemplateBinding Content}" VerticalContentAlignment="Stretch"
                                                FontSize="{ThemeResource ControlContentThemeFontSize}"
                                                FontFamily="{ThemeResource ContentControlThemeFontFamily}"
                                                Foreground="{TemplateBinding Foreground}"
                                                Grid.Row="1"
                                                TextWrapping="Wrap" />
                                        </Grid>
                                    </ScrollViewer>
                                    <Grid x:Name="CommandSpace" Visibility="Collapsed" Grid.Row="1" HorizontalAlignment="Stretch" VerticalAlignment="Bottom">
                                        <Grid.ColumnDefinitions>
                                            <ColumnDefinition/>
                                            <ColumnDefinition/>
                                        </Grid.ColumnDefinitions>
                                        <Border x:Name="Button1Host"
                                            Margin="{ThemeResource ContentDialogButton1HostMargin}"
                                            MinWidth="{ThemeResource ContentDialogButtonMinWidth}"
                                            MaxWidth="{ThemeResource ContentDialogButtonMaxWidth}"
                                            Height="{ThemeResource ContentDialogButtonHeight}"
                                            HorizontalAlignment="Stretch" />
                                        <Border x:Name="Button2Host"
                                            Margin="{ThemeResource ContentDialogButton2HostMargin}"
                                            MinWidth="{ThemeResource ContentDialogButtonMinWidth}"
                                            MaxWidth="{ThemeResource ContentDialogButtonMaxWidth}"
                                            Height="{ThemeResource ContentDialogButtonHeight}"
                                            Grid.Column="1"
                                            HorizontalAlignment="Stretch" />
                                    </Grid>
                                </Grid>
                            </Border>
                        </Grid>
                    </Border>
                </ControlTemplate>
            </Setter.Value>
        </Setter>
    </Style>
2.添加DragMove方法
需要移植的那个WPF窗口是可以在空白处进行拖动的。
通过输入指针的事件收集信息,对ContentDialog的Margin属性进行更改达到模拟拖动的效果。
子类调用DragMove方法启用拖动。
下面是VB代码示例。需要其它语言示例的话可以用SharpDevelop转换。
VB
    Protected Sub DragMove(ptr As Pointer)
        Pressed = True
        CapturePointer(ptr)
    End Sub

    Dim Pressed As Boolean
    Dim pos As Point
    Private Sub RoundCornerContentDialog_PointerMoved(sender As Object, e As PointerRoutedEventArgs) Handles Me.PointerMoved
        If Pressed Then
            Dim pt = e.GetCurrentPoint(Me).Position
            Dim marg = Margin
            Dim ofsx = pt.X - pos.X
            Dim ofsy = pt.Y - pos.Y
            marg.Left += ofsx
            marg.Right -= ofsx
            marg.Top += ofsy
            marg.Bottom -= ofsy
            Margin = marg
        End If
    End Sub

    Private Sub RoundCornerContentDialog_PointerReleased(sender As Object, e As PointerRoutedEventArgs) Handles Me.PointerReleased
        Pressed = False
        ReleasePointerCapture(e.Pointer)
    End Sub

    Private Sub RoundCornerContentDialog_PointerPressed(sender As Object, e As PointerRoutedEventArgs) Handles Me.PointerPressed
        pos = e.GetCurrentPoint(Me).Position
    End Sub
3.把对话框内容加进去
新建一个ContentDialog,并把Xaml根节点的名称改为刚才建立的local:RoundCornerContentDialog,还要在相应的类里面把基类也改成RoundCornerContentDialog。
注意,加入内容时要考虑照顾小屏幕设备和低性能设备。
我把布局改了一下,按钮的视觉效果也去除了。

4.在合适的位置调用DragMove
在你认为表示非客户区中可拖动部分的控件的PointerPressed调用DragMove
VB
Private Sub RectDrag_PointerPressed(sender As Object, e As PointerRoutedEventArgs) Handles RectDrag.PointerPressed
    DragMove(e.Pointer)
End Sub
5.其它功能的模拟
有些对话框需要拖动改变大小之类复杂的功能。这个可以仿照WPF的自定义处理非客户区碰撞检测消息进行编写。
以后我遇到需要实现这个功能的时候会补上这里的代码。
以上是关于在uwp仿制WPF的Window的主要内容,如果未能解决你的问题,请参考以下文章