nfs网络共享服务基础
Posted
tags:
篇首语:本文由小常识网(cha138.com)小编为大家整理,主要介绍了nfs网络共享服务基础相关的知识,希望对你有一定的参考价值。
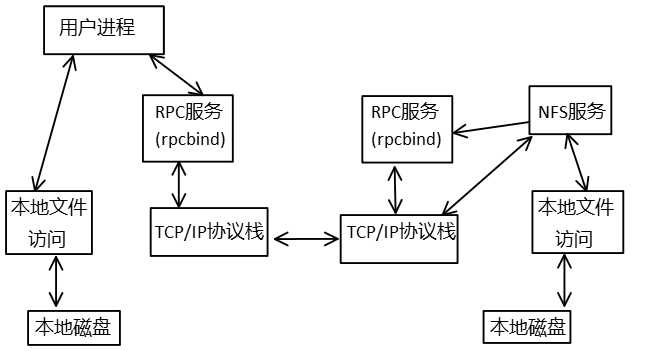
nfs原理

1.开启RPC服务
2.NFS向RPC服务注册启动的端口
3.用户向RPC询问NFS服务的端口
4.RPC返回端口给客户端
5.客户端通过获得的端口与NFS服务器进行数据传输
实验步骤
一、准备
1.检查系统版本信息
2.检查是否安装nfs和rpc服务
3.安装服务
二、配置
1.启动rpc服务和nfs服务
2.查看nfs是否有向rpc注册端口
3.设置开机自启动
4.编辑nfs配置文件,并重启服务
5.在客户端进行挂载
三、测试
1.测试客户端与服务端的连通性
2.在分享目录内创建文件并在客户机上测试
详细配置:
注意:关闭selinux和iptables
服务端:
检查系统版本
[[email protected] ~]# cat /etc/redhat-release
CentOS release 6.8 (Final)
[[email protected] ~]# uname -r
2.6.32-642.el6.x86_64
[[email protected] ~]# uname -m
x86_64
检查是否安装服务
[[email protected] ~]# rpm -aq nfs-utils rpcbind
安装服务
#这里可以有两种方法,一种是正常yum安装,另一种是yum组安装
#分别在服务端和客户端使用这两种方法
[[email protected] ~]# yum install nfs-utils rpcbind -y
启动rpc服务
#必须先开启rpc服务,在开启nfs服务,否则nfs服务会启动不了,并且可能会发生错误

[[email protected] ~]# /etc/init.d/rpcbind restart
Stopping rpcbind:                                          [  OK  ]
Starting rpcbind:                                          [  OK  ]
[[email protected] ~]# ps -ef |grep rpc
rpcuser   1258     1  0 18:36 ?        00:00:00 rpc.statd
rpc       1630     1  0 18:53 ?        00:00:00 rpcbind
root      1634  1546  0 18:54 pts/0    00:00:00 grep --color=auto rpc

#检查nfs是否有向rpc注册端口
[[email protected] ~]# rpcinfo -p localhost
   program vers proto   port  service
    100000    4   tcp    111  portmapper
    100000    3   tcp    111  portmapper
    100000    2   tcp    111  portmapper
    100000    4   udp    111  portmapper
    100000    3   udp    111  portmapper
    100000    2   udp    111  portmapper
#此处结果显示表示rpc自己使用的端口

[[email protected] ~]# rpcinfo -p localhost
rpcinfo: can‘t contact portmapper: RPC: Remote system error - Connection refused
#此处即为rpc没有开启而产生的报错
开启nfs服务
[[email protected] ~]# /etc/init.d/nfs start
Starting NFS services:                                     [  OK  ]
Starting NFS mountd:                                       [  OK  ]
Starting NFS daemon:                                       [  OK  ]
Starting RPC idmapd:                                       [  OK  ]
[[email protected] ~]# rpcinfo -p localhost
   program vers proto   port  service
    100000    4   tcp    111  portmapper
    100000    3   tcp    111  portmapper
    100000    2   tcp    111  portmapper
    100000    4   udp    111  portmapper
    100000    3   udp    111  portmapper
    100000    2   udp    111  portmapper
    100005    1   udp  44683  mountd
    100005    1   tcp  53742  mountd
    100005    2   udp  45815  mountd
    100005    2   tcp  37259  mountd
    100005    3   udp  43988  mountd
    100005    3   tcp  48220  mountd
    100003    2   tcp   2049  nfs
    100003    3   tcp   2049  nfs
    100003    4   tcp   2049  nfs
    100227    2   tcp   2049  nfs_acl
    100227    3   tcp   2049  nfs_acl
    100003    2   udp   2049  nfs
    100003    3   udp   2049  nfs
    100003    4   udp   2049  nfs
    100227    2   udp   2049  nfs_acl
    100227    3   udp   2049  nfs_acl
    100021    1   udp  43032  nlockmgr
    100021    3   udp  43032  nlockmgr
    100021    4   udp  43032  nlockmgr
    100021    1   tcp  52980  nlockmgr
    100021    3   tcp  52980  nlockmgr
    100021    4   tcp  52980  nlockmgr
#这种输出才是nfs向rpc注册端口后的结果,由于nfs提供多种服务,所以会申请多个端口
#还可以在/etc/sysconfig/nfs中设定监听端口,便于iptbales的书写
echo"LOCKD_TCPPORT=32803" >>/etc/sysconfig/nfs
将rpc和nfs设置为开机自启动
[[email protected] ~]# chkconfig nfs on
[[email protected] ~]# chkconfig rpcbind on
[[email protected] ~]# chkconfig --list nfs
nfs             0:off   1:off   2:on    3:on    4:on    5:on    6:off
[[email protected] ~]# chkconfig --list rpcbind
rpcbind         0:off   1:off   2:on    3:on    4:on    5:on    6:off
#其实查看/etc/init.d/nfs | rpcbind即可得知,rpc于nfs先启动,后关闭
配置nfs服务并重启
[[email protected] ~]# mkdir /data
[[email protected] data]# chown -R nfsnobody.nfsnobody /data/
#如果没有修改共享目录的属主,则可能会出现如下报错
#touch: cannot touch `hehe‘: Permission denied
#实际上nfs在开启服务后会自动创建nfsnobody这个用户,可在/var/lib/nfs/etab 查看默认设置

[[email protected] ~]# cat /etc/exports
##share my miss for glx at 2017/09/13
/data 192.168.1.0/24(rw,sync)
[[email protected] ~]# /etc/init.d/nfs reload
#ps:reload平滑重启不会影响正在访问客户

#重启后检查
[[email protected] ~]# showmount -e localhost
Export list for localhost:
/data 192.168.1.0/24
#ps:如果出现clnt_create: RPC: Program not registered错误,则是rpc和nfs的启动顺序出错,将两者都停止并按fpc,nfs顺序重新启动即可
客户端:
安装服务
[[email protected] ~]# yum groupinstall "NFS file server" -y
#其实这个安装包组中包含了nfs及rpc,实际上客户端只需要rpc即可
启动rpc服务,并设置成开机自启动
[[email protected] ~]# /etc/init.d/rpcbind start
Starting rpcbind:                                          [  OK  ]
[[email protected] ~]# chkconfig rpcbind on
[[email protected] ~]# chkconfig --list rpcbind
rpcbind         0:off   1:off   2:on    3:on    4:on    5:on    6:off
测试与服务端的连通性
[[email protected] ~]# ping 192.168.1.111
[[email protected] ~]# telnet 192.168.1.111 111
挂载共享目录到本地
[[email protected] ~]# mount -t nfs 192.168.1.111:/data /mnt
[[email protected] ~]# df -h
Filesystem           Size  Used Avail Use% Mounted on
/dev/sda2            7.1G  907M  5.9G  14% /
tmpfs                495M     0  495M   0% /dev/shm
/dev/sda1            190M   30M  150M  17% /boot
/dev/sr0             3.7G  3.7G     0 100% /media/cd
192.168.1.111:/data   12G  2.0G  8.9G  19% /mnt

#这样挂载重启就会失效,所以如果对安全没特别要求可写入/etc/fstab中
#或者echo "mount -t nfs 192.168.1.111:/data /mnt" >> /etc/rc.local
以上是关于nfs网络共享服务基础的主要内容,如果未能解决你的问题,请参考以下文章