servlet实现文件上传,预览,下载和删除
Posted Marydon
tags:
篇首语:本文由小常识网(cha138.com)小编为大家整理,主要介绍了servlet实现文件上传,预览,下载和删除相关的知识,希望对你有一定的参考价值。
一、准备工作
1.1 文件上传插件:uploadify;
1.2 文件上传所需jar包:commons-fileupload-1.3.1.jar和commons-io-2.2.jar
1.3 将数据转成JSON对象需要jar包:commons-beanutils-1.8.3.jar、commons-collections-3.2.1.jar、commons-lang-2.6.jar、commons-logging-1.1.3.jar、ezmorph-1.0.6.jar和json-lib-2.4-jdk15.jar

1.4 开发工具:我用的是Eclipse,随意
1.5 目录结构
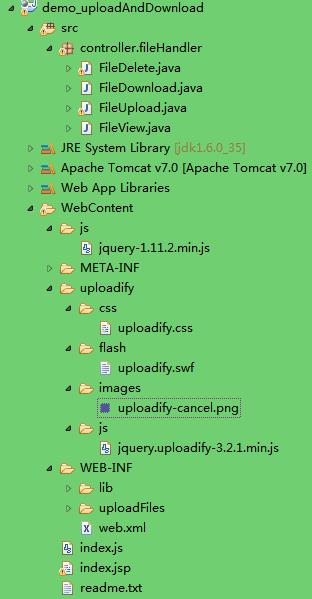
需要注意的是:变更uploadify.css文件中的取消文件上传图片的路径
.uploadify-queue-item .cancel a {
    background: url(\'../images/uploadify-cancel.png\') 0 0 no-repeat;
    float: right;
    height:    16px;
    text-indent: -9999px;
    width: 16px;
}
二、代码展示
2.1 客户端代码设计
JSP部分


 1 <%@ page language="java" import="java.util.*" pageEncoding="UTF-8"%>
 2 <!DOCTYPE html PUBLIC "-//W3C//DTD HTML 4.01 Transitional//EN">
 3 <html>
 4     <head>
 5         <title>演示-操作文件</title>
 6         <%@taglib uri="http://java.sun.com/jsp/jstl/core" prefix="c" %>
 7         <script type="text/javascript" src="<c:url value="/js/jquery-1.11.2.min.js"/>"></script>
 8         <script type="text/javascript" src="<c:url value="/uploadify/js/jquery.uploadify-3.2.1.min.js"/>"></script>
 9         <link href="<c:url value="/uploadify/css/uploadify.css"/>" type="text/css" rel="stylesheet"/>
10         <script type="text/javascript">var baseUrl = \'<%=request.getContextPath()%>\';</script>
11         <script type="text/javascript" src="<c:url value="/index.js"/>"></script>
12         <style type="text/css">
13             /* 上传、取消上传按钮style start */
14             .Button {
15                 width: 80px;
16                 margin: 3px 1px 0 5px;
17                 padding: 0 10px;
18                 background-color: #16a0d3;
19                 border: none;
20                 display: inline-block;
21                 font-family: "Microsoft Yahei";
22                 font-size: 14px;
23                 cursor: pointer;
24                 height: 30px;
25                 line-height: 30px;
26                 color: #FFF;
27                 border-radius: 5px;
28                 text-decoration:none;
29                 text-align:center;
30             }
31
32             .ButtonOver {
33                 width: 80px;
34                 margin: 3px 1px 0 5px;
35                 padding: 0 10px;
36                 background-color: #117ea6;
37                 border: none;
38                 display: inline-block;
39                 font-family: "Microsoft Yahei";
40                 font-size: 14px;
41                 cursor: pointer;
42                 height: 30px;
43                 line-height: 30px;
44                 color: #FFF;
45                 border-radius: 5px;
46                 text-decoration:none;
47                 text-align:center;
48             }
49             /* end 上传、取消上传按钮style */
50         </style>
51     </head>
52     <body>
53         <!-- 文件上传 -->
54         <div id="file_upload"></div>
55         <div id="ctrlUpload" style="display:none;">
56             <a href="javascript:;" onclick="$(\'#file_upload\').uploadify(\'upload\', \'*\');" class="Button"
57                 onmouseover="javascript:this.className=\'ButtonOver\'" onmouseout="javascript:this.className=\'Button\'">
58                         上传所有
59             </a>
60             <a href="javascript:;" onclick="$(\'#file_upload\').uploadify(\'cancel\', \'*\');$(\'#ctrlUpload\').hide();" class="Button"
61                 onmouseover="javascript:this.className=\'ButtonOver\'" onmouseout="javascript:this.className=\'Button\'">
62                         取消上传
63             </a>
64         </div>
65         <table border=1 style="border-collapse: collapse;" id="tableFiles">
66             <thead>
67                 <th>序号</th>
68                 <th>文件名</th>
69                 <th>文件预览</th>
70                 <th>文件下载</th>
71                 <th>文件删除</th>
72             </thead>
73             <tbody></tbody>
74         </table>
75     </body>
76 </html>
js文件
 1 var operateFile = new OperateFile();
 2 window.onload = function() {
 3     operateFile.init();
 4
 5 }
 6
 7 /**
 8  * 对文件进行操作
 9  * @returns
10  */
11 function OperateFile() {
12     var object = this;
13
14     /**
15      * 初始化操作:
16      */
17     this.init = function() {
18         // 队列中的文件数
19         var selectedCount = 0;
20         $(\'#file_upload\').uploadify({
21             \'method\' : \'get\',// 默认值post,设置成get是为了向后台传递自定义的参数
22             \'auto\' : false,// 设置为true当选择文件后就直接上传了,为false需要点击上传按钮才上传。默认值为TRUE
23             \'buttonText\' : \'添加文件\',// 按钮文本
24             \'fileTypeExts\' : \'*.gif; *.jpg; *.png;*.pdf;*.zip;\',// 限制上传文件类型,默认值没有限制(*.*)
25             \'fileTypeDesc\' : \'请选择gif jpg png pdf zip类型的文件\',// 这个属性值必须设置fileTypeExts属性后才有效,用来设置选择文件对话框中的提示文本,默认值:All Files
26             \'swf\' : baseUrl + \'/uploadify/flash/uploadify.swf\', // flash文件路径(帮助我们与后端交互数据)
27             \'uploader\' : baseUrl + \'/uploadFile.do\' , // 处理文件上传请求地址
28             \'formData\' : {\'param1\':\'测试文件上传\'},// 请求参数:上传每个文件的同时提交到服务器的额外数据
29             \'onDialogClose\' : function(queueData) {
30                 // 获取该队列中有多少个要上传的文件
31                 var queueSize = $(\'#file_upload-queue\').children(\'div\').length;
32                 if (queueSize > 0) {
33                     $(\'#ctrlUpload\').show();
34                 }
35             },
36             \'onUploadSuccess\' : function(file, data, response) {// 上传成功
37                 // 将josn字符串转换成JSON对象
38                 data = eval(\'(\' + data + \')\');
39                 // 获取页面上文件展示table 有多少行
40                 var rowsLength = $(\'#tableFiles\')[0].rows.length;
41                 // 设置查看文件所需参数
42                 var param = "fileName=" + data.fileName;
43                 // 查看文件请求地址
44                 var viewUrl = baseUrl + \'/viewFile.do?\' + param;
45                 // 下载文件请求地址
46                 var downloadUrl = baseUrl + \'/downloadFile.do?\' + param;
47
48                 // 拼接一行tr
49                 var trTemplate = \'<tr>\'
50                                 +    \'<td>\'
51                                 +        rowsLength
52                                 +    \'</td>\'
53                                 +   \'<td>\'
54                                 +        file.name // 仍展示原文件名
55                                 +    \'</td>\'
56                                 +   \'<td>\'
57                                 +        \'<a href="\' + viewUrl + \'" target="_blank">点击预览</a>\'
58                                 +        \'<input type="hidden" name="imgAddress" value="\' + data.fileName + \'"/>\'
59                                 +    \'</td>\'
60                                 +   \'<td>\'
61                                 +        \'<a href="\' + downloadUrl + \'">点击下载</a>\'
62                                 +    \'</td>\'
63                                 +   \'<td>\'
64                                 +        \'<a href="javascript:;" onclick="operateFile.deleteFile(\\\'\' + data.fileName + \'\\\',\' + rowsLength +\');">点击删除</a>\'
65                                 +    \'</td>\'
66                                 +\'</tr>\';
67                 $(\'#tableFiles\').append(trTemplate);
68             },
69             \'onUploadError\' : function(file, errorCode, errorMsg, errorString) {// 上传失败
70
71             }
72         });
73
74     }
75
76     /**
77      * 删除文件
78      * @param 文件名
79      */
80     this.deleteFile = function(fileName,rowIndex) {
81         // 设置删除文件所需参数
82         var param = "fileName=" + fileName;
83         // 删除文件请求地址
84         var deleteUrl = baseUrl + \'/deleteFile.do?\' + param;
85         $.get(
86             deleteUrl,
87             function(msg) {
88                 alert(msg);
89                 if ("删除失败!" != msg) {
90                     // 删除该行记录
91                     $(\'#tableFiles\')[0].deleteRow(rowIndex);
92                 }
93             }
94         );
95
96     }
97
98 }
2.2 服务器端代码设计
文件上传代码(FileUpload.java文件)
1 package controller.fileHandler; 2 3 import java.io.File; 4 import java.io.IOException; 5 import java.io.PrintWriter; 6 import java.util.HashMap; 7 import java.util.Iterator; 8 import java.util.List; 9 import java.util.Map; 10 import javax.servlet.ServletContext; 11 import javax.servlet.ServletException; 12 import javax.servlet.http.HttpServlet; 13 import javax.servlet.http.HttpServletRequest; 14 import javax.servlet.http.HttpServletResponse; 15 import org.apache.commons.fileupload.FileItem; 16 import org.apache.commons.fileupload.FileUploadException; 17 import org.apache.commons.fileupload.disk.DiskFileItemFactory; 18 import org.apache.commons.fileupload.servlet.ServletFileUpload; 19 import net.sf.json.JSONObject; 20 21 public class FileUpload extends HttpServlet { 22 private static final long serialVersionUID = 1L; 23 24 protected void doGet(HttpServletRequest request, HttpServletResponse response) 25 throws ServletException, IOException { 26 this.doPost(request, response); 27 } 28 29 /** 30 * 处理文件上传的post 31 * @precaution 下方的类名出自包import org.apache.commons.fileupload.* 32 */ 33 protected void doPost(HttpServletRequest request, HttpServletResponse response) 34 throws ServletException, IOException { 35 // 1.设置参数编码 36 request.setCharacterEncoding("UTF-8"); 37 // 设置响应数据字符集 38 response.setCharacterEncoding("UTF-8"); 39 // 设置响应数据格式 40 // response.setContentType("application/json; charset=UTF-8"); 41 PrintWriter out = response.getWriter(); 42 // 2.创建文件上传处理工厂 43 DiskFileItemFactory factory = new DiskFileItemFactory(); 44 // 3.设置临时文件存放地点 45 // 3.1获取当前web应用程序对象(WEB容器在启动时,它会为每个WEB应用程序都创建一个对应的ServletContext对象,它代表当前web应用) 46 ServletContext servletContext = this.getServletConfig().getServletContext(); 47 // 3.2获取服务器的临时目录(tomcat、WebLogic) 48 // D:\\ProgramFiles(x86)\\APACHE\\TOMCAT\\apache-tomcat-7.0.40-x86\\work\\Catalina\\localhost\\demo 49 File repository = (File) servletContext.getAttribute("javax.servlet.context.tempdir");