对vue生命周期/钩子函数的理解
Posted superDragon
tags:
篇首语:本文由小常识网(cha138.com)小编为大家整理,主要介绍了对vue生命周期/钩子函数的理解相关的知识,希望对你有一定的参考价值。
对于实现页面逻辑交互等效果,我们必须知晓vue的生命周期,才能愉快的玩耍,知道我们写的东西应该挂载到哪里,vue官方给出的api讲解的那叫一个简单啊,如下:
所有的生命周期钩子自动绑定this上下文到实例中,因此你可以访问数据,对属性和方法进行运算。这意味着你不能使用箭头函数来定义一个生命周期方法(例如created: () => this.fetchTodos())。这是因为箭头函数绑定了父上下文,因此this与你期待的 Vue 实例不同,this.fetchTodos的行为未定义。
下面附加一张生命周期图示


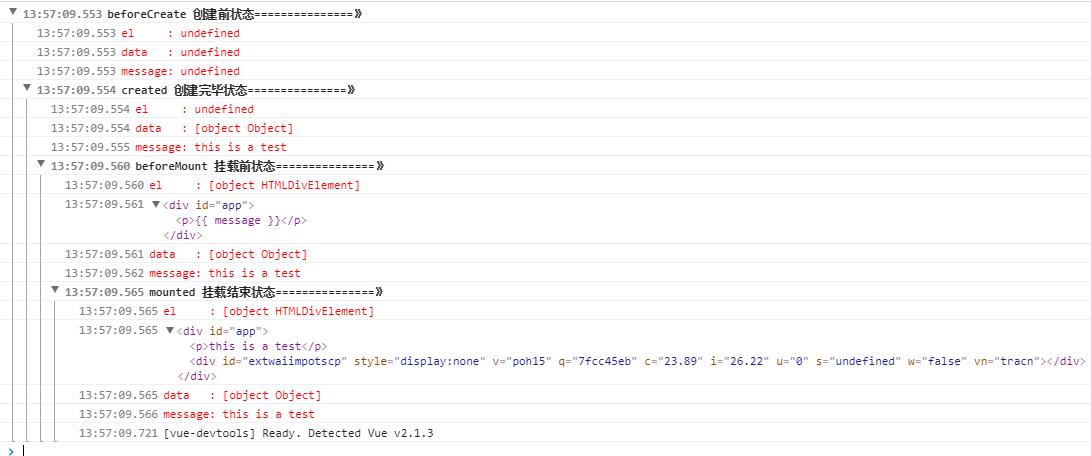
 1 <!DOCTYPE html>
 2 <html>
 3 <head>
 4     <title></title>
 5     <meta charset="utf-8">
 6     <script type="text/javascript" src="https://cdn.jsdelivr.net/vue/2.1.3/vue.js"></script>
 7 </head>
 8 <body>
 9
10 <div id="app">
11     <p>{{ message }}</p>
12 </div>
13
14 <script type="text/javascript">
15     var app = new Vue({
16         el: \'#app\',
17         data: {
18             message: "this is a test"
19         },
20         beforeCreate: function () {
21             console.group(\'beforeCreate 创建前状态===============》\');
22             console.log("%c%s", "color:red", "el     : " + this.$el); //undefined
23             console.log("%c%s", "color:red", "data   : " + this.$data); //undefined
24             console.log("%c%s", "color:red", "message: " + this.message)
25         },
26         created: function () {
27             console.group(\'created 创建完毕状态===============》\');
28             console.log("%c%s", "color:red", "el     : " + this.$el); //undefined
29             console.log("%c%s", "color:red", "data   : " + this.$data); //已被初始化
30             console.log("%c%s", "color:red", "message: " + this.message); //已被初始化
31         },
32         beforeMount: function () {
33             console.group(\'beforeMount 挂载前状态===============》\');
34             console.log("%c%s", "color:red", "el     : " + (this.$el)); //已被初始化
35             console.log(this.$el);
36             console.log("%c%s", "color:red", "data   : " + this.$data); //已被初始化
37             console.log("%c%s", "color:red", "message: " + this.message); //已被初始化
38         },
39         mounted: function () {
40             console.group(\'mounted 挂载结束状态===============》\');
41             console.log("%c%s", "color:red", "el     : " + this.$el); //已被初始化
42             console.log(this.$el);
43             console.log("%c%s", "color:red", "data   : " + this.$data); //已被初始化
44             console.log("%c%s", "color:red", "message: " + this.message); //已被初始化
45         },
46         beforeUpdate: function () {
47             console.group(\'beforeUpdate 更新前状态===============》\');
48             console.log("%c%s", "color:red", "el     : " + this.$el);
49             console.log(this.$el);
50             console.log("%c%s", "color:red", "data   : " + this.$data);
51             console.log("%c%s", "color:red", "message: " + this.message);
52         },
53         updated: function () {
54             console.group(\'updated 更新完成状态===============》\');
55             console.log("%c%s", "color:red", "el     : " + this.$el);
56             console.log(this.$el);
57             console.log("%c%s", "color:red", "data   : " + this.$data);
58             console.log("%c%s", "color:red", "message: " + this.message);
59         },
60         beforeDestroy: function () {
61             console.group(\'beforeDestroy 销毁前状态===============》\');
62             console.log("%c%s", "color:red", "el     : " + this.$el);
63             console.log(this.$el);
64             console.log("%c%s", "color:red", "data   : " + this.$data);
65             console.log("%c%s", "color:red", "message: " + this.message);
66         },
67         destroyed: function () {
68             console.group(\'destroyed 销毁完成状态===============》\');
69             console.log("%c%s", "color:red", "el     : " + this.$el);
70             console.log(this.$el);
71             console.log("%c%s", "color:red", "data   : " + this.$data);
72             console.log("%c%s", "color:red", "message: " + this.message)
73         }
74     })
75 </script>
76 </body>
77 </html>
- beforeCreate
- created
- beforeMount
- mounted
- beforeUpdate
- updated
- activated
- deactivated
- beforeDestroy
- destroyed
详解:
-
beforeCreate
官方说明:在实例初始化之后,数据观测(data observer) 和 event/watcher 事件配置之前被调用。
解释:这个时期,this变量还不能使用,在data下的数据,和methods下的方法,watcher中的事件都不能获得到;beforeCreate() { console.log(this.page); // undefined console.log{this.showPage); // undefined }, data() { return { page: 123 } }, methods: { showPage() { console.log(this.page); } } -
created
官方说明:实例已经创建完成之后被调用。在这一步,实例已完成以下的配置:数据观测(data observer),属性和方法的运算, watch/event 事件回调。然而,挂载阶段还没开始,$el 属性目前不可见。
解释说明: 这个时候可以操作vue实例中的数据和各种方法,但是还不能对"dom"节点进行操作;created() { console.log(this.page); // 123 console.log{this.showPage); // ... $(\'select\').select2(); // jQuery插件需要操作相关dom,不会起作用 }, data() { return { page: 123 } }, methods: { showPage() { console.log(this.page); } } -
beforeMounte
官方说明:在挂载开始之前被调用:相关的 render 函数首次被调用。 -
mounted
官方说明:el被新创建的vm.$el替换,并挂载到实例上去之后调用该钩子。如果root实例挂载了一个文档内元素,当mounted被调用时vm.$el也在文档内。
解释说明:挂载完毕,这时dom节点被渲染到文档内,一些需要dom的操作在此时才能正常进行mounted() { $(\'select\').select2(); // jQuery插件可以正常使用 },
这时初始化插件没有问题,插件能正常运行,但是这并不代表万事大吉;下面思考一个问题:

图中的select的option都是通过异步请求得到的,然后通过v-for渲染进去,到此一切看起来很正常。还有一个需求是当页面刷新后要保留上次一查询的条件。我通过vue-router来给select指定一个默认选项;
  <template v-for=\'(item, index) in agentList.name\' >
     <option v-if=\'item == name\' :key=\'index\' selected :value="item">{{item}}</option>
      <option v-else :key=\'index\' :value="item">{{item}}</option>
   </template>
那么问题就来了,option的获得是一个异步请求,那这个请求完成的时刻和mounted的顺序是什么?如果mounted在请求成功之前执行,那将很遗憾——默认选项会设置失败

什么时候执行$(\'select\').select2(),是解决这个问题的关键。大家肯定猜到了,mounted的确是在请求成功之前执行的,所以这时的办法就是将$(\'select\').select2()的执行放到请求成功的回调里执行:
  $.getJSON(urls.agentAndCity, {pageType: this.pageType}, (res) => {
    const a = this.agentList,
    d = res.data;
    a.id = d.orgIds;
    a.name = d.orgNames;
    a.city = d.cityMap;
    $(\'select\').select2();
  });
本以为这样就完美解决了,但是发现还是会出现和上图一样的效果;如何是好?这时轮到vm.$nextTick登场了:
说明: 将回调延迟到下次 DOM 更新循环之后执行。在修改数据之后立即使用它,然后等待 DOM 更新。
官方示例代码:
    new Vue({
      // ...
      methods: {
      // ...
      example: function () {
      // 修改数据
      this.message = \'changed\'
      // DOM 还没有更新
        this.$nextTick(function () {
          // DOM 现在更新了
          // `this` 绑定到当前实例
          this.doSomethingElse()
        })
      }
    }
  })
所以我的解决办法如下:
$.getJSON(urls.agentAndCity, {pageType: this.pageType}, (res) => {
    const a = this.agentList,
    d = res.data;
    a.id = d.orgIds;
    a.name = d.orgNames;
    a.city = d.cityMap;
    this.$nextTick(() => {
      $(\'select\').select2();
    });
  });
至此这个问题才算比较满意的解决
以上是关于对vue生命周期/钩子函数的理解的主要内容,如果未能解决你的问题,请参考以下文章
