zabbix监控之zabbix源码部署 (安装篇)
Posted
tags:
篇首语:本文由小常识网(cha138.com)小编为大家整理,主要介绍了zabbix监控之zabbix源码部署 (安装篇)相关的知识,希望对你有一定的参考价值。
【本文档所介绍的内容适用于公司测试/生产环境等常见的zabbix监控系统部署】
一:Zabbix部署前环境要求:
1.1相关软件以及系统
系统要求:Centos 6.6 (64位)
运行环境要求: php环境(LAMP或 LNMP)
相关中间件:zabbix-2.4.6.tar.gz
1.2 检查系统自带是否安装Zabbix软件包
rpm -qa | grep zabbix
如有安装,请使用以下命令卸载相关程序
yum remove zabbix
二:zabbix正式部署安装
2.1 zabbix 运行的WEB环境安装 (zabbix的安装需要LAMP或者LNMP环境)
(1)安装Apahce, PHP, mysql以及php连接mysql库组件
yum -y install httpd php mysql mysql-server php-mysql gcc gcc-c++
(2)安装php扩展
yum -y install php-gd gd-devel php-xml php-mbstring php-ldap php-pear php-xmlrpc php-bcmath libcurl-devel libxml2-devel curl-devel openssl-devel
上述安装完成后,需要配置Apache主配置文件和php.ini文件以支持zabbix安装,如下所示:
vim /etc/httpd/conf/httpd.conf
找到:ServerName 80
ServerName xxxx.com:80    //取消掉注释符号,改为"ServerName localhost:80";
vim /etc/php.ini
修改内容如下
date.timezone = Asia/Chongqing
max_execution_time = 300
max_input_time = 300
memory_limit = 128M
post_max_size = 32M
(3)安装MySQL链接驱动扩展
yum -y install mysql-devel
(4)启动相关服务(mysql,httpd)并设置数据库密码
service httpd start
service mysqld start
mysqladmin -u root password 123.com
创建一个php测试页面
vim /var/www/html/info.php
内容如下:
<?php
 $conn=mysqli_connect(‘localhost‘,‘root‘,‘123.com‘);
 if ($conn)
   echo "<h2>success...</h2>";
 else
   echo "<h2>Failure...</h2>";
?>
<?php
phpinfo();
?>输入http://ip/info.php 访问,出现如下页面说明zabbix运行环境ok了
以上为RPM方式安装LAMP环境,如要源码安装LAMP请访问:http://blief.blog.51cto.com/6170059/1658994
备注:
Zabbix对PHP参数、PHP模块有特殊要求,安装zabbix时PHP需要开启以下支持:
| 模块名称 | 开启方式 |
| bcmath | --enable-bcmath |
| mbstring | --enable-mbstring |
| sockets | --enable-sockets |
| gd | --with-gd |
| libxml | --with-libxml-dir=path |
| xmlwriter | --with-libxml-dir=path |
| xmlreader | --with-libxml-dir=path |
| ctype | 默认支持 |
| session | 默认支持 |
| gettext | 默认支持 |
2.2 zabbix 安装
首先到Zabbix官网(www.zabbix.com)下载Zabbix源码包,这里以zabbix-2.4.6包为例;
(1)安装zabbix所需的组件(server,agent)
yum -y install net-snmp-devel
(2)安装zabbix服务端程序
2.1.1 编译安装zabbix服务端(server服务端)
<--install zabbix-server-->
* 创建zabbix服务运行用户(server,agent)
groupadd -r zabbix
useradd -r -g zabbix  -d /usr/local/zabbix -M -s /sbin/nologin zabbix
* 编译安装zabbix-server
tar zxvf  zabbix-2.4.6.tar.gz  -C /usr/local/src
cd  /usr/local/src/zabbix-2.4.6
./configure --prefix=/usr/local/zabbix-server --enable-server \                  #开启zabbix server服务
--enable-proxy \                   #开启zabbix 代理监控功能,常用于分布式监控
--with-mysql \                     #使用MySQL
--with-libxml2 \                   #开启虚拟机监控
--with-libcurl \                   #开启web监控
--with-net-snmp                    #开启网络监控
make && make install
* 安装完成后(如有报错请根据错误提示排错)还需要将创建zabbix系统服务启动脚本,内容如下:
#!/bin/sh

# Zabbix
# Copyright (C) 2001-2015 Zabbix SIA
#
# This program is free software; you can redistribute it and/or modify
# it under the terms of the GNU General Public License as published by
# the Free Software Foundation; either version 2 of the License, or
# (at your option) any later version.
#
# This program is distributed in the hope that it will be useful,
# but WITHOUT ANY WARRANTY; without even the implied warranty of
# MERCHANTABILITY or FITNESS FOR A PARTICULAR PURPOSE. See the
# GNU General Public License for more details.
#
# You should have received a copy of the GNU General Public License
# along with this program; if not, write to the Free Software
# Foundation, Inc., 51 Franklin Street, Fifth Floor, Boston, MA  02110-1301, USA.

# Start/Stop the Zabbix server daemon.
# Place a startup script in /sbin/init.d, and link to it from /sbin/rc[023].d
. /etc/rc.d/init.d/functions

BASEDIR=/usr/local/zabbix-server
exec="${BASEDIR}/sbin/zabbix_server"
prog=zabbix_server
pidfile=/var/run/zabbix_server.pid
config="${BASEDIR}/etc/zabbix_server.conf"
lockfile=/var/lock/subsys/$prog

start() {
    [ -x $exec ] || exit 5
    [ -f $config ] || exit 6
    echo -n $"Starting $prog: "
    daemon   $exec -c $config
    retval=$?
    echo
    if [ $retval -eq 0 ]; then
        touch $lockfile || retval=4
    fi
    return $retval
}

stop() {
    echo -n $"Stopping $prog: "
    killproc  -p ${pidfile} $prog
    retval=$?
    echo
    [ $retval -eq 0 ] && rm -f $lockfile
    return $retval
}

restart() {
    stop
    start
}

reload() {
    restart
}

rh_status() {
    # run checks to determine if the service is running or use generic status
    status -p ${pidfile} $prog
}

rh_status_q() {
    rh_status >/dev/null 2>&1
}

case "$1" in
start)
     rh_status_q && exit 0
     $1
     ;;
stop)
     rh_status_q || exit 0
     $1
     ;;
restart)
     $1
     ;;
reload)
     rh_status_q || exit 7
     $1
     ;;
status)
     rh_status
     ;;
*)
echo $"Usage: $0 {start|stop|status|restart|reload}"
     exit 2
esac
说明
(zabbix系统服务启动脚本默认存放在源码解压包下的/misc/init.d子目录下,也可以使用自带的系统服务启动脚本)
zabbix_server启动后默认没有侦听状态(即 netstat -nltp | grep zabbix_server)所以需要另外添加侦听状态:
echo "zabbix-trapper 10051/tcp    # Zabbix Trapper" >>/etc/services
echo "zabbix-trapper 10051/udp    # Zabbix Trapper" >>/etc/services
备注:
zabbix-agent 10050 :通常为zabbix客户端侦听端口 & zabbix-trapper 10051 :通常为zabbix服务端侦听端口
2.2.2 导入zabbix图形模板数据及zabbix服务端配置
编译安装完zabbix后需要导入zabbix监控模板数据和修改zabbix服务端配置文件
* 将监控模板数据导入到数据库
1.登录数据库创建zabbix数据库并授权
 mysql -u root -p123.com
> create database zabbix;
> grant all on zabbix.* to [email protected] identified by ‘123.com‘;
> flush privileges;
2.导入zabbix监控模板数据到zabbix数据库
cd  /usr/local/src/zabbix-2.4.6/database/mysql/
mysql -uzabbix -p123.com zabbix < schema.sql
mysql -uzabbix -p123.com zabbix < images.sql
mysql -uzabbix -p123.com zabbix < data.sql
备注:
zabbix的模板数据文件主要存放源码解压包下的/database子目录下,该目录下存放着各种类型的数据库的模板文件,有MySQL,oracle等等常用的数据模板文件
* 配置zabbix服务端文件
1.默认情况下zabbix服务端配置文件和客户端配置(开启了agent功能)文件都存放在zabbix安装目录下的/etc文件夹下,如下:
[[email protected] mysql]# ll /usr/local/zabbix/etc/
total 40
-rw-r--r--. 1 root root 13051 Mar 24 04:04 zabbix_proxy.conf
drwxr-xr-x. 2 root root  4096 Mar 24 04:04 zabbix_proxy.conf.d
-rw-r--r--. 1 root root 13296 Mar 24 04:04 zabbix_server.conf
drwxr-xr-x. 2 root root  4096 Mar 24 04:04 zabbix_server.conf.d
2.备份原有zabbix_server.conf文件,新添加一个zabbix_server.conf文件,内容如下:
LogFile=/var/log/zabbix_server.log
PidFile=/var/run/zabbix_server.pid
DBHost=localhost
DBName=zabbix
DBUser=zabbix
DBPassword=123.com
DBSocket=/var/lib/mysql/mysql.sock
StartDiscoverers=5
CacheSize=256M
StartDBSyncers=5
HistoryCacheSize=128Mvi
TrendCacheSize=64M
HistoryTextCacheSize=256M
ValueCacheSize=128M
Timeout=30
AlertScriptsPath=/usr/local/zabbix/alertscripts
ExternalScripts=/usr/local/zabbix/externalscripts
LogSlowQueries=10000
StartProxyPollers=3
3.重启zabbix服务
service zabbix_server restart
备注:
因为zabbix服务运行账户是zabbix,所以有可能对"/var/run"和"/var/log"没有写入权限,如果没有权限写入,使用"chmod o+rwx"授予权限即可
2.2.3 部署zabbix web服务站点
导入完监控模板数据文件和配置完zabbix server端配置文件后,剩下就需要配置zabbix站点web服务,如下:
cd  /usr/local/src/zabbix-2.4.6
mkdir /var/www/html/zabbix
cp -r frontends/php/* /var/www/html/zabbix
复制位于conf下的zabbix.conf.php.example文件,操作如下:
cd  /var/www/html/zabbix/conf
cp zabbix.conf.php.example zabbix.conf.php
接下来就开始初始化zabbix,如下:
输入http://ip/zabbix, (这里为:http://172.51.96.175/zabbix)即可访问zabbix初始化页面
点击“next”会出现如下页面
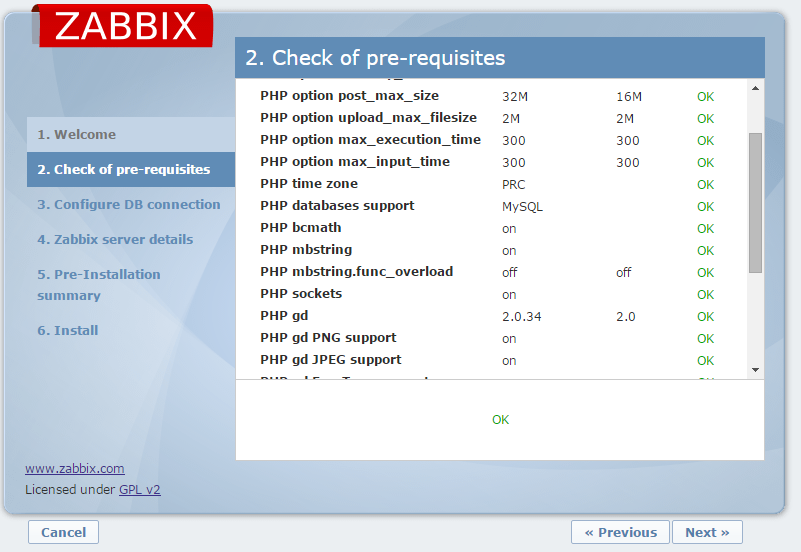
这里:zabbix会检查zabbix运行的web环境,当出现“ok”的状态的时候,才允许“next”,否则会提示“filed”,如有出现filed可根据提示排错
这里需要设置数据库连接信息,设置完成后,测试一下是否可以连接到数据库,否则就无法进行下一步;
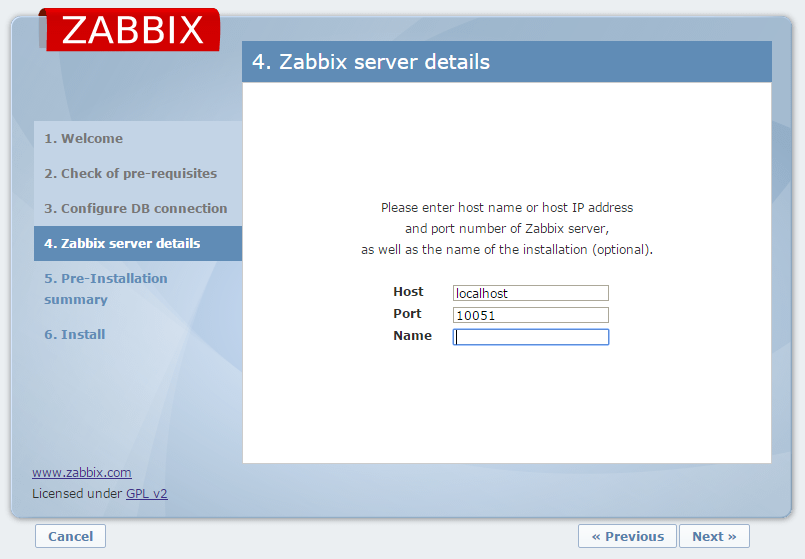
注意:这里是设置zabbix的主机名,数据传输端口以及zabbix名称的地方;关于主机名一定主机本身能够解析到该主机名,否则容易出现服务启动错误
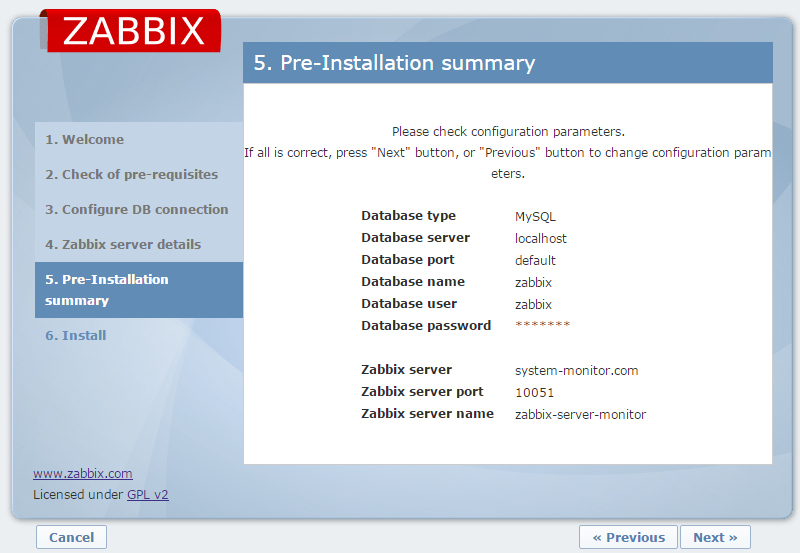
设置完成后,可以看到设置信息,如上
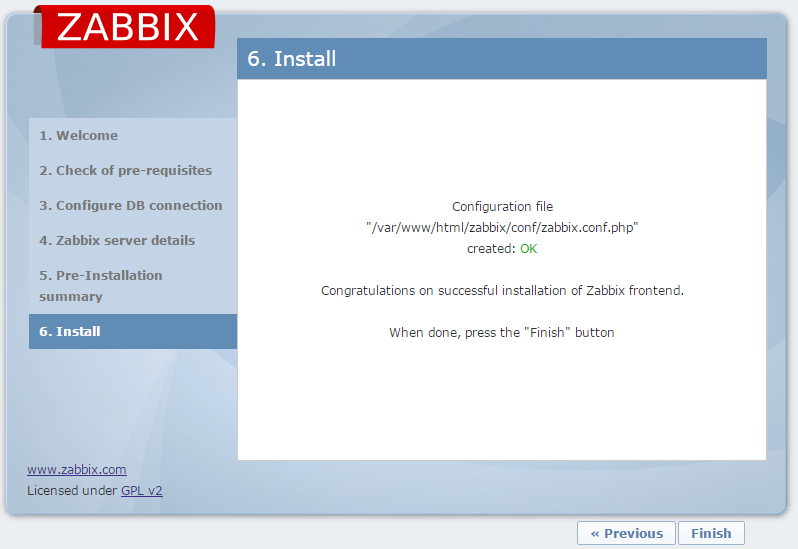
到了这里,当出现“ok”状态说明zabbix初始化完成,这一步有可能会出现“filed”提示没有权限写入,如果出现没有权限写入就根据提示授予可读写权限即可;
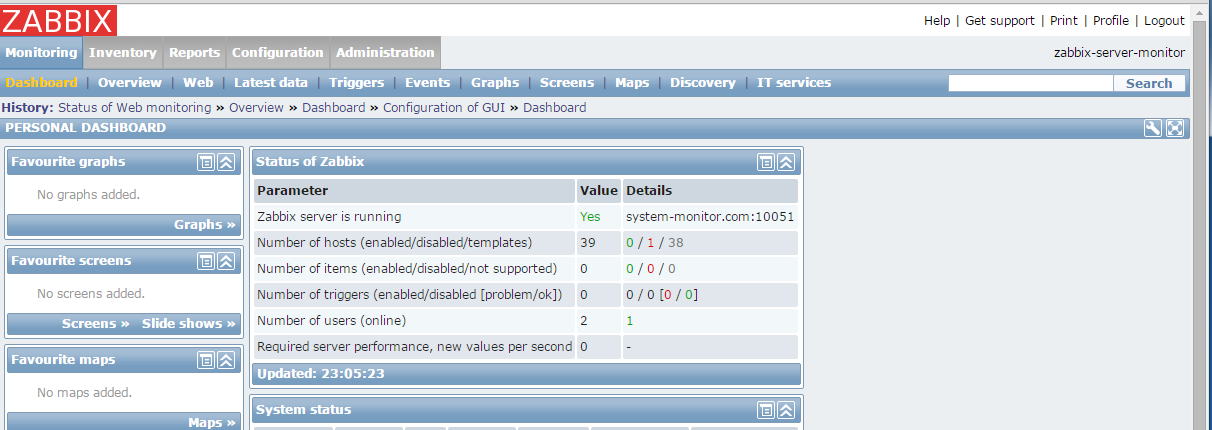
当初始化完之后,会出现zabbix监控主页,如下所示
注意:
如果出现“zabbix server is not running ”即zabbix状态不是“yes”而是“no”,解决办法如下:
1. 重启zabbix_server 服务; 2. 关闭seLinux或执行“setsebool -P httpd_can_network_connect on”
至此zabbix服务端就安装完成了,下面在服务器上安装zabbix_agent就可以实现对server的监控了
(3)安装zabbix客户端程序
1.编译安装zabbix客户端(agentd端)
tar zxvf  zabbix-2.4.6.tar.gz  -C /usr/local/src
cd  /usr/local/src/zabbix-2.4.6
./configure --prefix=/usr/local/zabbix-agent --enable-agent \                  #开启zabbix agentd
make && make install
* 安装完成后(如有报错请根据错误提示排错)还需要将创建zabbix_agentd系统服务启动脚本,内容如下:
#!/bin/sh

# Zabbix
# Copyright (C) 2001-2015 Zabbix SIA
#
# This program is free software; you can redistribute it and/or modify
# it under the terms of the GNU General Public License as published by
# the Free Software Foundation; either version 2 of the License, or
# (at your option) any later version.
#
# This program is distributed in the hope that it will be useful,
# but WITHOUT ANY WARRANTY; without even the implied warranty of
# MERCHANTABILITY or FITNESS FOR A PARTICULAR PURPOSE. See the
# GNU General Public License for more details.
#
# You should have received a copy of the GNU General Public License
# along with this program; if not, write to the Free Software
# Foundation, Inc., 51 Franklin Street, Fifth Floor, Boston, MA  02110-1301, USA.

# Start/Stop the Zabbix server daemon.
# Place a startup script in /sbin/init.d, and link to it from /sbin/rc[023].d
. /etc/rc.d/init.d/functions

BASEDIR=/usr/local/zabbix-agent
exec="${BASEDIR}/sbin/zabbix_agentd"
prog=zabbix_agentd
pidfile=/var/run/zabbix_agentd.pid
config="${BASEDIR}/etc/zabbix_agentd.conf"
lockfile=/var/lock/subsys/$prog

start() {
    [ -x $exec ] || exit 5
    [ -f $config ] || exit 6
    echo -n $"Starting $prog: "
    daemon   $exec -c $config
    retval=$?
    echo
    if [ $retval -eq 0 ]; then
        touch $lockfile || retval=4
    fi
    return $retval
}

stop() {
    echo -n $"Stopping $prog: "
    killproc  -p ${pidfile} $prog
    retval=$?
    echo
    [ $retval -eq 0 ] && rm -f $lockfile
    return $retval
}

restart() {
    stop
    start
}

reload() {
    restart
}

rh_status() {
    # run checks to determine if the service is running or use generic status
    status -p ${pidfile} $prog
}

rh_status_q() {
    rh_status >/dev/null 2>&1
}

case "$1" in
start)
     rh_status_q && exit 0
     $1
     ;;
stop)
     rh_status_q || exit 0
     $1
     ;;
restart)
     $1
     ;;
reload)
     rh_status_q || exit 7
     $1
     ;;
status)
     rh_status
     ;;
*)
echo $"Usage: $0 {start|stop|status|restart|reload}"
     exit 2
esac
说明
(zabbix系统服务启动脚本默认存放在源码解压包下的/misc/init.d子目录下,也可以使用自带的系统服务启动脚本)
2.添加zabbix_agentd侦听状态:
echo "zabbix-agent 10050/tcp      # Zabbix Agentd" >>/etc/services
echo "zabbix-agent 10050/udp      # Zabbix Agentd" >>/etc/services
2. 修改zabbix_agentd主配置文件
备份原有zabbix_server.conf文件,新添加一个zabbix_server.conf文件,内容如下:
LogFile=/var/log/zabbix_agentd.log    #设置log存放路径
PidFile=/var/run/zabbix_agentd.pid    #设置pid文件存放路径
Server=127.0.0.1                      #设置zabbix-se以上是关于zabbix监控之zabbix源码部署 (安装篇)的主要内容,如果未能解决你的问题,请参考以下文章


