『TensotFlow』基础RNN网络回归问题
Posted
tags:
篇首语:本文由小常识网(cha138.com)小编为大家整理,主要介绍了『TensotFlow』基础RNN网络回归问题相关的知识,希望对你有一定的参考价值。
两个tensorflow收获
lstm_cell.zero_state()节点虽然不是占位符但是可以feed,如果不feed每个batch训练tf都会重新初始化一遍,篇尾会详细讨论这个发现。

tf.contrib.legacy_seq2seq.sequence_loss_by_example()的使用
任务简介
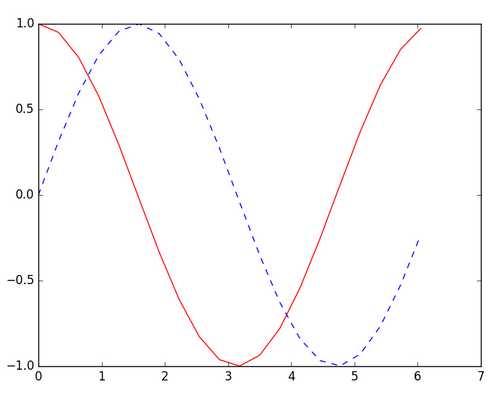
如下图所示,此次的目标是使用蓝色的虚线作为输入,拟合红色的实线输出:

这和文本预测不一样,也和一般的预测型任务很不一样,正常都是使用同一条线,使用前面的作为输入去拟合后面的输出。
不过正常的预测型数据如何处理在介绍中文文本数据预处理一篇中已经提到,这里不在赘述,由于那一篇对于RNN实践还是大白的我有点难度,所以来点简单的练习练习,后面再考虑怎么完成它。
载入包与参数设置
import tensorflow as tf
import numpy as np
import matplotlib.pyplot as plt

BATCH_START = 0     # 建立 batch data 时候的 index

BATCH_SIZE = 50
TIME_STEPS = 20     # backpropagation through time 的 time_steps

INPUT_SIZE = 1      # sin 数据输入 size
OUTPUT_SIZE = 1     # cos 数据输出 size
CELL_SIZE = 10      # RNN 的 hidden unit size
LR = 0.006          # learning rate
实际上从上一篇的数据预处理已经可以看出来RNN的流程了,原始数据分为[batch,[time_step,[input_raw]]]三维,而input_raw是受原始数据形势限制的,所以经过一个作用在最小维度(input_raw)上的矩阵乘法将其转换尺度为cell_size,这个input才是RNN直接使用的数据,想似的,RNN直接输出数据维度等于输出数据维度 cell_size,所以也需要一层转换为输出维度。
数据生成函数
def get_batch():
    ‘‘‘
    每调用一次会在上一次数据范围基础上向后平移,生成新的数据点,个人觉得使用yield更好
    :return: [batch[[],[]],[[],[]]]
    ‘‘‘
    global BATCH_START, TIME_STEPS
    # xs shape (50batch, 20steps)
    xs = np.arange(BATCH_START, BATCH_START+TIME_STEPS*BATCH_SIZE).reshape((BATCH_SIZE, TIME_STEPS)) / (10*np.pi)
    seq = np.sin(xs)
    res = np.cos(xs)
    BATCH_START += TIME_STEPS

    # [[1,1],[1,1]] -> [[[1],[1]],[[1],[1]]],每个时间step上只有一个数字
    return [seq[:, :, np.newaxis], res[:, :, np.newaxis], xs]
有意思的是这里,每次在坐标轴上前进,生成baatch的数据,思路挺新颖,不过要是我说的话应该使用yield机制代替return,不过这不是这个程序的重点,带过。注意生成数据维度是3维,input维度是1.
LSTM类初始化
class LSTMRNN(object):
    def __init__(self, n_steps, input_size, output_size, cell_size, batch_size):
        self.n_steps = n_steps
        self.input_size = input_size
        self.output_size = output_size
        self.cell_size = cell_size
        self.batch_size = batch_size
        with tf.name_scope(‘inputs‘):
            self.xs = tf.placeholder(tf.float32, [None, n_steps, input_size], name=‘xs‘)
            self.ys = tf.placeholder(tf.float32, [None, n_steps, output_size], name=‘ys‘)
        with tf.variable_scope(‘in_hidden‘):
            self.add_input_layer()
        with tf.variable_scope(‘LSTM_cell‘):
            self.add_cell()
        with tf.variable_scope(‘out_hidden‘):
            self.add_output_layer()
        with tf.name_scope(‘cost‘):
            self.compute_cost()
        with tf.name_scope(‘train‘):
            self.train_op = tf.train.AdamOptimizer(LR).minimize(self.cost)
网络结构生成
承上文所讲,分为三层,我之前都觉得1,3两层属于外围处理,其实人家就是网络的一部分,为了方便矩阵乘法1,3两层都有3Dto2D再变回来的操作。
    def add_input_layer(self,):
        l_in_x = tf.reshape(self.xs,[-1,self.input_size],name=‘2_2D‘)  # (batch*n_step, in_size)
        # Ws (in_size, cell_size)
        Ws_in = self._weight_variable([self.input_size,self.cell_size])
        # bs (cell_size, )
        bs_in = self._bias_variable([self.cell_size,])
        # l_in_y = (batch * n_steps, cell_size)
        with tf.name_scope(‘Wx_plus_b‘):
            l_in_y = tf.matmul(l_in_x,Ws_in) + bs_in
        # reshape l_in_y ==> (batch, n_steps, cell_size)
        self.l_in_y = tf.reshape(l_in_y,[-1,self.n_steps,self.cell_size],name=‘2_3D‘)

    def add_cell(self):
     # 忘记门为1表示不忘记的意思,后面的True其实Goole已经考虑去掉这个参数,并一律为True了
        lstm_cell = tf.contrib.rnn.BasicLSTMCell(self.cell_size,forget_bias=1.0,state_is_tuple=True)
        with tf.name_scope(‘initial_state‘):
        # 下面这个节点名self.cell_init_state可以接受feed!!!应该是由于contrib封装的关系......
            self.cell_init_state = lstm_cell.zero_state(self.batch_size,dtype=tf.float32)
        self.cell_outputs,self.cell_final_state = tf.nn.dynamic_rnn(
            lstm_cell,self.l_in_y,initial_state=self.cell_init_state,time_major=False)

    def add_output_layer(self):
        # shape = (batch * steps, cell_size)
        l_out_x = tf.reshape(self.cell_outputs, [-1, self.cell_size], name=‘2_2D‘)
        Ws_out = self._weight_variable([self.cell_size, self.output_size])
        bs_out = self._bias_variable([self.output_size, ])
        # shape = (batch * steps, output_size)
        with tf.name_scope(‘Wx_plus_b‘):
            self.pred = tf.matmul(l_out_x, Ws_out) + bs_out
计算Loss损失
    def compute_cost(self):
        losses = tf.contrib.legacy_seq2seq.sequence_loss_by_example(
            [tf.reshape(self.pred, [-1], name=‘reshape_pred‘)],
            [tf.reshape(self.ys, [-1], name=‘reshape_target‘)],
            [tf.ones([self.batch_size * self.n_steps], dtype=tf.float32)],
            average_across_timesteps=True,
            softmax_loss_function=self.ms_error,
            name=‘losses‘
        )
        with tf.name_scope(‘average_cost‘):
            self.cost = tf.div(
                tf.reduce_sum(losses, name=‘losses_sum‘),
                self.batch_size,
                name=‘average_cost‘)
            tf.summary.scalar(‘cost‘, self.cost)

    def ms_error(self, y_target, y_pre):
        return tf.square(tf.subtract(y_target, y_pre))
有关sequence_loss_by_example(logits, targets, weights):
logits 的shape = [batch_size*numsteps, vocab_size], vocab_size是(分类)类别的个数
targets 的shape = [batch_size*num_steps]
weights就是一维的张量长度为batch_size*num_steps,并且是一个tf.float32的数,是权重的意思。
sequence_loss_by_example的做法是,针对logits中的每一个num_step,即[batch_size, vocab_size], 对所有vocab_size个预测结果,得出预测值最大的那个类别,与target中的值相比较计算Loss值
对应过来就是(本例vocab_size=1)会输出batch_size*numsteps个数分别对应各自batch和各自step的loss,这个loss我们使用的是平方差,并在之后求了个平均作为最后输出。
内部调用方法
    def _weight_variable(self, shape, name=‘weights‘):
        initializer = tf.random_normal_initializer(mean=0., stddev=1.,)
        return tf.get_variable(shape=shape, initializer=initializer, name=name)

    def _bias_variable(self, shape, name=‘biases‘):
        initializer = tf.constant_initializer(0.1)
        return tf.get_variable(name=name, shape=shape, initializer=initializer)
训练过程
if __name__ == ‘__main__‘:
    # 搭建 LSTMRNN 模型
    model = LSTMRNN(TIME_STEPS,INPUT_SIZE,OUTPUT_SIZE,CELL_SIZE,BATCH_SIZE)
    sess = tf.Session()
    sess.run(tf.global_variables_initializer())

    # 训练 200 次
    for i in range(200):
        seq,res,xs = get_batch()  # 提取 batch data

        if i == 0:
            # 初始化 data
            feed_dict = {
                model.xs: seq,
                model.ys: res,
            }
        else:
            feed_dict = {
                model.xs: seq,
                model.ys: res,
                model.cell_init_state: state  # <---------------------除了第0次外,每循环一次修改一次实例属性
            }

        # 训练
        _,cost,state,pred = sess.run(
            [model.train_op,model.cost,model.cell_final_state,model.pred],
            feed_dict=feed_dict)

        # 打印 cost 结果
        if i % 20 == 0:
            print(‘cost: ‘,round(cost,4))
输出损失函数如下:
cost: 14.7518
cost: 6.1004
cost: 3.2012
cost: 0.6067
cost: 0.1749
cost: 0.6066
cost: 0.3295
cost: 0.1676
cost: 0.0803
cost: 0.1631
有关本程序的讨论
1.
我们注释掉
model.cell_init_state: state # <---------------------除了第0次外,每循环一次修改一次实例属性
这样也是能够输出的:
cost: 15.4693
cost: 8.93
cost: 7.5157
cost: 5.6763
cost: 4.5344
cost: 3.4221
cost: 3.1435
cost: 2.7241
cost: 2.4597
cost: 2.2695
收敛速度明显下降,也就是说这个操作很有必要(各个batch之间继承cell矩阵)。
进一步探究:
tf.trainable_variables()
Out[1]:
[<tf.Variable ‘in_hidden/weights:0‘ shape=(1, 10) dtype=float32_ref>,
<tf.Variable ‘in_hidden/biases:0‘ shape=(10,) dtype=float32_ref>,
<tf.Variable ‘LSTM_cell/rnn/basic_lstm_cell/weights:0‘ shape=(20, 40) dtype=float32_ref>,
<tf.Variable ‘LSTM_cell/rnn/basic_lstm_cell/biases:0‘ shape=(40,) dtype=float32_ref>,
<tf.Variable ‘out_hidden/weights:0‘ shape=(10, 1) dtype=float32_ref>,
<tf.Variable ‘out_hidden/biases:0‘ shape=(1,) dtype=float32_ref>]
cell并不是一个可训练的量,也可以理解,毕竟它表示的仅仅是对于前面time_step的记忆,各个batch并没有记忆关系,但是这个做法的确可以提高效率。
2.
修改训练部分为如下语句:
else:
    feed_dict = {
        model.xs: seq,
        model.ys: res,
        model.cost:10
        # model.cell_init_state: state  # 保持 state 的连续性,除了第0次外,每循环一次修改一次实例属性
    }
另外:
# 打印 cost 结果
if i % 20 == 0:
    print(‘cost: ‘,cost)#round(cost,4))
能输出而且:
cost: 11.5421
cost: 10.0
cost: 10.0
cost: 10.0
cost: 10.0
cost: 10.0
cost: 10.0
cost: 10.0
cost: 10.0
cost: 10.0
也就是占位符真的就只是占位符而已,其实TensorFlow所有的张量都是可以feed的... ... 不过这个风格真的很符合python一贯的尿性... ...
这样就比较完整的了解了RNN的工作流程,结合上一节的文本数据处理方法,我感觉我对RNN的理解还是可以抢救一下的。
以上是关于『TensotFlow』基础RNN网络回归问题的主要内容,如果未能解决你的问题,请参考以下文章