SSH服务介绍
Posted
tags:
篇首语:本文由小常识网(cha138.com)小编为大家整理,主要介绍了SSH服务介绍相关的知识,希望对你有一定的参考价值。
本文是在m01机器上面操作的。
查看ssh服务是否启动:
[[email protected] ~]# /etc/init.d/sshd status
openssh-daemon (pid 1220) is running...
ssh服务对应进程是什么?
[[email protected] ~]# ps -ef|grep sshd
root 1220 1 0 19:13 ? 00:00:00 /usr/sbin/sshd (ssh服务)
root 1268 1220 0 19:16 ? 00:00:00 sshd: [email protected]/0
root 1306 1270 0 19:21 pts/0 00:00:00 grep sshd
ssh服务对应的端口是什么?
[[email protected] ~]# netstat -lntup|grep sshd
tcp 0 0 0.0.0.0:22 0.0.0.0:* LISTEN 1220/sshd
tcp 0 0 :::22 :::* LISTEN 1220/sshd
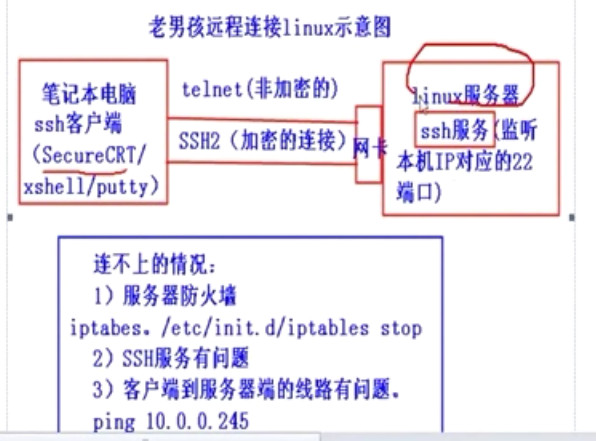
上面的0.0.0.0默认是本机的所有网卡,默认情况下监听本机IP对应的22端口。
0.0.0.0的地址修改了,内网ip网卡,外面的人连接不过来。
只要开启了ssh服务/etc/init.d/sshd status
就会监听22端口
端口存在的意义是什么?
一台计算机有很多服务,不同的服务通过端口连接,远程连接通过不通的服务连接。
[[email protected] ~]# rpm -qa openssh openssl
openssl-1.0.1e-48.el6.x86_64 #用于加密服务
openssh-5.3p1-117.el6.x86_64 #用于远程连接
企业面试题1:给你一个端口22,如何用命令行查出端口22对应的服务是什么?
方法1:红色的是端口对应的服务
[[email protected] ~]# lsof -i :22
COMMAND PID USER FD TYPE DEVICE SIZE/OFF NODE NAME
sshd 1376 root 3u IPv4 11226 0t0 TCP *:ssh (LISTEN)
sshd 1376 root 4u IPv6 11228 0t0 TCP *:ssh (LISTEN)
sshd 1675 root 3r IPv4 11972 0t0 TCP 10.0.0.31:ssh->10.0.0.1:50383 (ESTABLISHED)
方法2:红色的是端口对应的服务
[[email protected] ~]# netstat -lntup|grep 22
tcp 0 0 0.0.0.0:111 0.0.0.0:* LISTEN 1227/rpcbind
tcp 0 0 0.0.0.0:22 0.0.0.0:* LISTEN 1376/sshd
tcp 0 0 :::111 :::* LISTEN 1227/rpcbind
tcp 0 0 :::22 :::* LISTEN 1376/sshd
udp 0 0 0.0.0.0:111 0.0.0.0:* 1227/rpcbind
udp 0 0 0.0.0.0:978 0.0.0.0:* 1227/rpcbind
udp 0 0 :::111 :::* 1227/rpcbind
udp 0 0 :::978 :::* 1227/rpcbind
方法3:
[[email protected] ~]# netstat -lntup|grep "\b22\b"
tcp 0 0 0.0.0.0:22 0.0.0.0:* LISTEN 1376/sshd
tcp 0 0 :::22 :::* LISTEN 1376/sshd
方法4:
[[email protected] ~]# netstat -lntup|grep -w "22"
tcp 0 0 0.0.0.0:22 0.0.0.0:* LISTEN 1376/sshd
tcp 0 0 :::22 :::* LISTEN 1376/sshd
企业面试题2:如果给你一个进程名sshd,如何查看对应的端口是什么?
netstat -lntup|grep oldboy
方法1:
[[email protected] ~]# netstat -lntup|grep sshd
tcp 0 0 0.0.0.0:22 0.0.0.0:* LISTEN 1376/sshd
tcp 0 0 :::22 :::* LISTEN 1376/sshd
ssh的配置文件:
[[email protected] ~]# ll /etc/ssh/sshd_config
-rw-------. 1 root root 3879 May 11 2016 /etc/ssh/sshd_config
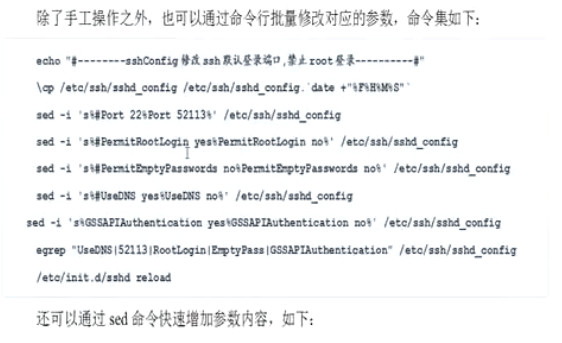
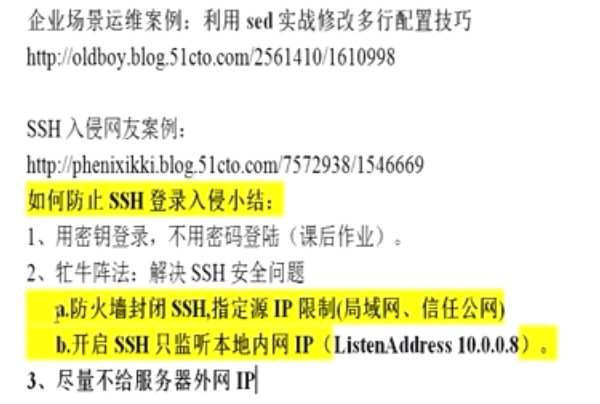
ssh服务安全优化:
[[email protected] ~]# vim /etc/ssh/sshd_config #编辑sshd_config
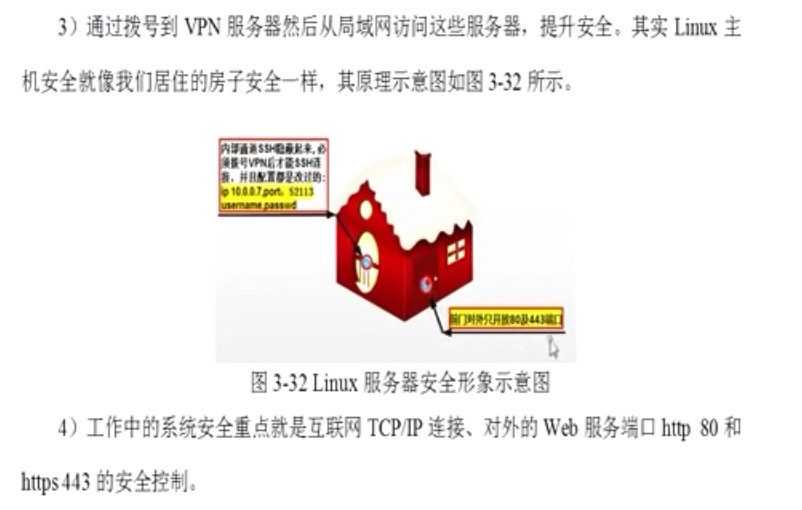
Port 52113 #ssh连接默认端口是22,这都知道,因提高安全级别,建议改掉它。
ListenAddress 172.16.1.61:52113
PermitRootLogin no
PasswordAuthentication yes
ChallengeResponseAuthentication no
GSSAPIAuthentication no
调整以管理机为例:
[[email protected] ~]# vim /etc/ssh/sshd_config #编辑sshd_config
Port 52113 #ssh连接默认端口是22,这都知道,因提高安全级别,建议改掉它。
ListenAddress 172.16.1.61:52113 #监听的网段修改为本机的内网ip地址和ssh端口 172.16.1.61:52113
PermitRootLogin no #默认是允许用户登录的,这里修改为no不允许。
80行改为GSSAPIAuthentication no #默认是#GSSAPIAuthentication no,解决linux之间使用ssh连接慢的问题。
81行改为#GSSAPIAuthentication yes #默认是没有#注释的,这里加上#注释掉
122行改为UseDNS no #默认是#UseDNS yes 禁止dns反向解析域名
65行改为PermitEmptyPasswords no默认是#PermitEmptyPasswords no 禁止空密码登录
sshd_config修改的相关参数说明如下:
| 参数 | 说明 |
| Port | 指定sshd守护进程监听的端口号,默认为22.默认在本机的所有网络接口上监听,也可以通过ListenAddress指定只在某个特定的接口上监听。 端口范围:0-65525,不能和已有的服务端口冲突。一般建议改为比1024大的端口 |
| PermitEmptyPasswords | 是否允许密码为空的用户远程登录。默认为“no” |
| PermitRootLogin | 是否允许root登录。可用值如下“yes(默认)”表示允许;“no”表示禁止;“without-password”表示禁止使用密码 认证登录:“forced-commands-only”表示只有在指定了command选项的情况下才允许使用公钥认证登录,同时其他认证方法全部被禁止,这个值常用于做远程备份之类的事情 |
| UseDNS | 指定sshd是否应该对远程主机名进行反向解析,以检查此主机名是否与其IP地址真实对应,默认值为“yes”,建议改为“no”,否则可能会导致SSH连接很慢。 |
| GSSAPIAuthentication no | 解决Linux之间使用SSH远程连接慢的问题 |
将以上信息更改后,保存退出。
执行如下命令重启sshd,使修改的配置生效;
[[email protected] ~]# /etc/init.d/sshd reload
Reloading sshd: [ OK ]
重新载入sshd:
或者
[[email protected] ~]# /etc/init.d/sshd restart
Stopping sshd: [ OK ]
Starting sshd: [ OK ]
提示:reload为平滑重启,不影响正在SSH连接的其他用户,因此要好于restart
此时远程连接linux,就仅有oldboy用户可通过52113端口远程连接到系统中了(本地登录的用户不受影响)
用diff比较工具比较一下:
[[email protected] ssh]# diff sshd_config sshd_config.ori
13c13
< #Port 22
---
> Port 52113
15c15
< #ListenAddress 0.0.0.0
---
> ListenAddress 172.16.1.61:52113
42c42
< #PermitRootLogin yes
---
> PermitRootLogin no
80,81c80,81
< #GSSAPIAuthentication no
< GSSAPIAuthentication yes
---
> GSSAPIAuthentication no
> #GSSAPIAuthentication yes
122c122
< #UseDNS yes
---
> UseDNS no
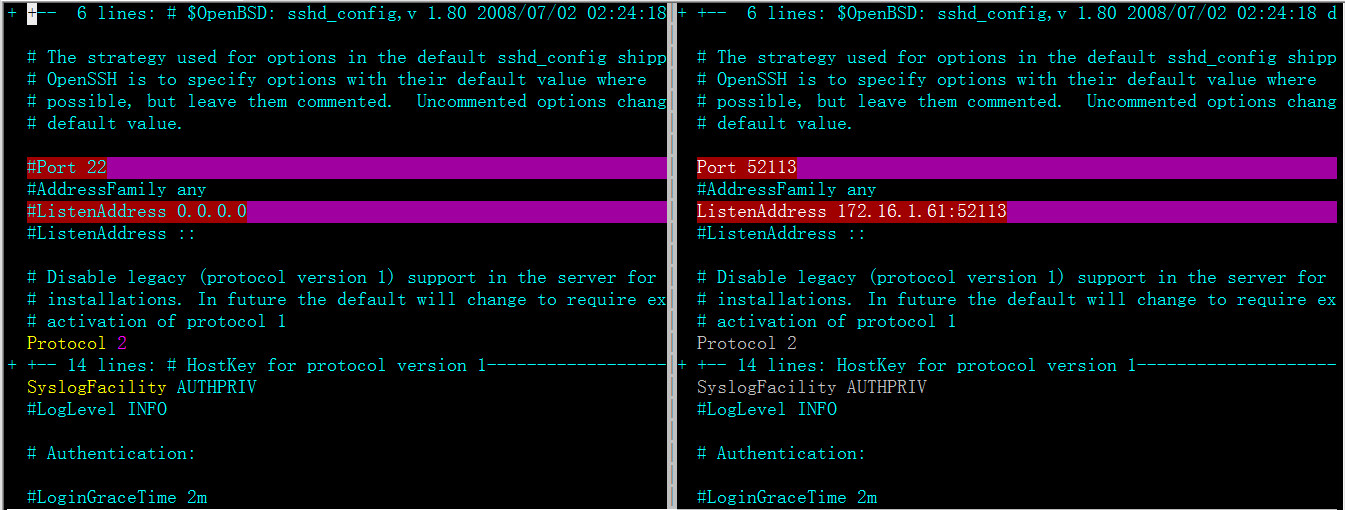
用vimdiff比较工具比较一下:
[[email protected] ssh]# vimdiff sshd_config sshd_config.ori
红色的就是修改的内容
然后再创建账号:
[[email protected] ~]# useradd oldboy
useradd: user ‘oldboy‘ already exists
[[email protected] ~]# echo 123456|passwd --stdin oldboy
Changing password for user oldboy.
passwd: all authentication tokens updated successfully.
在nfs服务器上面远程连接:ssh -p52113 [email protected]
本文出自 “sandshell” 博客,请务必保留此出处http://sandshell.blog.51cto.com/9055959/1955962
以上是关于SSH服务介绍的主要内容,如果未能解决你的问题,请参考以下文章
