pxe+kickstart cobbler无人值守装机
Posted Nuwanda
tags:
篇首语:本文由小常识网(cha138.com)小编为大家整理,主要介绍了pxe+kickstart cobbler无人值守装机相关的知识,希望对你有一定的参考价值。
环境准备:
一台服务器
[[email protected] tftpboot]# cat /etc/redhat-release
CentOS Linux release 7.2.1511 (Core)
[[email protected] tftpboot]# uname -a
Linux admin 3.10.0-327.el7.x86_64 #1 SMP Thu Nov 19 22:10:57 UTC 2015 x86_64 x86_64 x86_64 GNU/Linux
[[email protected] tftpboot]#
pxe+kickstart自动装机原理:
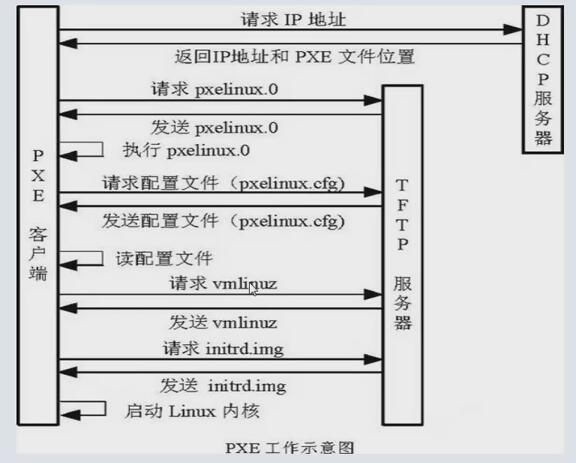
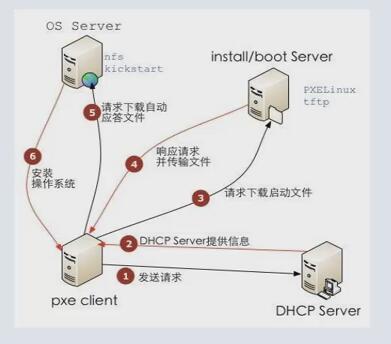
PXE(preboot execute environment,预启动执行环境)是由Intel公司开发的最新技术,工作于Client/Server的网络模式,支持工作站通过网络从远端服务器下载映像,并由此支持通过网络启动操作系统,在启动过程中,终端要求服务器分配IP地址,再用TFTP(trivial file transfer protocol)或MTFTP(multicast trivial file transfer protocol)协议下载一个启动软件包到本机内存中执行,由这个启动软件包完成终端(客户?)基本软件设置,从而引导预先安装在服务器中的终端操作系统。PXE可以引导多种操作系统,如:Windows95/98/2000/windows2003/windows2008/winXP/win7/win8,linux等。
原理图


准备条件:
一个镜像文件
httpd服务
tftp服务
dhcp服务
[[email protected] tftpboot]# mount /dev/cdrom /mnt/
[[email protected] tftpboot]# yum install httpd dhcp tftp-server createrepo xinetd -y
[[email protected] tftpboot]# mkdir /var/www/html/CentOS-7.1-x86_64/
[[email protected] tftpboot]# cp -a /mnt/* /var/www/html/CentOS-7.1-x86_64/
[[email protected] tftpboot]# createrepo -pdo /var/www/html/CentOS-7.1-x86_64/ /var/www/html/CentOS-7.1-x86_64/
[[email protected] tftpboot]# createrepo -g `ls /var/www/html/CentOS-7.1-x86_64/*-comps.xml` /var/www/html/CentOS-7.1-x86_64/
[[email protected] tftpboot]# vim /etc/xinetd.d/tftp
disable                            = no
[[email protected] dhcp-4.2.5]# cp /usr/share/doc/dhcp-4.2.5/dhcpd.conf.example /etc/dhcp/dhcpd.conf

subnet 192.168.220.0 netmask 255.255.255.0 {
  range dynamic-bootp 192.168.220.10 192.168.220.90;
  option subnet-mask 255.255.255.0;
  next-server 192.168.220.165;
  filename "pxelinux.0";
}

[[email protected] dhcp-4.2.5]# service dhcpd start
Redirecting to /bin/systemctl start  dhcpd.service
[[email protected] dhcp-4.2.5]# service httpd start
Redirecting to /bin/systemctl start  httpd.service
[[email protected] dhcp-4.2.5]# service xinetd start
Redirecting to /bin/systemctl start  xinetd.service
[[email protected] dhcp-4.2.5]#


上传ks.cfg文件至/var/www/html/CentOS-7.1-x86_64/

[[email protected] dhcp-4.2.5]# yum install syslinux -y
[[email protected] dhcp-4.2.5]# cp /usr/share/syslinux/pxelinux.0 /var/lib/tftpboot/
[[email protected] dhcp-4.2.5]# cp /mnt/isolinux/* /var/lib/tftpboot/
[[email protected] tftpboot]# mkdir /var/lib/tftpboot/pxelinux.cfg
[[email protected] tftpboot]# cp /mnt/isolinux/isolinux.cfg /var/lib/tftpboot/pxelinux.cfg/default
[[email protected] pxelinux.cfg]# vim default

label linux
  menu label ^AUTO Install CentOS 7
  kernel vmlinuz
  append initrd=initrd.img ks=http://192.168.220.165/CentOS-7.1-x86_64/CentOS-7.1-x86_64.cfg

[[email protected] pxelinux.cfg]# getenforce
Permissive
[[email protected] pxelinux.cfg]# setenforce 0
[[email protected] pxelinux.cfg]# vim /etc/selinux/config
    SELINUX=disabled


[[email protected] pxelinux.cfg]# service firewalld stop
Redirecting to /bin/systemctl stop  firewalld.service
[[email protected] pxelinux.cfg]#
以上是关于pxe+kickstart cobbler无人值守装机的主要内容,如果未能解决你的问题,请参考以下文章