elasticsearch 冷热数据的读写分离
Posted
tags:
篇首语:本文由小常识网(cha138.com)小编为大家整理,主要介绍了elasticsearch 冷热数据的读写分离相关的知识,希望对你有一定的参考价值。
步骤
一、冷热分离集群配置
比如三个机器共六个node的es集群。
每个机器上各挂载一个ssd 和 一个sata。每个机器需要启动两个es进程、每个进程对应不同类型的磁盘。
关键配置:
node.max_local_storage_nodes: 2 #允许每个机器启动两个es进程
path.data: /home/centos/es/elasticsearch-2.1.0/data/ssd #需要显示指定es对应的数据目录
启动命令中需要指定node tag
./elasticsearch -d -Des.path.conf=/home/centos/es/elasticsearch-2.1.0/config/ssd -d --node.tag=ssd
./elasticsearch -d -Des.path.conf=/home/centos/es/elasticsearch-2.1.0/config/sata -d --node.tag=sata
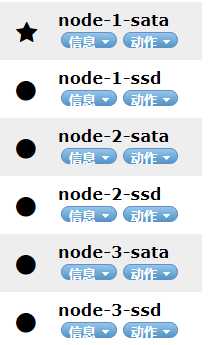
启动以后节点如下:

二、创建索引模板
http://192.168.126.132:9200/_template/hottest/ PUT
{
    "order": 1,
    "template": "hottest*",
    "settings": {
        "index": {
            "number_of_shards": "3",
            "number_of_replicas": "1",
            "refresh_interval": "1s",
            "routing.allocation.require.tag": "ssd"
        }
    },
    "mappings": {
        "_default_": {
            "properties": {
                "userid": {
                    "index": "not_analyzed",
                    "type": "string"
                },
                "username": {
                    "index": "not_analyzed",
                    "type": "string"
                },
                "sex": {
                    "index": "not_analyzed",
                    "type": "string"
                },
                "address": {
                    "index": "no",
                    "type": "string"
                }
            },
            "_all": {
                "enabled": false
            }
        }
    },
    "aliases": {
        "hottest": {}
    }
}
"routing.allocation.require.tag": "ssd" 指定默认写入到 ssd 节点。
三、插入数据
http://192.168.126.132:9200/hottest_20170805/def/100001/ PUT
{
    "userid": "100001",
    "username": "zhangsan",
    "sex": "1",
    "address": "beijing"
}
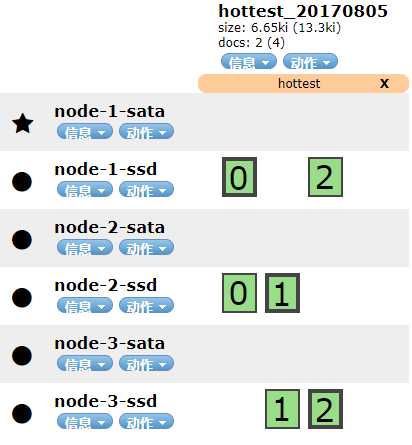
在head 中看到数据全部保存在的 ssd 节点。

四、定时迁移老数据到 sata
http://192.168.126.132:9200/hottest_20170805/_settings/ PUT
{
    "index.routing.allocation.require.tag": "sata"
}
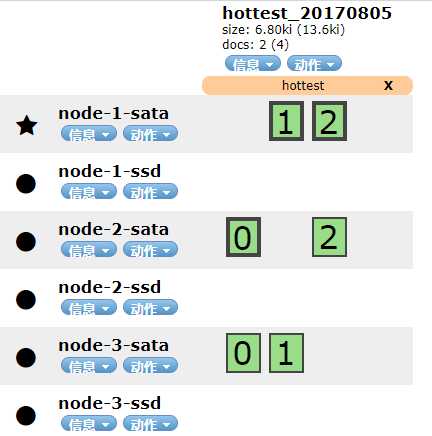
在head中看到数据移动到了 sata 节点

解决了两个问题
一、使用有限的ssd节点资源来实现同时支持高并发读写和大数据量的存储。
通过配置使最新的数据保存在ssd磁盘节点上,较老的数据自动迁移到廉价sata节点。
二、用户做一次大的查询,大量的读io和聚合操作导致集群load升高,阻塞新数据的写入,能做到一定程度的读写分离。
以上是关于elasticsearch 冷热数据的读写分离的主要内容,如果未能解决你的问题,请参考以下文章