开源实时日志分析ELK平台部署
Posted kaka_jon
tags:
篇首语:本文由小常识网(cha138.com)小编为大家整理,主要介绍了开源实时日志分析ELK平台部署相关的知识,希望对你有一定的参考价值。
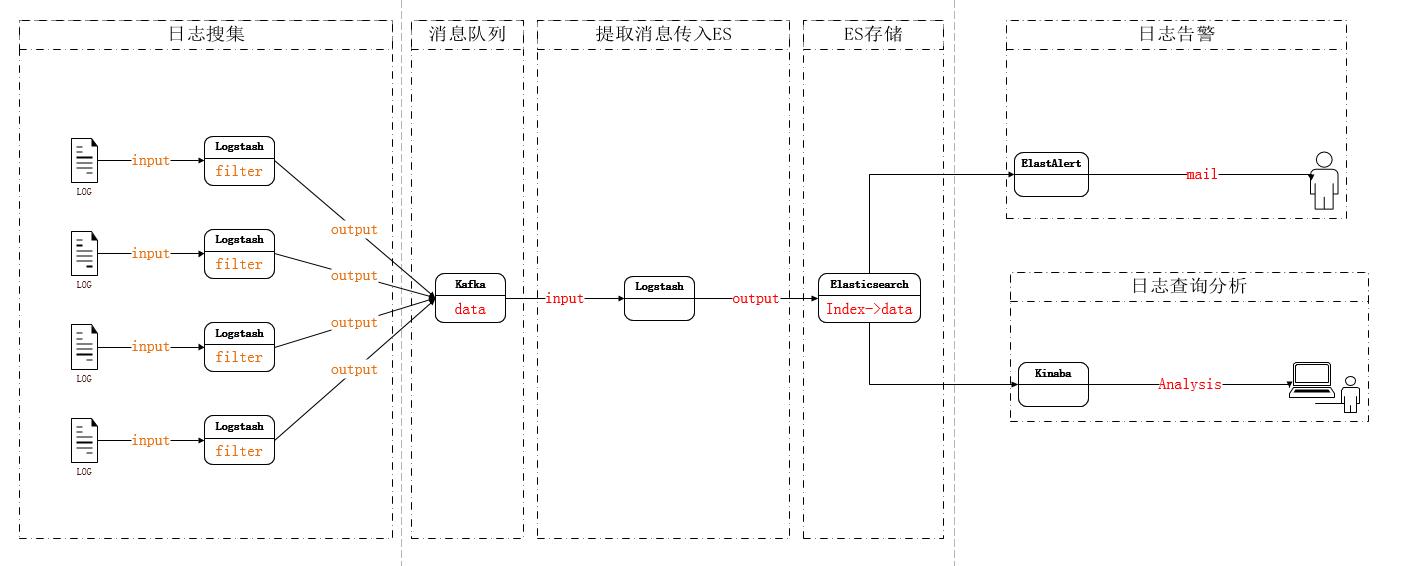
ELK架构图:

1. JDK环境
-------------------
1.1 下载最新JDK,解压到/usr/local/java目录。
1.2 设置环境变量
打开/etc/profile,添加下面内容
export JAVA_HOME=/usr/local/java
export JRE_HOME=$JAVA_HOME/jre
export PATH=$PATH:$JAVA_HOME/bin
export CLASSPATH=.:$JAVA_HOME/lib/dt.jar:$JAVA_HOME/lib/tools.jar:$JRE_HOME/lib:$CLASSPATH
export ES_HOME=/data/elk/elasticsearch
1.3 使设置生效
source /etc/profile
2. 安装配置Elasticsearch
---------------------------
2.1 下载
wget https://artifacts.elastic.co/downloads/elasticsearch/elasticsearch-5.5.0.tar.gz
2.2 安装
tar xf elasticsearch-5.5.0.tar.gz
mv elasticsearch-5.5.1 /data/elk/elasticsearch
2.3 配置文件
默认会加载config目录下的三个配置文件
elasticsearch.yml:主配置文件
jvm.options:java运行环境参数设置,最主要是下面两个参数,根据系统实际情况设置
-Xms4g
-Xmx8g
log4j2.properties:日志格式配置文件,可以忽略。
2.4 启动和关闭
启动:最新版不允许使用root启动elasticsearch,添加elastic用户作为运行用户
groupadd elastic
useradd elastic -g elastic
chown -R elastic:elastic /data/elk/elasticsearch
su – elastic
/data/elk/elasticsearch/bin/elasticsearch -d
netstat -ntl |grep 9200
关闭:kill -9 `ps aux |grep elasticsearch |grep java |awk -F" " \'{print $2}\'`
2.5 安装x-pack插件
/data/elk/elasticsearch/bin/elasticsearch-plugin install x-pack
2.6 数据查询
查看指定索引数据:curl -u elastic:xxx12345 http://127.0.0.1:9200/logstash-web-zx-proxy-nginx-access/_search?size=1000&from=0&pretty
查看所有可用索引列表:curl -u elastic:xxxx12345 \'localhost:9200/_cat/indices?v\'
2.7 elasticsearch重要配置
日志和数据目录
path:
logs: /var/log/elasticsearch
data: /var/data/elasticsearch
注意:生产环境最好不要保留默认配置,不然在升级elasticsearch的时候,这些目录可能被删除或覆盖。
集群名称
cluster.name: logging-prod
注意:所有节点的集群名称都必须一致
节点名称
node.name:prod-data-2
注意:集群中每个节点有唯一的节点名称
锁定内存
bootstrap.memory_lock: true
侦听IP
network.host: 192.168.1.10
指定集群其它节点
discovery.zen.ping.unicast.hosts:
- 192.168.1.10:9300
- 192.168.1.11
- seeds.mydomain.com
指定最小合格主节点数
discovery.zen.minimum_master_nodes: 2
这个值一般设置为:(master_eligible_nodes / 2) + 1
注意:这个值很重要,默认值为1,默认值有可能导致脑裂的情况出现,所以需要修改为合适的值。
3. 安装配置 kibana
----------------------
3.1 下载
wget https://artifacts.elastic.co/downloads/kibana/kibana-5.5.1-linux-x86_64.tar.gz
3.2 安装
tar -xzf kibana-5.5.1-linux-x86_64.tar.gz
mv kibana-5.5.1-linux-x86_64 /data/elk/kibana
3.3 配置文件:kibana.yml
##kibana默认只侦听127.0.0.1,所以需要更改为0.0.0.0
vi /data/elk/kibana/config/kibana.yml
server.host: 0.0.0.0
3.4 启动和关闭
启动:nohup /data/elk/kibana/bin/kibana &
netstat -na |grep 5601
关闭:kill -9 `ps aux |grep kibana |grep elk|awk -F" " \'{print $2}\'`
3.5 安装x-pack插件
/data/elk/kibana/bin/kibana-plugin install x-pack
4. 安装配置Logstash
----------------------
4.1 下载
wget https://artifacts.elastic.co/downloads/logstash/logstash-5.5.1.tar.gz
4.2 安装
tar xf logstash-5.5.1.tar.gz
mv logstash-5.5.1 /data/elk/logstash
4.3 测试安装是否正确
/data/elk/logstash/bin/logstash -e \'input { stdin {} } output { stdout {} }\'
##终端输入 hello world,有添加时间戳输出即是正常
2017-07-29T22:34:01.643Z server.lishen.com hello world
4.4 安装x-pack插件
/data/elk/logstash/bin/logstash-plugin install x-pack
4.5 配置文件
默认会自动加载config下面三个文件:
logstash.yml:主配置文件
jvm.options:java运行环境参数设置,最主要是下面两个参数,根据系统实际情况设置
-Xms6144m
-Xmx8g
log4j2.properties:日志格式配置文件,可以忽略。
同时可以自定义配置文件,然后在启动的时候使用 -f选项指定自定义的配置文件: nginx_log.conf
input {
kafka {
bootstrap_servers => "59.188.25.2xx:9092"
#group_id => ""
topics => ["web-proxy-nginx-log","web-zx-proxy-nginx-log","phone-proxy-nginx-log","tiger-proxy-nginx-log","exter-tiger-proxy-nginx-log","chat-proxy-nginx-log"]
codec => "json"
consumer_threads => 5
decorate_events => true
}
}
filter {
######大陆专线
if[fields][log_type] == "web-zx-proxy-nginx-access" {
grok {
match => { "message" => "%{NGINXPHONEACCESS}" }
}
mutate {
remove_field => ["message"]
}
mutate {
convert => ["upstream_response_time", "float"]
convert => ["body_bytes_sent", "integer"]
}
geoip {
source => "user_real_ip"
target => "geoip"
database => "/data/elk/logstash/vendor/bundle/jruby/1.9/gems/logstash-filter-geoip-4.2.1-java/vendor/GeoLite2-City.mmdb"
add_field => [ "[geoip][coordinates]", "%{[geoip][longitude]}" ]
add_field => [ "[geoip][coordinates]", "%{[geoip][latitude]}" ]
}
mutate {
convert => [ "[geoip][coordinates]", "float"]
}
}
if[fields][log_type] == "web-zx-proxy-nginx-error" {
grok {
match => { "message" => "%{NGINXPHONEERROR}" }
}
mutate {
remove_field => ["message"]
}
}
}
output {
if[fields][log_type] == "web-zx-proxy-nginx-access" {
elasticsearch {
hosts => [ "127.0.0.1:9200" ]
index => "logstash-web-zx-proxy-nginx-access"
user => elastic
password => xxxx12345
}
}
if[fields][log_type] == "web-zx-proxy-nginx-error" {
elasticsearch {
hosts => [ "127.0.0.1:9200" ]
index => "logstash-web-zx-proxy-nginx-error"
user => elastic
password => xxxx12345
}
}
}
4.6 启动和关闭
启动:nohup /data/elk/logstash/bin/logstash -f /data/elk/logstash/config/nginx_log.conf --config.reload.automatic &
关闭:kill -9 `ps aux|grep logstash|grep java|awk -F" " \'{print $2}\'`
5 ELK安全
------------------
X-Pack插件提供了基本的安全认证
5.1 安装x-pack插件(elasticsearch/kibana/logstash)
5.2 更改默认管理员密码:
curl -XPUT -u elastic \'localhost:9200/_xpack/security/user/elastic/_password\' -H "Content-Type: application/json" -d \'{
"password" : "xxxx12345"
}\'
curl -XPUT -u elastic \'localhost:9200/_xpack/security/user/kibana/_password\' -H "Content-Type: application/json" -d \'{
"password" : "xxxx12345"
}\'
curl -XPUT -u elastic \'localhost:9200/_xpack/security/user/logstash_system/_password\' -H "Content-Type: application/json" -d \'{
"password" : "xxxx12345"
}\'
默认超级管理员账号密码是:elastic changeme
##一旦修改了密码,需要更改kibana配置文件kibana.yml中的密码
elasticsearch.password: xxxx12345
##重启kibana
##同时也要修改logstash配置文件logstash.yml的密码,增加两行
xpack.monitoring.elasticsearch.username: elastic
xpack.monitoring.elasticsearch.password: xxxx12345
##如果要修改密码和增加用户,也可以到kibana页面修改:
访问kibana:http://ip:5601
到Management > Security > User中进行操作
以上是关于开源实时日志分析ELK平台部署的主要内容,如果未能解决你的问题,请参考以下文章