Tensorflow实践 mnist手写数字识别
Posted
tags:
篇首语:本文由小常识网(cha138.com)小编为大家整理,主要介绍了Tensorflow实践 mnist手写数字识别相关的知识,希望对你有一定的参考价值。
minst数据集
tensorflow的文档中就自带了mnist手写数字识别的例子,是一个很经典也比较简单的入门tensorflow的例子,非常值得自己动手亲自实践一下。由于我用的不是tensorflow中自带的mnist数据集,而是从kaggle的网站下载下来的,数据集有些不太一样,所以直接按照tensorflow官方文档上的参数训练的话还是踩了一些坑,特此记录。
首先从kaggle网站下载mnist数据集,一份是train.csv,用于训练,另一份是test.csv 用于测试提交的。
1 import pandas as pd
2 import numpy as np
3
4 train = pd.read_csv("train.csv")
5 test = pd.read_csv("test.csv")

表中的每一行代表一张图片,label代表这张图片的数字,其他列是每个像素点的值,不是0就是1,每张图有 28 * 28 = 784 个像素点。
由于输出的时候用的是softmax,所以要先对label进行one-hot encode.
all_x = np.array(train_data.iloc[:,1:],dtype=np.float32)
all_y = np.array(train_data.iloc[:,0])
from sklearn.preprocessing import OneHotEncoder
enc = OneHotEncoder()
all_y_onehot = enc.fit_transform(all_y.reshape(-1,1)).toarray()

最后为了不用提交能测试模型的效果,将train_data 拆分成用于训练和用于测试两部分。
from sklearn.model_selection import train_test_split
train_x,test_x,train_y,test_y = train_test_split(all_x,all_y_onehot,test_size=0.1,random_state=0)
感知机模型
先从最简单的神经网络模型出发,设计一个只有两层的神经网络,网络的输入是 784 维的,输出是10维的。大致可以分成两步:1. 设计网络结构 2. 设置优化方法
import tensorflow as tf

sess = tf.InteractiveSession()

x = tf.placeholder("float",shape=[None,784])
y_ = tf.placeholder("float",shape=[None,10])

W = tf.Variable(tf.zeros((784,10)))
b = tf.Variable(tf.zeros((10,)))
y = tf.nn.softmax(tf.matmul(x, W) + b)

cross_entropy = -tf.reduce_sum(y_*tf.log(y))
train_step = tf.train.GradientDescentOptimizer(1e-2).minimize(cross_entropy)

sess.run(tf.global_variables_initializer())
然后就可以开始训练了
train_size = train_x.shape[0]
for i in range(1000):
    start = i*50 % train_size
    end = (i+1)*50 % train_size
    #print(start,end)
    #print(b.eval())
    if start > end:
        start = 0
    batch_x = train_x[start:end]
    batch_y = train_y[start:end]
    print(cross_entropy.eval(feed_dict={x:batch_x,y_:batch_y}))
    sess.run(train_step,feed_dict={x:batch_x,y_:batch_y})
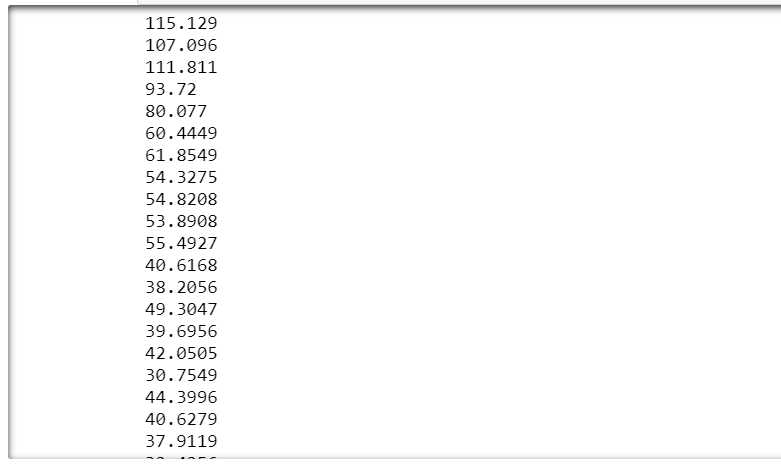
为了查看模型的收敛情况,我把训练过程中的cross_entropy也打印出来了,但是发生了不幸的情况。

额,第一次迭代完之后交叉熵就变成nan了,可以同时把 b 和 y 的值也打印出来,发现应该是因为步长太大了,所以将步长调小,我将步长调为了1e-7。

嗯,输出就变正常啦~ 再看一下这个模型的效果。

在测试集上达到了90%的准确率,嗯,还不错,但是应该可以更好,毕竟kaggle上面的最高准确率都到100%了==,所以接着尝试用更复杂一些的卷积神经网络。
卷积神经网络
def weight_variable(shape):
    initial = tf.truncated_normal(shape, stddev=0.0001)
    return tf.Variable(initial)

def bias_variable(shape):
    initial = tf.constant(0.1, shape=shape)
    return tf.Variable(initial)

def conv2d(x, W):
    return tf.nn.conv2d(x,W,strides=[1,1,1,1],padding=‘SAME‘)

def max_pool_2x2(x):
    return tf.nn.max_pool(x, ksize=[1,2,2,1],
                         strides=[1,2,2,1],
                         padding=‘SAME‘)

#因为要进行卷积操作,所以要将图片reshape成28*28*1的形状。
x_image = tf.reshape(x,[-1,28,28,1])
开始设计网络
#第一层卷积层 + relu正则函数 + 池化层
W_conv1 = weight_variable([5,5,1,32])
b_conv1 = bias_variable([32])

h_conv1 = tf.nn.relu(conv2d(x_image, W_conv1) + b_conv1)
h_pool1 = max_pool_2x2(h_conv1)

#第二层卷积层 + relu正则函数 + 池化层
W_conv2 = weight_variable([5,5,32,64])
b_conv2 = bias_variable([64])

h_conv2 = tf.nn.relu(conv2d(h_pool1, W_conv2) + b_conv2)
h_pool2 = max_pool_2x2(h_conv2)


#第一个全连接层 + relu正则函数 + 随机失活
W_fc1 = weight_variable([7*7*64, 1024])
b_fc1 = bias_variable([1024])

h_pool2_flat = tf.reshape(h_pool2,[-1,7*7*64])
h_fc1 = tf.nn.relu(tf.matmul(h_pool2_flat, W_fc1) + b_fc1)

keep_prob = tf.placeholder("float")
h_fc1_drop = tf.nn.dropout(h_fc1, keep_prob)

#第二个全连接层 + softmax输出
W_fc2 = weight_variable([1024,10])
b_fc2 = bias_variable([10])
y_conv = tf.nn.softmax(tf.matmul(h_fc1_drop, W_fc2) + b_fc2)
设置优化方法
cross_entropy = -tf.reduce_sum(y_*tf.log(y_conv))
train_step = tf.train.AdamOptimizer(1e-4).minimize(cross_entropy)
correct_prediction = tf.equal(tf.argmax(y_conv,1),tf.argmax(y_,1))
accuracy = tf.reduce_mean(tf.cast(correct_prediction,"float"))
sess.run(tf.global_variables_initializer())
然后就可以开始训练啦
train_size = train_x.shape[0]
for i in range(1000):
    start = i*50 % train_size
    end = (i+1)*50 % train_size
    if start > end:
        start = 0
    batch_x = train_x[start:end]
    batch_y = train_y[start:end]
    if i%20 == 0:
        print("iter {} : the accuracy is {:.2f}".format(i,accuracy.eval(feed_dict={x:batch_x,y_:batch_y,keep_prob:1.0})),
        ", the cross_entropy is {:.2f}".format(cross_entropy.eval(feed_dict={x:batch_x,y_:batch_y,keep_prob:1.0})))
    sess.run(train_step,feed_dict={x:batch_x,y_:batch_y,keep_prob:0.5})
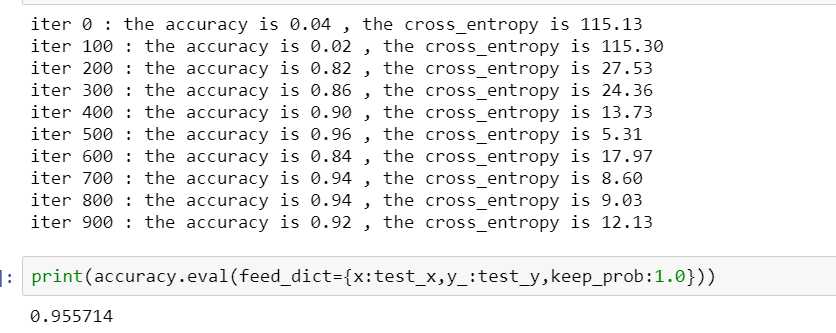
看一下输出的结果

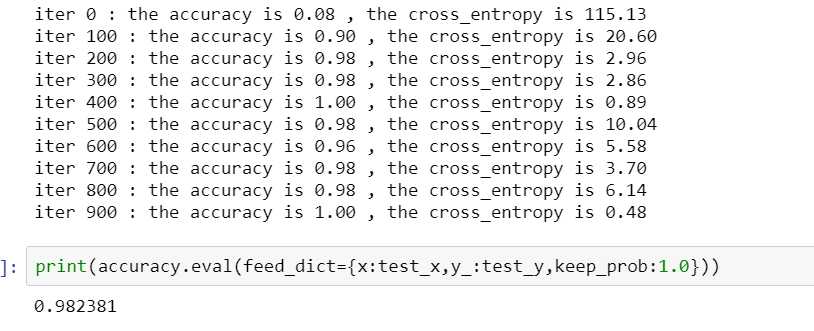
最后准确率停留在0.95左右,但是训练开始的时候交叉熵变化不大,收敛比较慢,所以可以尝试将步长设大一些,于是将步长改为1e-3

嗯,准确率提升到了98%,还是不错的。这样模型就训练好了,在测试集上预测一下结果并将结果上传到kaggle。
test_x = np.array(test_data,dtype=np.float32)
test_pred_y = y_conv.eval(feed_dict={x:test_x,keep_prob:1.0})
test_pred = np.argmax(test_pred_y,axis=1)

在测试集上的准确率也是98%左右,排名906,差不多是50%的位置,作为一个开始还是不错的^^.
总结
一, 用tensorflow的三大步骤:1、设计网络结构 2、设置优化方法 3、迭代进行训练
二,训练过程中观察损失函数的输出,如果一下子变成nan,可能是优化时的步长太大了,如果多次迭代没有变化的话可能是步长太小了。
三,多动手,毕竟就算是文档中的例子,自己运行的时候也不知道会发生什么[捂脸]

以上是关于Tensorflow实践 mnist手写数字识别的主要内容,如果未能解决你的问题,请参考以下文章