Druid源码分析(八) DestroyThread扫描回收连接
Posted
tags:
篇首语:本文由小常识网(cha138.com)小编为大家整理,主要介绍了Druid源码分析(八) DestroyThread扫描回收连接相关的知识,希望对你有一定的参考价值。
参考技术A 在DruidDataSource创建后,调用init()方法进行连接池初始化的时候.会创建一个销毁线程.通过设置 destroyScheduler 来区分创建方式,一种是通过定时任务机制去执行配置的 destroyTask ,另外中是直接创建默认销毁线程任务
线程里睡眠60s,并且调用了 DestoryTask
真正回收连接的任务.
判断连接池中对象是否存活,如果不满足则剔除.
Druid数据库连接池源码分析
Druid不仅仅是一个数据库连接池,还有很多标签,比如统计监控、过滤器、SQL解析等。既然要分析连接池,那先看看DruidDataSource类
getConnection方法的实现:
    @Override
    public DruidPooledConnection getConnection() throws SQLException {
        return getConnection(maxWait);
    }

    public DruidPooledConnection getConnection(long maxWaitMillis) throws SQLException {
        init();

        if (filters.size() > 0) {
            FilterChainImpl filterChain = new FilterChainImpl(this);
            return filterChain.dataSource_connect(this, maxWaitMillis);
        } else {
            return getConnectionDirect(maxWaitMillis);
        }
    }
返回的是一个DruidPooledConnection,这个类后面再说;另外这里传入了一个long类型maxWait,应该是用来做超时处理的;init方法在getConnection方法里面调用,这也是一种很好的设计;里面的过滤器链的处理就不多说了。
    public void init() throws SQLException {
        if (inited) {
            return;
        }

        final ReentrantLock lock = this.lock;  // 使用lock而不是synchronized
        try {
            lock.lockInterruptibly();
        } catch (InterruptedException e) {
            throw new SQLException("interrupt", e);
        }

        boolean init = false;
        try {
            if (inited) {
                return;
            }

            init = true;

            connections = new DruidConnectionHolder[maxActive];  // 数组

            try {
                // init connections
                for (int i = 0, size = getInitialSize(); i < size; ++i) {
                    Connection conn = createPhysicalConnection();  // 生成真正的数据库连接
                    DruidConnectionHolder holder = new DruidConnectionHolder(this, conn);
                    connections[poolingCount] = holder;
                    incrementPoolingCount();
                }

                if (poolingCount > 0) {
                    poolingPeak = poolingCount;
                    poolingPeakTime = System.currentTimeMillis();
                }
            } catch (SQLException ex) {
                LOG.error("init datasource error, url: " + this.getUrl(), ex);
                connectError = ex;
            }

            createAndLogThread();
            createAndStartCreatorThread();
            createAndStartDestroyThread();

            initedLatch.await();

            initedTime = new Date();
            registerMbean();

            if (connectError != null && poolingCount == 0) {
                throw connectError;
            }
        } catch (SQLException e) {
            LOG.error("dataSource init error", e);
            throw e;
        } catch (InterruptedException e) {
            throw new SQLException(e.getMessage(), e);
        } finally {
            inited = true;
            lock.unlock();  // 释放锁

            if (init && LOG.isInfoEnabled()) {
                LOG.info("{dataSource-" + this.getID() + "} inited");
            }
        }
    }
我这里做了删减,加了一些简单的注释。通过这个方法,正好复习一下之前写的那些知识点,如果感兴趣,可以看看我之前写的文章。
这里使用了lock,并且保证只会被执行一次。根据初始容量,先生成了一批数据库连接,用一个数组connections存放这些连接的引用,而且专门定义了一个变量poolingCount来保存这些连接的总数量。
看到initedLatch.await有一种似曾相识的感觉
private final CountDownLatch initedLatch = new CountDownLatch(2);
这里调用了await方法,那countDown方法在哪些线程里面被调用呢
    protected void createAndStartCreatorThread() {
        if (createScheduler == null) {
            String threadName = "Druid-ConnectionPool-Create-" + System.identityHashCode(this);
            createConnectionThread = new CreateConnectionThread(threadName);
            createConnectionThread.start();
            return;
        }

        initedLatch.countDown();
    }
这里先判断createScheduler这个调度线程池是否被设置,如果没有设置,直接countDown;否则,就开启一个创建数据库连接的线程,当然这个线程的run方法还是会调用countDown方法。但是这里我有一个疑问:开启创建连接的线程,为什么一定要有一个调度线程池呢???
难道是当数据库连接创建失败的时候,需要过了指定时间后,再重试?这么理解好像有点牵强,希望高人来评论。
还有就是,当开启destroy线程的时候也会调用countDown方法。
接着在看getConnection方法,一直调用到getConnectionInternal方法
        DruidConnectionHolder holder;
        try {
            lock.lockInterruptibly();
        } catch (InterruptedException e) {
            connectErrorCount.incrementAndGet();
            throw new SQLException("interrupt", e);
        }

        try {
            if (maxWait > 0) {
                holder = pollLast(nanos);
            } else {
                holder = takeLast();
            }

        } catch (InterruptedException e) {
            connectErrorCount.incrementAndGet();
            throw new SQLException(e.getMessage(), e);
        } catch (SQLException e) {
            connectErrorCount.incrementAndGet();
            throw e;
        } finally {
            lock.unlock();
        }

        holder.incrementUseCount();

        DruidPooledConnection poolalbeConnection = new DruidPooledConnection(holder);
        return poolalbeConnection;
我这里还是做了删减。大体逻辑是:先从连接池中取出DruidConnectionHolder,然后再封装成DruidPooledConnection对象返回。再看看取holder的方法:
    DruidConnectionHolder takeLast() throws InterruptedException, SQLException {
        try {
            while (poolingCount == 0) {
                emptySignal(); // send signal to CreateThread create connection
                notEmptyWaitThreadCount++;
                if (notEmptyWaitThreadCount > notEmptyWaitThreadPeak) {
                    notEmptyWaitThreadPeak = notEmptyWaitThreadCount;
                }
                try {
                    notEmpty.await(); // signal by recycle or creator
                } finally {
                    notEmptyWaitThreadCount--;
                }
                notEmptyWaitCount++;

                if (!enable) {
                    connectErrorCount.incrementAndGet();
                    throw new DataSourceDisableException();
                }
            }
        } catch (InterruptedException ie) {
            notEmpty.signal(); // propagate to non-interrupted thread
            notEmptySignalCount++;
            throw ie;
        }

        decrementPoolingCount();
        DruidConnectionHolder last = connections[poolingCount];
        connections[poolingCount] = null;

        return last;
    }
这个方法非常好的诠释了Lock-Condition的使用场景,几行绿色的注释解释的很明白了,如果对empty和notEmpty看不太懂,可以去看看我之前写的那篇文章。
这个方法的逻辑:先判断池中的连接数,如果到0了,那么本线程就得被挂起,同时释放empty信号,并且等待notEmpty的信号。如果还有连接,就取出数组的最后一个,同时更改poolingCount。
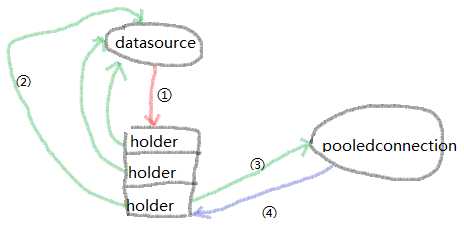
到这里,基本理解了Druid数据库连接池获取连接的实现流程。但是,如果不去看看里面的数据结构,还是会一头雾水。我们就看看几个基本的类,以及它们之间的持有关系。
1、DruidDataSource持有一个DruidConnectionHolder的数组,保存所有的数据库连接
private volatile DruidConnectionHolder[] connections; // 注意这里的volatile
2、DruidConnectionHolder持有数据库连接,还有所在的DataSource等
    private final DruidAbstractDataSource       dataSource;
    private final Connection                    conn;
3、DruidPooledConnection持有DruidConnectionHolder,所在线程等
    protected volatile DruidConnectionHolder holder;

    private final Thread                     ownerThread;

对于这种设计,我很好奇为什么要添加一层holder做封装,数组里直接存放Connection好像也未尝不可。
其实,这么设计是有道理的。比如说,一个Connection对象可以产生多个Statement对象,当我们想同时保存Connection和对应的多个Statement的时候,就比较纠结。
再看看DruidConnectionHolder的成员变量
    private PreparedStatementPool               statementPool;

    private final List<Statement>               statementTrace           = new ArrayList<Statement>(2);
这样的话,既可以做缓存,也可以做统计。
最终我们对Connection的操作都是通过DruidPooledConnection来实现,比如commit、rollback等,它们大都是通过实际的数据库连接完成工作。而我比较关心的是close方法的实现,close方法最核心的逻辑是recycle方法:
    public void recycle() throws SQLException {
        if (this.disable) {
            return;
        }

        DruidConnectionHolder holder = this.holder;
        if (holder == null) {
            if (dupCloseLogEnable) {
                LOG.error("dup close");
            }
            return;
        }

        if (!this.abandoned) {
            DruidAbstractDataSource dataSource = holder.getDataSource();
            dataSource.recycle(this);
        }

        this.holder = null;
        conn = null;
        transactionInfo = null;
        closed = true;
    }
通过最后几行代码,能够看出,并没有调用实际数据库连接的close方法,而只是断开了之前那张图里面的4号引用。用这种方式,来实现数据库连接的复用。
from: https://www.cnblogs.com/cz123/p/8117146.html
以上是关于Druid源码分析(八) DestroyThread扫描回收连接的主要内容,如果未能解决你的问题,请参考以下文章
Druid源码分析(四) 从连接池获取数据库链接getConnectionDirect()
真难!通过源码告诉你阿里的数据库连接池Druid为啥如此牛逼!
[ Druid ] 源码拆解 —— 2. 连接是如何创建的 ?
