NPOI操作Excel
Posted 心以不防
tags:
篇首语:本文由小常识网(cha138.com)小编为大家整理,主要介绍了NPOI操作Excel相关的知识,希望对你有一定的参考价值。
1.通过FileStream新建xls文件
FileStream FS = new FileStream(@"H:\\test1.xls", FileMode.Create); //新建xls文件
2.添加引用
using NPOI.HSSF.UserModel;
using NPOI.SS.UserModel;
using System.IO;
3.创建一个Sheet
 HSSFWorkbook HB = new HSSFWorkbook();
 ISheet Sheet1 = HB.CreateSheet("One");  //创建一个Sheet

4.设置单元的宽度高度并插入数据
Sheet1.SetColumnWidth(0, 15 * 256);
Sheet1.SetColumnWidth(1, 15 * 256);
Sheet1.SetColumnWidth(2, 15 * 256);
Sheet1.SetColumnWidth(3, 15 * 256);

for (int i = 0; i < 10; i++)
{
      IRow row1 = Sheet1.CreateRow(i);
      row1.Height = 20 * 20;        //设置行高
      for (int j = 0; j < 10; j++)
      {
          ICell cell1 = row1.CreateCell(j);
          cell1.SetCellValue("第" + (i + 1) + "行,第" + (j + 1) + "列");
      }
}
HB.Write(FS);  //把流写入excel
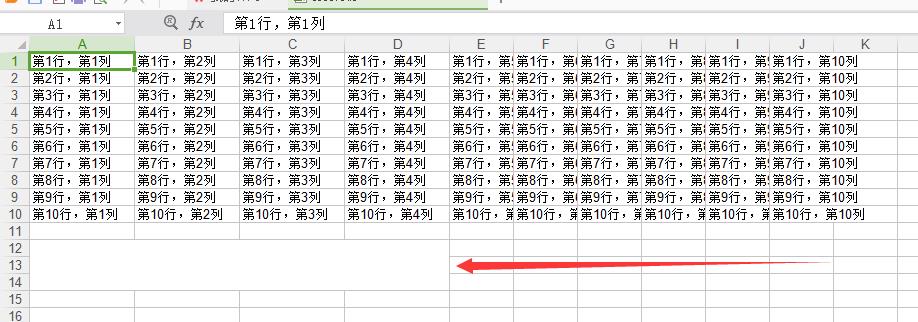
起始四列设置了宽度,红线右边没有。自己对比看

5.合并单元格
 //CellRangeAddress()该方法的参数次序是:开始行号,结束行号,开始列号,结束列号。
Sheet1.AddMergedRegion(new NPOI.SS.Util.CellRangeAddress(11, 13, 0, 3));
合并效果:

整体
    using System;
    using System.Collections.Generic;
    using System.Linq;
    using System.Text;
    using System.Threading.Tasks;
    using NPOI.HSSF.UserModel;
    using NPOI.SS.Formula.Eval;
    using NPOI.SS.Formula.Functions;
    using NPOI.SS.UserModel;
    using NPOI.XSSF.UserModel;
    using NPOI.POIFS.FileSystem;
    using NPOI.HPSF;
    using System.IO;
    using NPOI.SS.Util;
    using System.Drawing;
    using NPOI.HSSF.Util;

    namespace NPOI
    {
        class Program3
        {
            static void Main(string[] args)
            {
                //说明:设置单元格对齐方式

                //1.创建EXCEL中的Workbook
                IWorkbook myworkbook = new XSSFWorkbook();

                //2.创建Workbook中的Sheet
                ISheet mysheet = myworkbook.CreateSheet("sheet1");

                mysheet.SetColumnWidth(0, 24 * 256);
                mysheet.SetColumnWidth(1, 24 * 256);
                mysheet.SetColumnWidth(2, 24 * 256);
                mysheet.SetColumnWidth(3, 24 * 256);

                //3.创建Row中的Cell并赋值
                IRow row0 = mysheet.CreateRow(0);
                row0.Height = 50 * 20;
                row0.CreateCell(0).SetCellValue("对齐方式");
                row0.CreateCell(1).SetCellValue("对齐方式");
                row0.CreateCell(2).SetCellValue("对齐方式");
                row0.CreateCell(3).SetCellValue("对齐方式");

                IRow row1 = mysheet.CreateRow(1);
                row1.Height = 50 * 20;
                row1.CreateCell(0).SetCellValue("对齐方式");
                row1.CreateCell(1).SetCellValue("Shanghai is the largest city by population in ");
                row1.CreateCell(2).SetCellValue("对齐方式");
                row1.CreateCell(3).SetCellValue("对齐方式");

                //4.创建CellStyle
                ICellStyle style0 = myworkbook.CreateCellStyle();
                style0.Alignment = HorizontalAlignment.General;//【General】数字、时间默认:右对齐;BOOL:默认居中;字符串:默认左对齐

                ICellStyle style1 = myworkbook.CreateCellStyle();
                style1.Alignment = HorizontalAlignment.Left;//【Left】左对齐

                ICellStyle style2 = myworkbook.CreateCellStyle();
                style2.Alignment = HorizontalAlignment.Center;//【Center】居中

                ICellStyle style3 = myworkbook.CreateCellStyle();
                style3.Alignment = HorizontalAlignment.Right;//【Right】右对齐

                ICellStyle style4 = myworkbook.CreateCellStyle();
                style4.Alignment = HorizontalAlignment.Fill;//【Fill】填充

                ICellStyle style5 = myworkbook.CreateCellStyle();
                style5.Alignment = HorizontalAlignment.Justify;//【Justify】两端对齐[会自动换行](主要针对英文)

                ICellStyle style6 = myworkbook.CreateCellStyle();
                style6.Alignment = HorizontalAlignment.CenterSelection;//【CenterSelection】跨列居中

                ICellStyle style7 = myworkbook.CreateCellStyle();
                style7.Alignment = HorizontalAlignment.Distributed;//【Distributed】分散对齐[会自动换行]

                //【Tips】
                // 1.通过ICellStyle的VerticalAlignment属性可以设置垂直对齐模式与水平对齐无异 不再演示
                // 2.通过ISheet的SetDefaultColumnStyle(int column, ICellStyle style)方法可以设置整列的默认单元格样式;

                //5.将CellStyle应用于具体单元格
                row0.GetCell(0).CellStyle = style0;
                row0.GetCell(1).CellStyle = style1;
                row0.GetCell(2).CellStyle = style2;
                row0.GetCell(3).CellStyle = style3;

                row1.GetCell(0).CellStyle = style4;
                row1.GetCell(1).CellStyle = style5;
                row1.GetCell(2).CellStyle = style6;
                row1.GetCell(3).CellStyle = style7;

                //6.保存
                FileStream file = new FileStream(@"E:\\myworkbook3.xlsx", FileMode.Create);
                myworkbook.Write(file);
                file.Close();
            }
        }
    }
以上是关于NPOI操作Excel的主要内容,如果未能解决你的问题,请参考以下文章
NPOI操作Excel 005:写入空Excel(Winform版)