ARKit-1
Posted 不忘初心,方得始终
tags:
篇首语:本文由小常识网(cha138.com)小编为大家整理,主要介绍了ARKit-1相关的知识,希望对你有一定的参考价值。
1.1-AR技术简介
增强现实技术(Augmented Reality,简称 AR),是一种实时地计算摄影机影像的位置及角度并加上相应图像、视频、3D模型的技术,这种技术的目标是在屏幕上把虚拟世界套在现实世界并进行互动。
一个最简单地AR场景实现所需要的技术以及步骤包含如下
1.多媒体捕捉现实图像:如摄像头
2.三维建模:3D立体模型
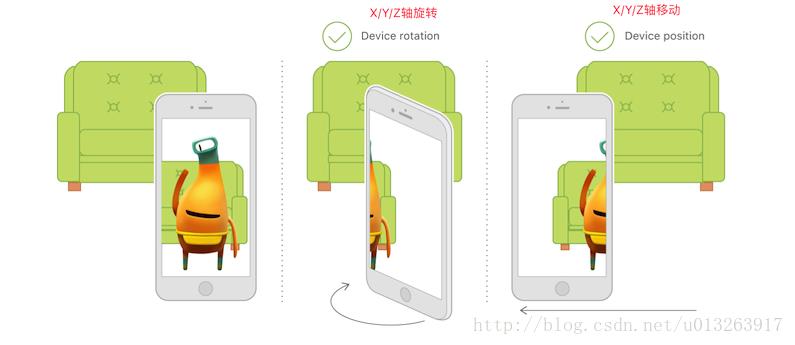
3.传感器追踪:主要追踪现实世界动态物体的六轴变化,这六轴分别是X、Y、Z轴位移及旋转。其中位移三轴决定物体的方位和大小,旋转三周决定物体显示的区域。
4.坐标识别及转换:3D模型显示在现实图像中不是单纯的frame坐标点,而是一个三维的矩阵坐标。这基本上也是学习AR最难的部分,好在ARKit帮助我们大大简化了这一过程。
4.除此之外,AR还可以与虚拟物体进行一些交互。
1.2-ARKit概述及特点介绍
1.ARKit是2017年6月6日,苹果发布ios11系统所新增框架,它能够帮助我们以最简单快捷的方式实现AR技术功能。
2.ARKit框架提供了两种AR技术,一种是基于3D场景(SceneKit)实现的增强现实,一种是基于2D场景(SpriktKit)实现的增强现实
一般主流都是基于3D实现AR技术,ARKit不仅支持3D游戏引擎SceneKit还支持2D游戏引擎SpriktKit,这一点出乎笔者意料之外
3.要想显示AR效果,必须要依赖于苹果的游戏引擎框架(3D引擎SceneKit,2D引擎SpriktKit),主要原因是游戏引擎才可以加载物体模型。
虽然ARKit框架中视图对象继承于UIView,但是由于目前ARKit框架本身只包含相机追踪,不能直接加载物体模型,所以只能依赖于游戏引擎加载ARKit
4.误区解读:ARKit虽然是iOS11新出的框架,但并不是所有的iOS11系统都可以使用,而是必须要是处理器A9及以上才能够使用,苹果从iPhone6s开始使用A9处理器,也就是iPhone6及以前的机型无法使用ARKit
5.开发环境介绍
-
- 1.Xcode版本:Xcode9及以上
- 2.iOS系统:iOS11及以上
- 3.iOS设备:处理器A9及以上(6S机型及以上)
- 4.MacOS系统:10.12.4及以上(安装Xcode9对Mac系统版本有要求)
1.3-ARKit初体验之3D效果
1.打开Xcode9bete版本,新建一个工程,选择Augmented Reality APP(Xcode9新增),点击next
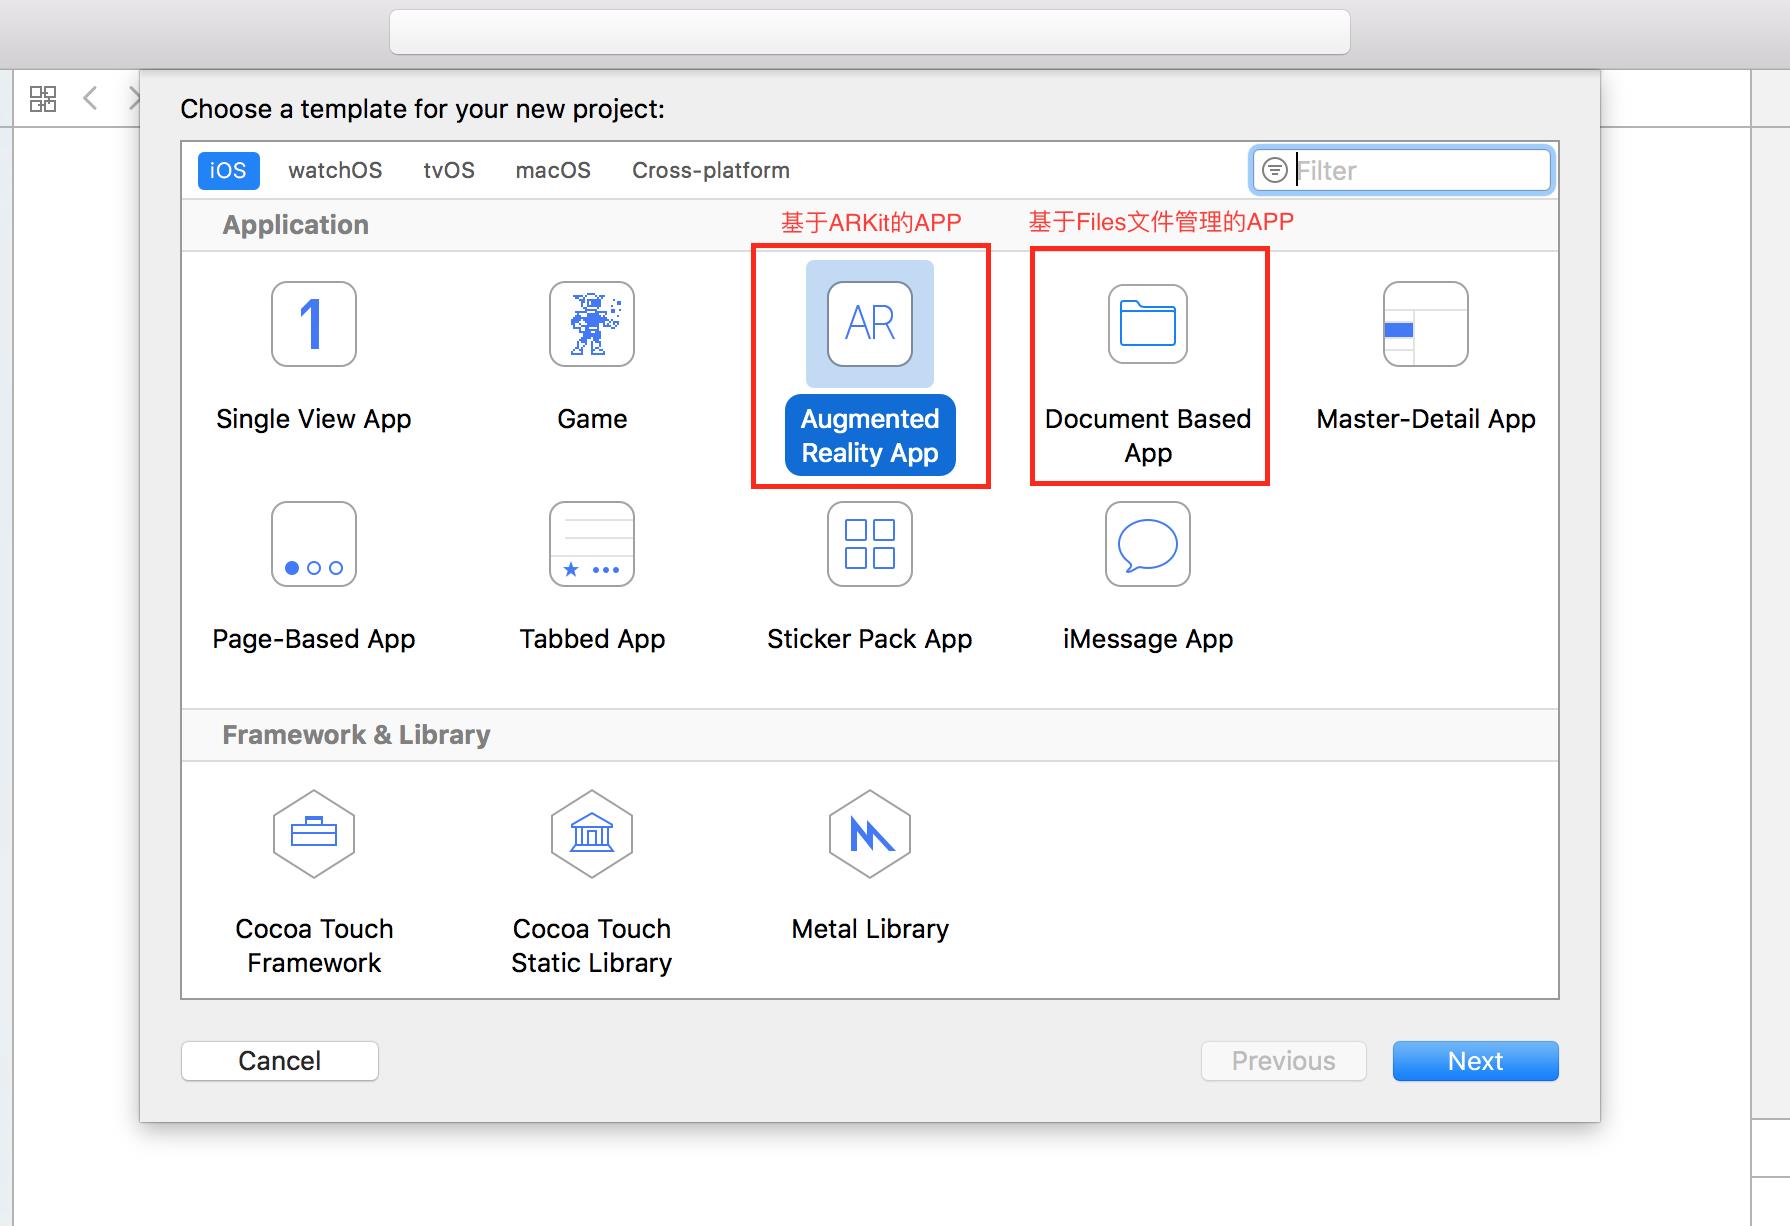
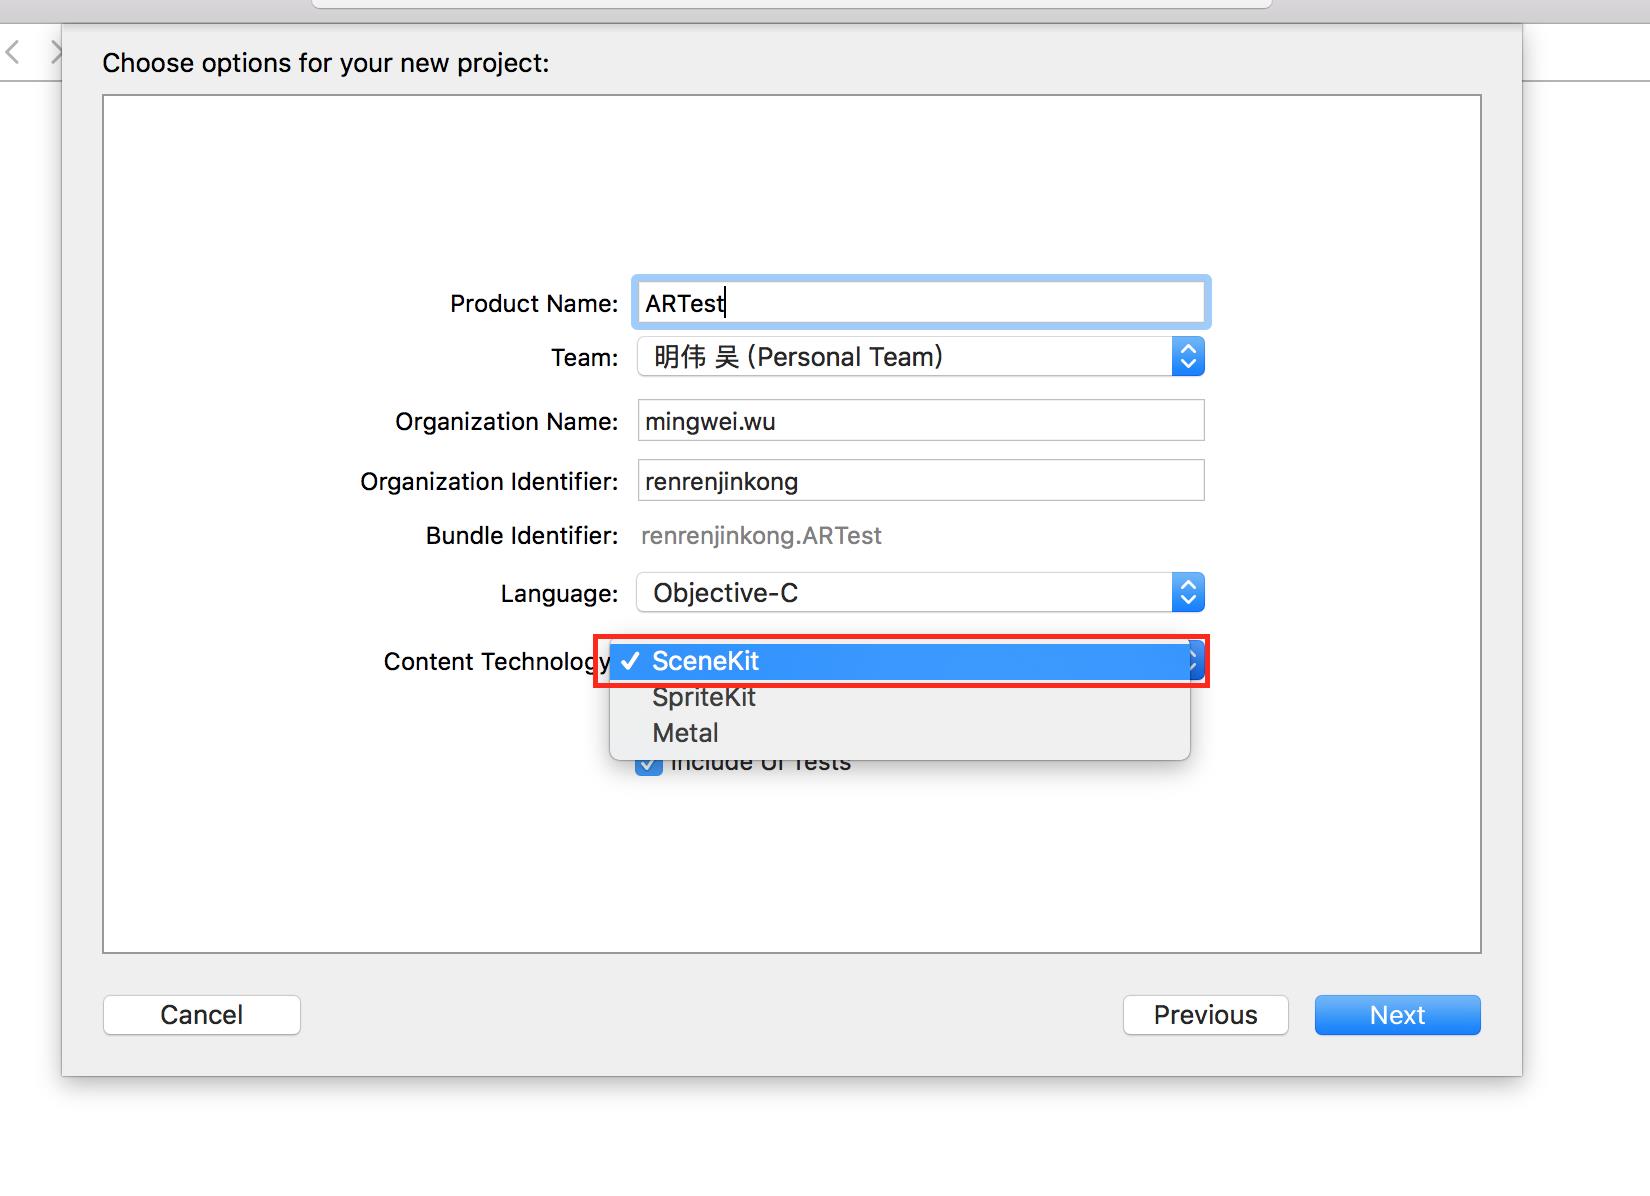
2.在包含技术选项中选择SceneKit
3.此时,Xcode会自动为我们生成一段极其简洁的AR代码
本小节主要体验一下系统的AR效果,代码的具体含义以及ARKit框架的架构及具体使用将会在后期介绍
 1 #import "ViewController.h"
 2
 3 @interface ViewController () <ARSCNViewDelegate>
 4
 5 //ARKit框架中用于3D显示的预览视图
 6 @property (nonatomic, strong) IBOutlet ARSCNView *sceneView;
 7
 8 @end
 9
10
11 @implementation ViewController
12
13 - (void)viewDidLoad {
14     [super viewDidLoad];
15
16     // Set the view\'s delegate
17     // 设置代理
18     self.sceneView.delegate = self;
19
20     // Show statistics such as fps and timing information
21     // ARKit统计信息
22     self.sceneView.showsStatistics = YES;
23
24     // Create a new scene
25     // 使用模型创建节点(scn格式文件是一个基于3D建模的文件,使用3DMax软件可以创建,这里系统有一个默认的3D飞机)
26     SCNScene *scene = [SCNScene sceneNamed:@"art.scnassets/ship.scn"];
27
28     // Set the scene to the view
29     // 设置ARKit的场景为SceneKit的当前场景(SCNScene是Scenekit中的场景,类似于UIView)
30     self.sceneView.scene = scene;
31 }
32
33 - (void)viewWillAppear:(BOOL)animated {
34     [super viewWillAppear:animated];
35
36     // Create a session configuration
37     // 创建一个追踪设备配置(ARWorldTrackingSessionConfiguration主要负责传感器追踪手机的移动和旋转)
38     ARWorldTrackingSessionConfiguration *configuration = [ARWorldTrackingSessionConfiguration new];
39
40     // Run the view\'s session
41     // 开始启动ARSession会话(启动AR)
42     [self.sceneView.session runWithConfiguration:configuration];
43 }
44
45 - (void)viewWillDisappear:(BOOL)animated {
46     [super viewWillDisappear:animated];
47
48     // Pause the view\'s session
49     // 暂停ARSession会话
50     [self.sceneView.session pause];
51 }
52
53 - (void)didReceiveMemoryWarning {
54     [super didReceiveMemoryWarning];
55     // Release any cached data, images, etc that aren\'t in use.
56 }
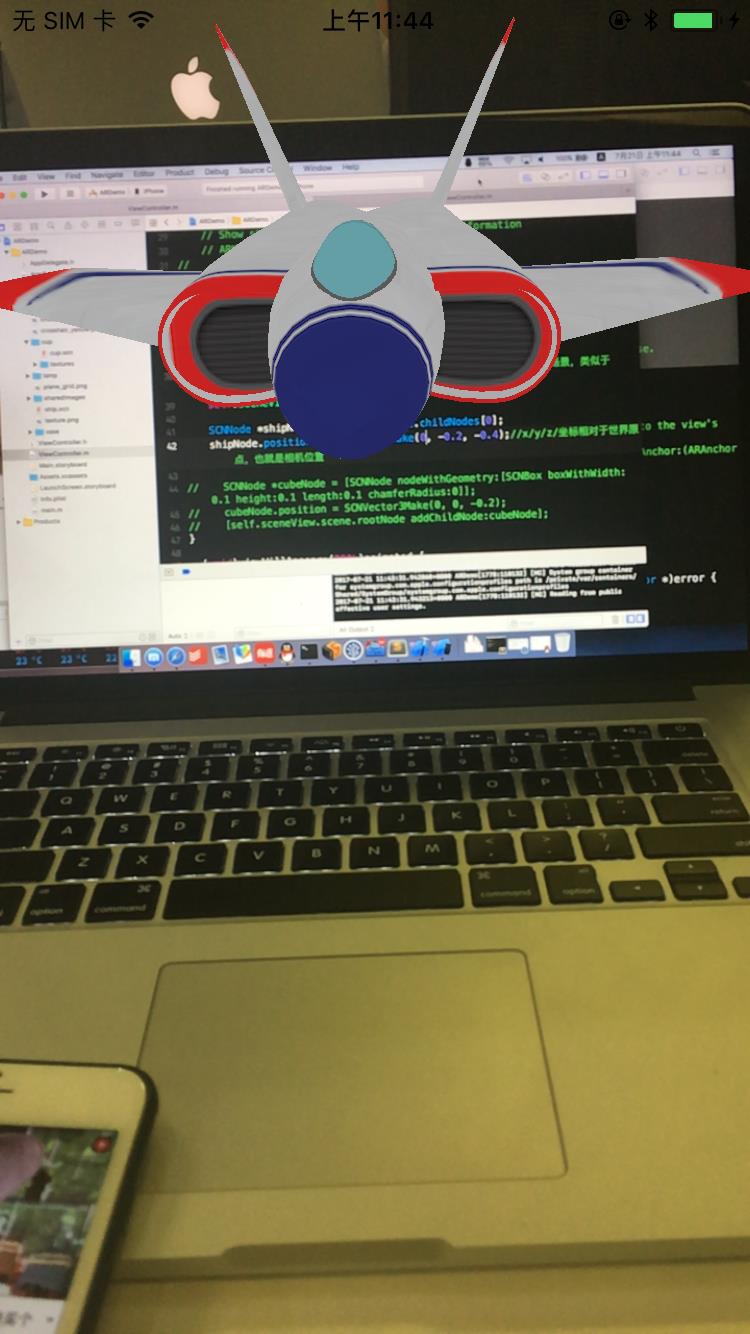
效果演示
3D效果AR特点:1.飞机能够随着摄像头位置的变化而看到不同的部位(六轴)2.飞机能够随着摄像头的远近进行缩放
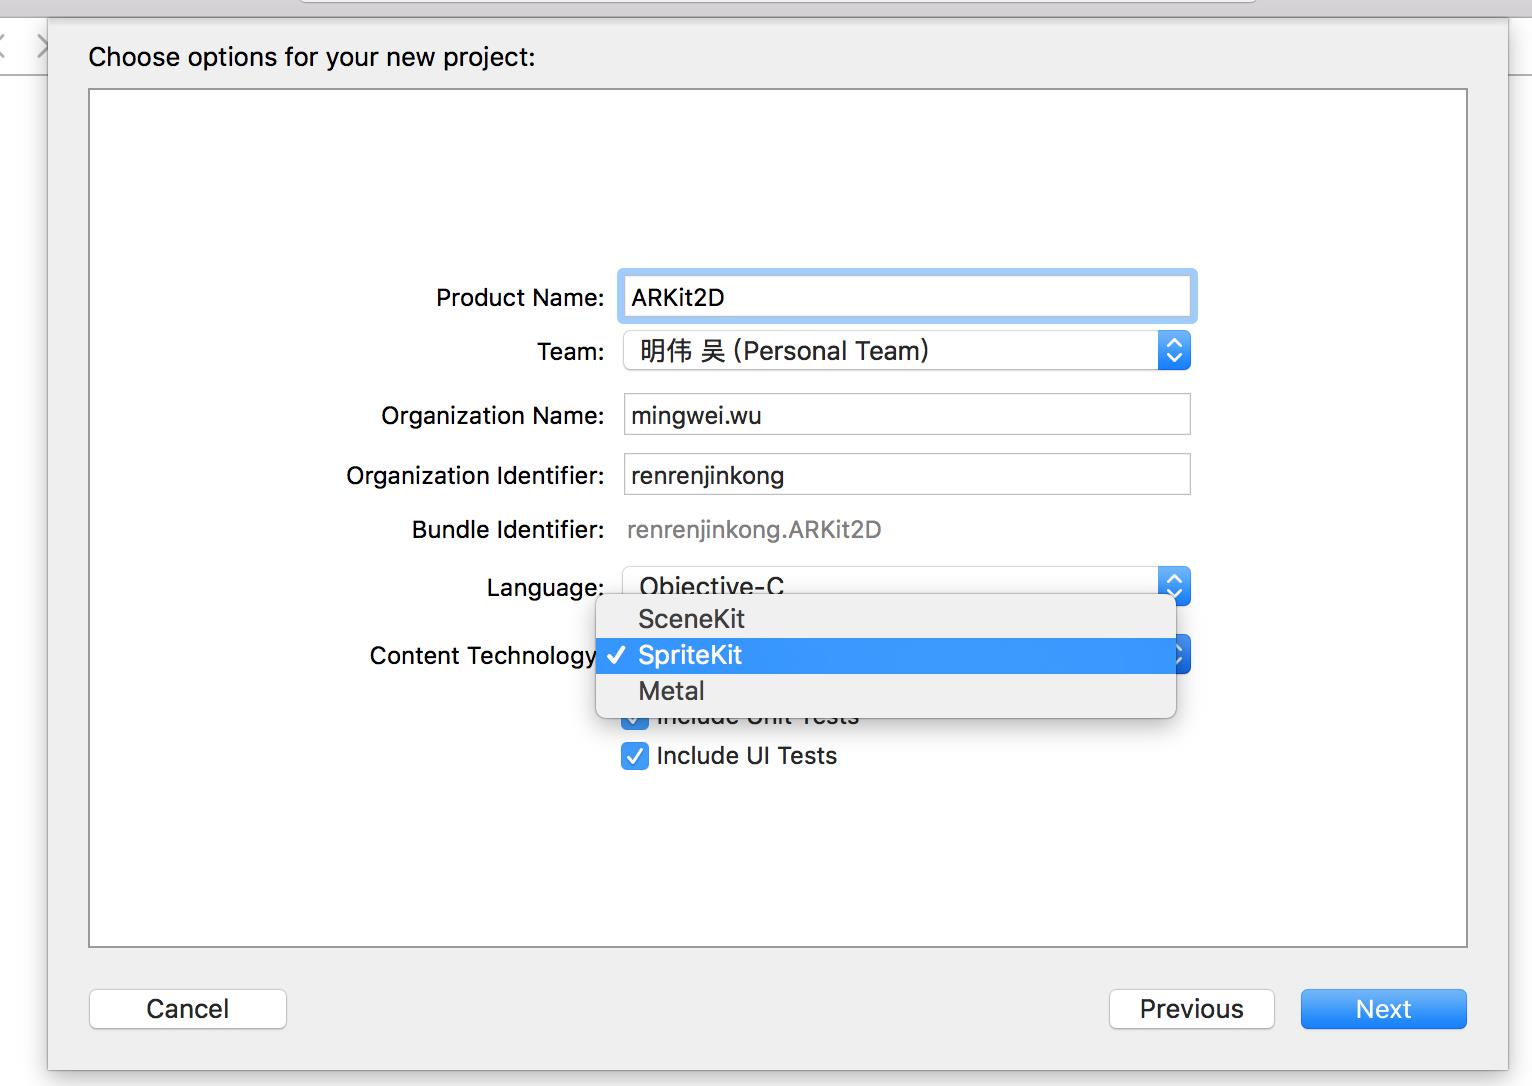
2.1-ARKit初体验之2D效果
示例效果是点击屏幕,在中心点生成一个2D AR图像
2D效果的AR与3D效果有一点的区别
1.使用步骤与3D基本类似,在创建Xcode的时候选择SpriteKit引擎
2.此时Xcode会为我们生成简洁的2D地图加载场景
 1 #import "ViewController.h"
 2 #import "Scene.h"
 3
 4 @interface ViewController () <ARSKViewDelegate>
 5
 6 @property (nonatomic, strong) IBOutlet ARSKView *sceneView;
 7
 8 @end
 9
10
11 @implementation ViewController
12
13 - (void)viewDidLoad {
14     [super viewDidLoad];
15
16     // Set the view\'s delegate
17     // 设置场景视图代理
18     self.sceneView.delegate = self;
19
20     // Show statistics such as fps and node count
21     // 显示帧率
22     self.sceneView.showsFPS = YES;
23     // 显示界面节点(游戏开发中,一个角色对应一个节点)
24     self.sceneView.showsNodeCount = YES;
25
26     // Load the SKScene from \'Scene.sks\'
27     // 加载2D场景(2D是平面的)
28     Scene *scene = (Scene *)[SKScene nodeWithFileNamed:@"Scene"];
29
30     // Present the scene
31     // AR预览视图展现场景(这一点与3D视图加载有区别)
32     [self.sceneView presentScene:scene];
33 }
34
35 - (void)viewWillAppear:(BOOL)animated {
36     [super viewWillAppear:animated];
37
38     // Create a session configuration
39     // 创建设备追踪设置
40     ARWorldTrackingSessionConfiguration *configuration = [ARWorldTrackingSessionConfiguration new];
41
42     // Run the view\'s session
43     // 开始启动AR
44     [self.sceneView.session runWithConfiguration:configuration];
45 }
46
47 - (void)viewWillDisappear:(BOOL)animated {
48     [super viewWillDisappear:animated];
49
50     // Pause the view\'s session
51     // 暂停ARSession会话
52     [self.sceneView.session pause];
53 }
54
55 - (void)didReceiveMemoryWarning {
56     [super didReceiveMemoryWarning];
57     // Release any cached data, images, etc that aren\'t in use.
58 }
pragma mark - ARSKViewDelegate
// 点击界面会调用该方法,类似于touch begin方法 anchor是2D坐标的瞄点

- (SKNode *)view:(ARSKView *)view nodeForAnchor:(ARAnchor *)anchor {
    // Create and configure a node for the anchor added to the view\'s session.
    // 创建节点(节点可以理解为AR将要展示的2D图像)Text 为添加的展示内容
    SKLabelNode *labelNode = [SKLabelNode labelNodeWithText:@"以上是关于ARKit-1的主要内容,如果未能解决你的问题,请参考以下文章