shutil模块
Posted
tags:
篇首语:本文由小常识网(cha138.com)小编为大家整理,主要介绍了shutil模块相关的知识,希望对你有一定的参考价值。
对文件进行copy、还可以压缩包
文件copy
1)shutil.copyfileobj(fsrc, fdst[, length])
将文件内容拷贝到另一个文件中,需要打开文件,fsrc,fdst是2个文件的文件句柄
1 import shutil
2 with open("old_file",encoding = "utf-8") as f1,3     open("new_file","w",encoding = "utf-8") as f2:
4     shutil.copyfileobj(f1,f2)
2)shutil.copyfile(src, dst)
从一个文件拷贝到另一个文件,不需要打开文件这样的操作,src,dst 是2个文件的文件名
1 shutil.copyfile("old_file","new_file3")
3)shutil.copymode(src, dst) ??
仅拷贝权限。内容、组、用户均不变
[[email protected] ~]# ll
total 8
-rwxr-xr-x 1 root   root   0 Apr  1 16:05 zhangqigao   #有执行权限
-rw-r--r-- 1 whtest whtest 0 Apr  1 16:06 zhangqigao_old  #没有执行权限
>>> import os,shutil
>>> os.chdir("/root")
#拷贝"zhangqigao_old"权限给"zhangqigao"
>>> shutil.copymode("zhangqigao_old","zhangqigao")
[[email protected] ~]# ll
total 8
-rw-r--r-- 1 root   root   0 Apr  1 16:05 zhangqigao  # 获得跟"zhangqigao_old"一样的文件权限
-rw-r--r-- 1 whtest whtest 0 Apr  1 16:06 zhangqigao_old
4)shutil.copystat(src, dst) ??
拷贝状态的信息,包括:mode bits, atime, mtime, flags
5)shutil.copy(src, dst)
拷贝文件和权限
 1 #拷贝前
 2 [[email protected]_sh temp]# ll
 3 total 0
 4 -rwxr-xr-x 1 jenkins jenkins 0 Apr  1 16:26 zhangqigao_old
 5 #拷贝中
 6 >>> import os,shutil
 7 >>> os.chdir("/temp")
 8 >>> shutil.copy("zhangqigao_old","zhangqigao")
 9 #拷贝结果输出
10 [[email protected]_sh temp]# ll
11 total 0
12 -rwxr-xr-x 1 root    root    0 Apr  1 17:42 zhangqigao  #拷贝了zhangqigao_old文件和文件权限
13 -rwxr-xr-x 1 jenkins jenkins 0 Apr  1 16:26 zhangqigao_old
6)shutil.copy2(src, dst)
功能:拷贝文件和文件的状态
 1 #拷贝前
 2 [[email protected]_sh temp]# ll
 3 total 0
 4 -rwxr-xr-x 1 jenkins jenkins 0 Apr  1 16:26 zhangqigao_old
 5 #拷贝中
 6 >>> import os,shutil
 7 >>> os.chdir("/temp")
 8 >>> shutil.copy2("zhangqigao_old","zhangqigao")
 9 #拷贝后
10 [[email protected]_sh temp]# ll
11 total 0
12 -rwxr-xr-x 1 root    root    0 Apr  1 16:26 zhangqigao  #拷贝了zhangqigao_old的文件和状态
13 -rwxr-xr-x 1 jenkins jenkins 0 Apr  1 16:26 zhangqigao_old
7)shutil.copytree(src, dst, symlinks=False, ignore=None)
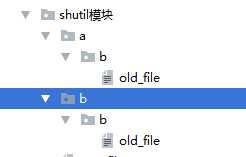
递归的去拷贝文件,将文件1递归拷贝到文件2
1 shutil.copytree("a","b")

8)shutil.rmtree(path[, ignore_errors[, onerror]])
递归删除文件目录,会删除空文件
1 shutil.rmtree("b")

文件打包
1)shutil.make_archive(base_name, format,...)
- 创建压缩包并返回文件路径,例如:zip、tar
- base_name: 压缩包的文件名,也可以是压缩包的路径。只是文件名时,则保存至当前目录,否则保存至指定路径,
- 如:www =>保存至当前路径
- 如:/Users/wupeiqi/www =>保存至/Users/wupeiqi/
- format: 压缩包种类,“zip”, “tar”, “bztar”,“gztar”
- root_dir: 要压缩的文件夹路径(默认当前目录)
- owner: 用户,默认当前用户
- group: 组,默认当前组
- logger: 用于记录日志,通常是logging.Logger对象
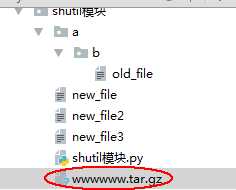
1 shutil.make_archive("wwwwww","gztar","E:\\python_3.5\\second\\json模块")

2)zipfile
shutil 对压缩包的处理是调用 ZipFile 和 TarFile 两个模块来进行的
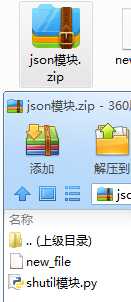
功能:以zip的形式压缩文件,注意了这个只能压缩文件,不能压缩目录,如果压缩,也只能显示空目录。
压缩
import zipfile
z = zipfile.ZipFile("json模块.zip","w")
z.write("new_file")
z.write("shutil模块.py")

z.close()

解压
1 z = zipfile.ZipFile(‘json模块.zip‘, ‘r‘)
2 z.extractall()
3 z.close()
3、tarfile
 1 import tarfile
 2
 3 # 压缩
 4 tar = tarfile.open(‘your.tar‘,‘w‘)
 5 tar.add(‘/Users/wupeiqi/PycharmProjects/bbs2.zip‘, arcname=‘bbs2.zip‘)
 6 tar.add(‘/Users/wupeiqi/PycharmProjects/cmdb.zip‘, arcname=‘cmdb.zip‘)
 7 tar.close()
 8
 9 # 解压
10 tar = tarfile.open(‘your.tar‘,‘r‘)
11 tar.extractall()  # 可设置解压地址
12 tar.close()
13
14 tarfile 压缩解压
以上是关于shutil模块的主要内容,如果未能解决你的问题,请参考以下文章