连接池
Posted 殷瑜泰
tags:
篇首语:本文由小常识网(cha138.com)小编为大家整理,主要介绍了连接池相关的知识,希望对你有一定的参考价值。
数据库连接池的原理:
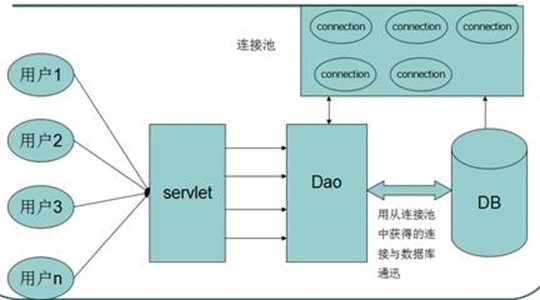
目的:解决建立数据库连接耗费资源和时间很多的问题,提高性能。
编写标准的数据源:
自定义数据库连接池要实现javax.sql.DataSource接口,一般都叫数据源
demo: |
public class MyDataSource implements DataSource{ //创建一个存放连接的池子 private static LinkedList<Connection> pool = (LinkedList<Connection>) Collections.synchronizedList(new LinkedList<Connection>());
static{ try { for (int i = 0; i < 10; i++) { Connection conn = DBUtils.getConnection(); pool.add(conn); } } catch (Exception e) { throw new ExceptionInInitializerError("初始化数据库连接失败,请检查配置文件是否正确!"); } }
public Connection getConnection() throws SQLException { Connection conn = null; if(pool.size()>0){ conn = pool.removeFirst();//从池中取出一个连接 return conn; }else{ //等待 //新创建一个连接 throw new RuntimeException("服务器忙。。。"); } }
public Connection getConnection(String username, String password) throws SQLException { // TODO Auto-generated method stub return null; }
public PrintWriter getLogWriter() throws SQLException { // TODO Auto-generated method stub return null; }
public void setLogWriter(PrintWriter out) throws SQLException { // TODO Auto-generated method stub
}
public void setLoginTimeout(int seconds) throws SQLException { // TODO Auto-generated method stub
}
public int getLoginTimeout() throws SQLException { // TODO Auto-generated method stub return 0; }
public <T> T unwrap(Class<T> iface) throws SQLException { // TODO Auto-generated method stub return null; }
public boolean isWrapperFor(Class<?> iface) throws SQLException { // TODO Auto-generated method stub return false; } } |
编写数据源时数据源关闭问题:
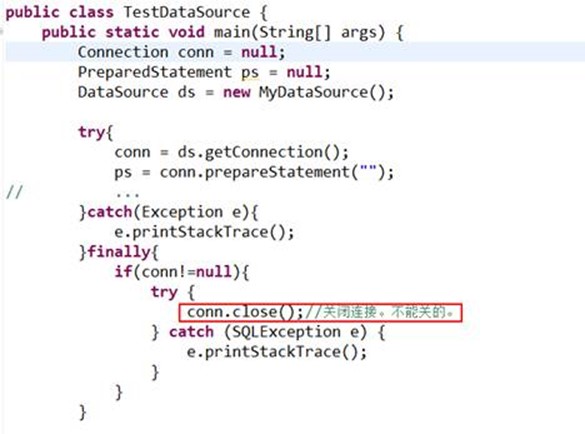
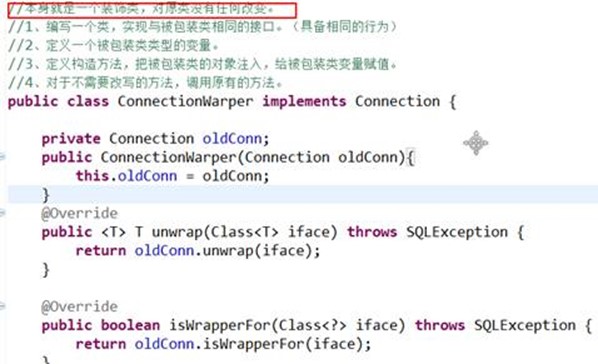
这时候我们需要引入装饰模式解决该问题:
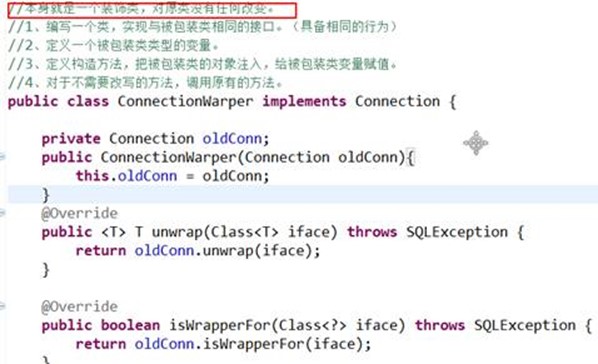
目的:改写已存在的类的某个方法或某些方法,装饰设计模式(包装模式)
口诀:
1、编写一个类,实现与被包装类相同的接口。(具备相同的行为)
2、定义一个被包装类类型的变量。
3、定义构造方法,把被包装类的对象注入,给被包装类变量赋值。
4、对于不需要改写的方法,调用原有的方法。
5、对于需要改写的方法,写自己的代码。
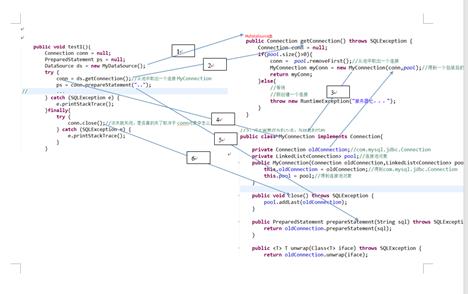
装饰者模式解析图:
默认适配器:装饰设计模式一个变体
DBCP连接池:
DBCP:Apache推出的Database Connection Pool
使用步骤:
> 添加jar包 commons-dbcp-1.4.jar commons-pool-1.5.6.jar
> 添加属性资源文件
> 编写数据源工具类
demo: DBCP的工具类 |
public class DBCPUtil { private static DataSource ds = null; static{ Properties prop = new Properties(); try { prop.load(DBCPUtil.class.getClassLoader().getResourceAsStream("dbcpconfig.properties"));//根据DBCPUtil的classes的路径,加载配置文件 ds = BasicDataSourceFactory.createDataSource(prop);//得到一个数据源 } catch (Exception e) { throw new ExceptionInInitializerError("初始化错误,请检查配置文件"); } }
public static Connection getConnection(){ try { return ds.getConnection(); } catch (SQLException e) { throw new RuntimeException("服务器忙。。。"); } }
public static void release(Connection conn,Statement stmt,ResultSet rs){ //关闭资源 if(rs!=null){ try { rs.close(); } catch (Exception e) { e.printStackTrace(); } rs = null; } if(stmt!=null){ try { stmt.close(); } catch (Exception e) { e.printStackTrace(); } stmt = null; } if(conn!=null){ try { conn.close();//关闭 } catch (Exception e) { e.printStackTrace(); } conn = null; } }
} |
demo: 配置文件: |
#连接设置 driverClassName=com.mysql.jdbc.Driver url=jdbc:mysql://localhost:3306/day13 username=root password=abc
#<!-- 初始化连接 --> initialSize=10
#最大连接数量 maxActive=50
#<!-- 最大空闲连接 --> maxIdle=20
#<!-- 最小空闲连接 --> minIdle=5
#<!-- 超时等待时间以毫秒为单位 6000毫秒/1000等于60秒 --> maxWait=60000
#JDBC驱动建立连接时附带的连接属性属性的格式必须为这样:[属性名=property;] #注意:"user" 与 "password" 两个属性会被明确地传递,因此这里不需要包含他们。 connectionProperties=useUnicode=true;characterEncoding=utf8
#指定由连接池所创建的连接的自动提交(auto-commit)状态。 defaultAutoCommit=true
#driver default 指定由连接池所创建的连接的只读(read-only)状态。 #如果没有设置该值,则"setReadOnly"方法将不被调用。(某些驱动并不支持只读模式,如:Informix) defaultReadOnly=
#driver default 指定由连接池所创建的连接的事务级别(TransactionIsolation)。 #可用值为下列之一:(详情可见javadoc。)NONE,READ_UNCOMMITTED, READ_COMMITTED, REPEATABLE_READ, SERIALIZABLE defaultTransactionIsolation=REPEATABLE_READ |
demo: 测试类 |
public class TestJDBC { @Test public void test1(){ Connection conn = null; PreparedStatement ps = null;
try { conn = DBCPUtil.getConnection(); ps = conn.prepareStatement("...");
// ... } catch (SQLException e) { e.printStackTrace(); }finally{ DBCPUtil.release(conn, ps, null); }
} } |
C3P0连接池:
使用步骤:
1、添加jar包
2、编写配置文件
c3p0-config.xml,放在classpath中,或classes目录中
demo: 配置文件 |
<?xml version="1.0" encoding="UTF-8"?> <c3p0-config> <default-config> <property name="driverClass">com.mysql.jdbc.Driver</property> <property name="jdbcUrl">jdbc:mysql://localhost:3306/day13</property> <property name="user">root</property> <property name="password">abc</property> <property name="initialPoolSize">10</property> <property name="maxIdleTime">30</property> <property name="maxPoolSize">100</property> <property name="minPoolSize">10</property>
</default-config>
</c3p0-config> |
Demo: C3P0工具类 |
public class C3P0Util { //得到一个数据源 private static DataSource dataSource = new ComboPooledDataSource();
//从数据源中得到一个连接对象 public static Connection getConnection(){ try { return dataSource.getConnection(); } catch (SQLException e) { throw new RuntimeException("服务器错误"); } }
public static void release(Connection conn,Statement stmt,ResultSet rs){ //关闭资源 if(rs!=null){ try { rs.close(); } catch (Exception e) { e.printStackTrace(); } rs = null; } if(stmt!=null){ try { stmt.close(); } catch (Exception e) { e.printStackTrace(); } stmt = null; } if(conn!=null){ try { conn.close();//关闭 } catch (Exception e) { e.printStackTrace(); } conn = null; } }
} |
demo: 测试类 |
public class TestCRUD {
@Test public void testInsert(){ Connection conn = null; PreparedStatement ps = null;
try { conn = C3P0Util.getConnection(); ps = conn.prepareStatement("insert into account(name,money) values(\'ggg\',2000)"); ps.executeUpdate(); } catch (Exception e) { e.printStackTrace(); }finally{ C3P0Util.release(conn, ps, null);
}
System.out.println(conn.getClass().getName()); } } |
使用JavaWeb服务器管理数据源
开发JavaWeb应用,必须使用一个JavaWeb服务器,JavaWeb服务器都内置数据源。
Tomcat:(DBCP)
数据源只需要配置服务器即可。
配置数据源的步骤:
1、拷贝数据库连接的jar到tomcatlib目录下
2、配置数据源XML文件
a)如果把配置信息写在tomcat下的conf目录的context.xml中,那么所有应用都能使用此数据源。
b)如果是在当前应用的META-INF中创建context.xml, 编写数据源,那么只有当前应用可以使用。

3、使用连接池

JNDI:java nameing directory interface
JNDI容器就是一个Map
key(String) | value(Object) |
path+name | 对象 |
path+"jdbc/day16" | DataSource对象 |
Demo: Index.jsp | |
<%@page import="java.sql.Connection"%> <%@page import="javax.sql.DataSource"%> <%@page import="javax.naming.InitialContext"%> <%@page import="javax.naming.Context"%> <%@ page language="java" import="java.util.*" pageEncoding="UTF-8"%> <% String path = request.getContextPath(); String basePath = request.getScheme()+"://"+request.getServerName()+":"+request.getServerPort()+path+"/"; %>
<!DOCTYPE html PUBLIC "-//W3C//DTD HTML 4.01 Transitional//EN"> <html> <head> <base href="<%=basePath%>">
<title>My JSP \'index.jsp\' starting page</title> <meta http-equiv="pragma" content="no-cache"> <meta http-equiv="cache-control" content="no-cache"> <meta http-equiv="expires" content="0"> <meta http-equiv="keywords" content="keyword1,keyword2,keyword3"> <meta http-equiv="description" content="This is my page"> <!-- <link rel="stylesheet" type="text/css" href="styles.css"> --> </head>
<body> <% Context initContext = new InitialContext(); DataSource ds = (DataSource)initContext.lookup("java:/comp/env/jdbc/itheima"); Connection conn = ds.getConnection(); out.print(conn); %> </body> </html> | |
Demo
| |
<?xml version="1.0" encoding="UTF-8"?> <Context> <Resource name="jdbc/day13_03_JNDI" auth="Container" type="javax.sql.DataSource" maxActive="100" maxIdle="30" maxWait="10000" username="root" password="abc" driverClassName="com.mysql.jdbc.Driver" url="jdbc:mysql://localhost:3306/day13"/>
</Context> | |
以上是关于连接池的主要内容,如果未能解决你的问题,请参考以下文章
