如何自己搭建一个sentry服务
Posted
tags:
篇首语:本文由小常识网(cha138.com)小编为大家整理,主要介绍了如何自己搭建一个sentry服务相关的知识,希望对你有一定的参考价值。
参考技术A I. python在不同系统下安装Python的方式不同
Mac
如果我没记错的话,Mac是自带python的,当然你也可以用Homebrew或其他方式安装一个别的版本的python
Ubuntu
sudo apt-get install python
目前我已知的是ubuntu上要安装这些依赖的库
sudo apt-get install libxml2-dev libxslt1-dev python-dev libffi-dev
其他
对其他系统不甚了解,CentOS应该能用yum install python安装
II. Pip
pip是python的一个很好的包管理软件,类似npm对于nodejs的关系。似乎pip一般不随python自动安装,但是一个叫easy_install的命令一般都是自带的,所以我们可以通过
sudo easy_install pip
来安装,至于为什么不直接用easy_install来安装所有依赖,通俗一点来讲,pip更流行:)(具体对比可自行搜索,例如http://python-packaging-user-guide.readthedocs.org/en/latest/pip_easy_install/)
III. virtualenv
virtualenv is a tool to create isolated Python environments.
virtualenv能为python提供一个隔离的安装环境,如果没有virtualenv,通常python的module都会自动安装到同一个全局的目录,如/usr/lib/python2.7/site-packages/下,这样就意味着,如果项目A依赖版本1.x.x版本的公共的X模块,而项目B却依赖2.x.x版本的X模块时,安装依赖时会发生错误,两个版本的c模块无法共存。
virtualenv可以通过上面的pip安装
pip install virtualenv
然后随意找个文件夹作为根文件夹,进入根文件夹执行
virtualenv sentry
命令会在当前根文件夹下新建一个sentry文件夹(可以随意起别的名字),sentry里面会包含python的执行文件以及pip库。
然后执行
source sentry/bin/activate
就能激活出一个新的环境,在这个新环境下我们在进行后续操作
IV. sentry
执行
pip install sentry
来安装sentry
当然也可以install from source,从github上下载源码,然后
python setup.py develop
但是这样sentry就会被装到python默认的路径下,所以初学者还是推荐上面这种傻瓜式的安装方法
安装完sentry之后就有sentry命令了
usage: sentry [--config=/path/to/settings.py] [command] [options]
随便设置一个配置文件的路径,比如~/.sentry/sentry.conf.py,执行
sentry init ~/.sentry/sentry.conf.py
sentry会帮你初始化一份配置文件
配置文件中你需要设置几处
数据库配置,推荐Postgresql,其次是mysql
Redis配置
邮件服务配置
web服务配置
V. Postgresql
官方是推荐使用Postgresql的,所以我们就用这个数据库,安装postgresql在不同系统下不同,但都累死,Mac下我用brew install postgresql装,ubuntu下用apt-get install postgresql
安装完之后配置数据库配置文件,启动数据库
另外,根据sentry.conf.py里面提的,如使用postgresql,需要另装模块
pip install psycopg2
VI. Redis
redis的安装方式和postgresql也类似,brew install redis/apt-get install redis-server
安装好后启动服务
VII. 配置文件
将配置文件中的postgresql和redis部分按照实际情况填写,邮件服务需要你有smtp的账号和密码,可以去购买或通过其他途径获得,web服务配置是配置,用来指定HOST和PORT,另外,还要设置
SENTRY_ADMIN_EMAIL和SENTRY_URL_PREFIX,前者是管理员邮箱,后者是网址前缀,例如'http://sentry100.sankuai.com'。
VIII. 数据库和用户初始化
执行命令创建名为sentry的数据库
createdb -E utf-8 sentry
为sentry项目初始化数据
sentry --config=~/.sentry/sentry.conf.py upgrade
创建新用户
sentry --config=~/.sentry/sentry.conf.py createuser
然后就可以启动服务了
sentry --config=~/.sentry/sentry.conf.py start
另外,还需要启动Worker
sentry --config=~/.sentry/sentry.conf.py celery worker -B
假设web服务器端口是9000,那么访问localhost:9000就能开始使用sentry了!
VIII. 其他
还有其他的设置如配置Apache或nginx,开启SSL,配置开机自动脚本等就不细说了,可以查看参考链接或其他资料。本回答被提问者采纳 参考技术B 自己搭建还是比较麻烦的,直接用SaaS最方便。要么用Sentry的SaaS,要么用国内类似公司比如Fundebug的SaaS服务。省得自己维护,省心省力!
项目集成sentry
本文章将介绍基于Sentry官方提供的在线服务集成sentry,本地搭建sentry将在下篇文章中介绍。
Sentry是个什么东西,自行百度了解。
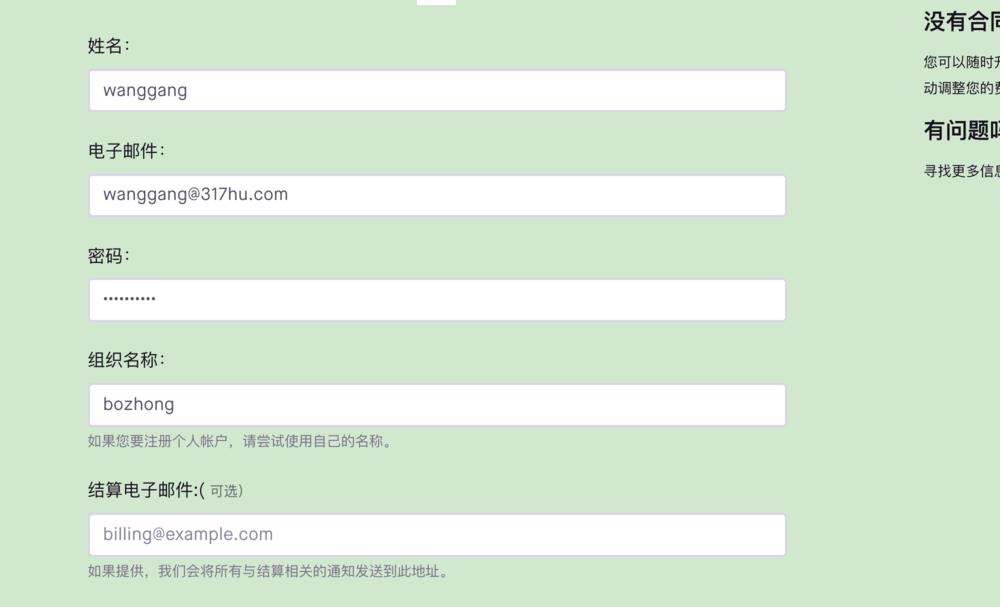
1、注册,登录
网址:https://sentry.io/
注册一个账号

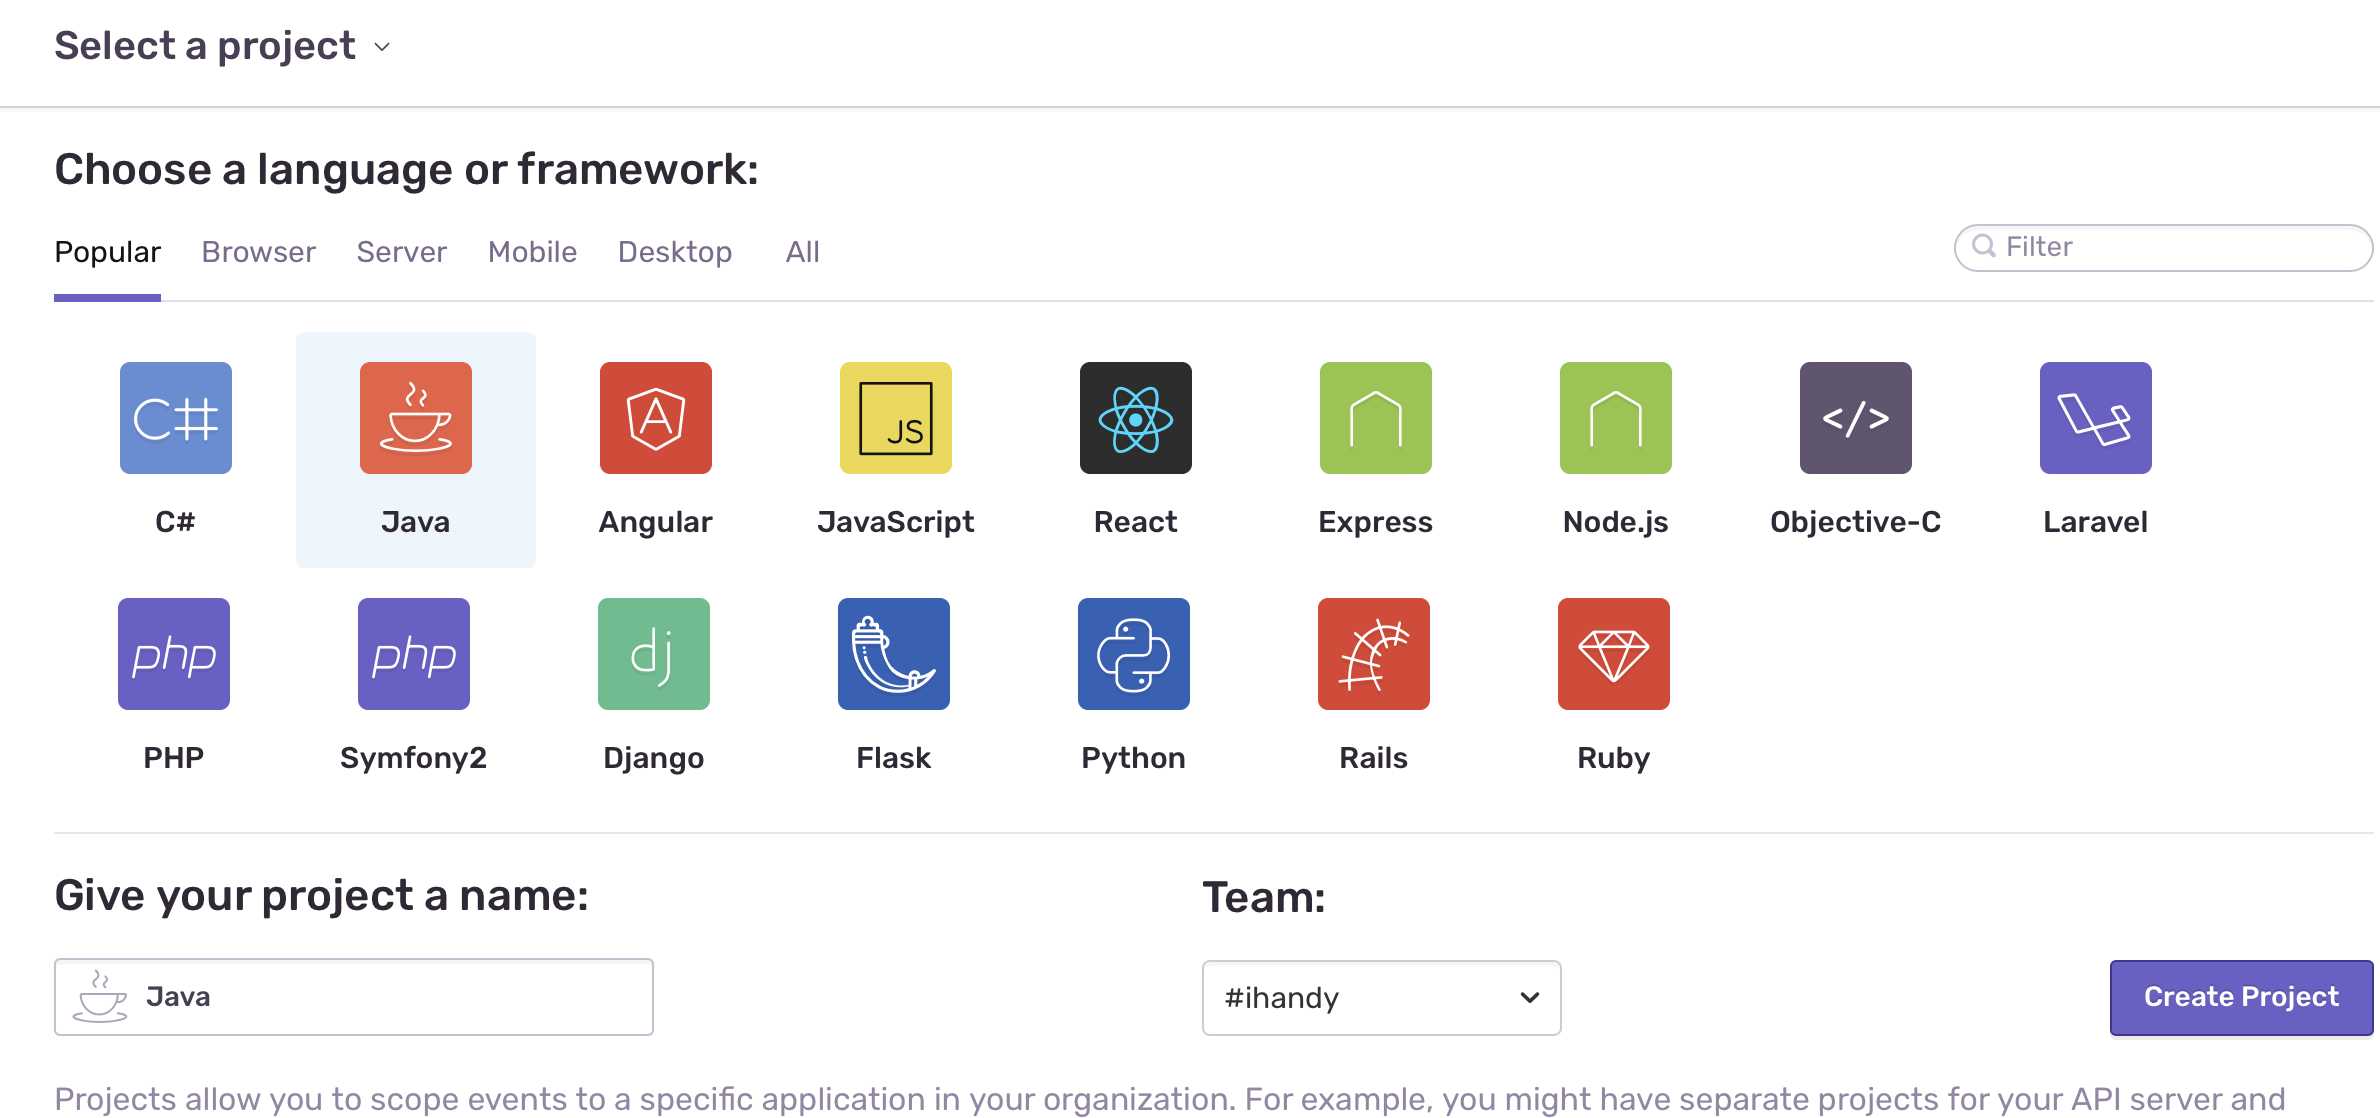
2、创建一个project

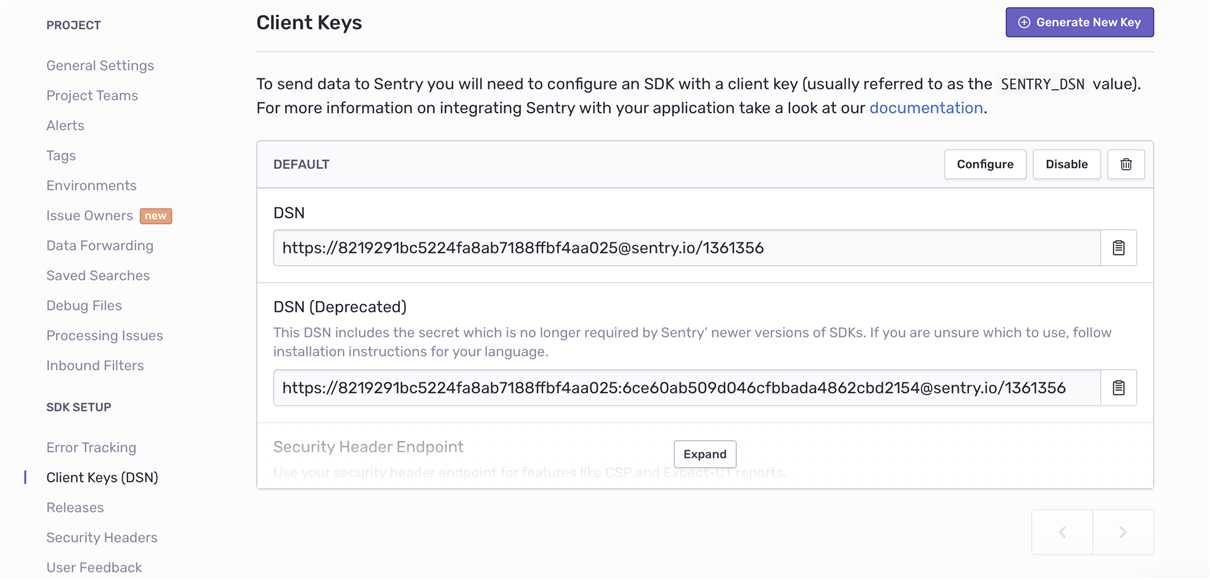
3、获取project的DSN

4、maven配置依赖
<dependency>
    <groupId>io.sentry</groupId>
    <artifactId>sentry-log4j</artifactId>
    <version>1.7.10</version>
</dependency>
普通java项目需要引入的jar包包括:sentry-1.7.16.jar、sentry-log4j-1.7.17-SNAPSHOT.jar、jackson-annotations-2.1.0.jar、jackson-core-2.1.2.jar、jackson-databind-2.1.0.jar等,根据需要引入。
5、log4j集成sentry时需要在log4j中增加下列配置:
# Enable the Console and Sentry appenders
log4j.rootLogger=INFO, Console, Sentry

# Configure the Console appender
log4j.appender.Console=org.apache.log4j.ConsoleAppender
log4j.appender.Console.layout=org.apache.log4j.PatternLayout
log4j.appender.Console.layout.ConversionPattern=%d{HH:mm:ss.SSS} [%t] %-5p: %m%n

# Configure the Sentry appender, overriding the logging threshold to the WARN level
log4j.appender.Sentry=io.sentry.log4j.SentryAppender
log4j.appender.Sentry.threshold=WARN
如果是log4j.xml,则
<?xml version="1.0" encoding="UTF-8" ?>
<!DOCTYPE log4j:configuration SYSTEM "log4j.dtd">
<log4j:configuration debug="true"
    xmlns:log4j=‘http://jakarta.apache.org/log4j/‘>

    <!-- Configure the Console appender -->
    <appender name="Console" class="org.apache.log4j.ConsoleAppender">
        <layout class="org.apache.log4j.PatternLayout">
            <param name="ConversionPattern"
                   value="%d{yyyy-MM-dd HH:mm:ss} %-5p %c{1}:%L - %m%n" />
        </layout>
    </appender>

    <!-- Configure the Sentry appender, overriding the logging threshold to the WARN level -->
    <appender name="Sentry" class="io.sentry.log4j.SentryAppender">
        <!-- Override the Sentry handler log level to WARN -->
        <filter class="org.apache.log4j.varia.LevelRangeFilter">
            <param name="levelMin" value="WARN" />
        </filter>
    </appender>

    <!-- Enable the Console and Sentry appenders, Console is provided as an example
 of a non-Sentry logger that is set to a different logging threshold -->
    <root level="INFO">
        <appender-ref ref="Console" />
        <appender-ref ref="Sentry" />
    </root>
</log4j:configuration>
如果指定sentrylogger形式的日志才需要发送到sentry,其他日志不需要发送时,则按照下面的格式配置:
log4j.logger.sentrylogger=INFO,Sentry

## Enable the Console and Sentry appenders
#log4j.rootLogger=INFO, Console, Sentry
#
## Configure the Console appender
log4j.appender.Console=org.apache.log4j.ConsoleAppender
log4j.appender.Console.layout=org.apache.log4j.PatternLayout
log4j.appender.Console.layout.ConversionPattern=%d{HH:mm:ss.SSS} [%t] %-5p: %m%n
##
## Configure the Sentry appender, overriding the logging threshold to the INFO level
log4j.appender.Sentry=io.sentry.log4j.SentryAppender log4j.appender.Sentry.threshold=INFO
6、设置DSN
在文件系统或类路径上的属性文件中(默认为sentry.properties):
dsn=https://public:[email protected]:port/1
通过Java系统属性(在Android上不可用):
-Dsentry.dsn=https://public:[email protected]:port/1 -jar app.jar
通过系统环境变量(在Android上不可用):
SENTRY_DSN=https://public:[email protected]:port/1 java -jar app.jar
代码中:
import io.sentry.Sentry;

Sentry.init("https://public:[email protected]:port/1");
7、demo代码:
package io.sentry.example.basic;

import io.sentry.Sentry;
import io.sentry.SentryClient;
import io.sentry.SentryClientFactory;
import io.sentry.context.Context;
import io.sentry.event.BreadcrumbBuilder;
import io.sentry.event.UserBuilder;

public class MyClass {
    private static SentryClient sentry;

    public static void main(String... args) {
        /*
        It is recommended that you use the DSN detection system, which
        will check the environment variable "SENTRY_DSN", the Java
        System Property "sentry.dsn", or the "sentry.properties" file
        in your classpath. This makes it easier to provide and adjust
        your DSN without needing to change your code. See the configuration
        page for more information.
        */
        Sentry.init("https://8219291bc5224fa8ab7188ffbf4aa025:[email protected]/1361356");

        // You can also manually provide the DSN to the ``init`` method.
        // String dsn = "https://<SENTRY_PUBLIC_KEY>:<SENTRY_PRIVATE_KEY>@sentry.io/<PROJECT_ID>";
        // Sentry.init(dsn);

        /*
        It is possible to go around the static ``Sentry`` API, which means
        you are responsible for making the SentryClient instance available
        to your code.
        */
        sentry = SentryClientFactory.sentryClient();

        MyClass myClass = new MyClass();
        myClass.logWithStaticAPI();
    }

    /**
     * An example method that throws an exception.
     */
    void unsafeMethod() {
        throw new UnsupportedOperationException("You shouldn‘t call this!");
    }

    /**
     * Examples using the (recommended) static API.
     */
    void logWithStaticAPI() {
        // Note that all fields set on the context are optional. Context data is copied onto
        // all future events in the current context (until the context is cleared).

        // Record a breadcrumb in the current context. By default the last 100 breadcrumbs are kept.
        Sentry.getContext().recordBreadcrumb(
                new BreadcrumbBuilder().setMessage("User made an action").build()
        );

        // Set the user in the current context.
        Sentry.getContext().setUser(
                new UserBuilder().setEmail("[email protected]").build()
        );

        // Add extra data to future events in this context.
        Sentry.getContext().addExtra("extra", "thing");

        // Add an additional tag to future events in this context.
        Sentry.getContext().addTag("tagName", "tagValue");

        /*
        This sends a simple event to Sentry using the statically stored instance
        that was created in the ``main`` method.
        */
        Sentry.capture("This is a test by weichangjin");

        try {
            unsafeMethod();
        } catch (Exception e) {
            // This sends an exception event to Sentry using the statically stored instance
            // that was created in the ``main`` method.
            Sentry.capture(e);
        }
    }

}
自测成功!
以上是关于如何自己搭建一个sentry服务的主要内容,如果未能解决你的问题,请参考以下文章