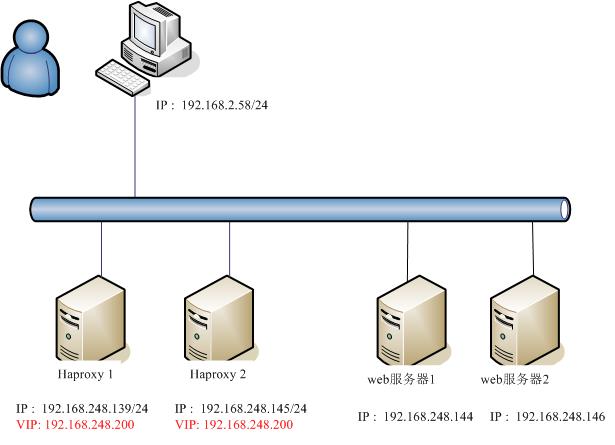
haproxy + keepalived 实现网站高可靠
Posted 专注于ICT转型
tags:
篇首语:本文由小常识网(cha138.com)小编为大家整理,主要介绍了haproxy + keepalived 实现网站高可靠相关的知识,希望对你有一定的参考价值。

haproxy 1的配置文件,包括 keepalived 和 haproxy 的配置,分别如下:
【haproxy 1的keepalived 配置文件】 /etc/keepalived/keepalived.conf
global_defs {
router_id NodeB
}
vrrp_instance VI_1 {
state BACKUP #设置为主服务器
interface ens33 #监测网络接口
virtual_router_id 51 #主、备必须一样
priority 90 #(主、备机取不同的优先级,主机值较大,备份机值较小,值越大优先级越高)
advert_int 1 #VRRP Multicast广播周期秒数
authentication {
auth_type PASS #VRRP认证方式,主备必须一致
auth_pass 1111 #(密码)
}
virtual_ipaddress {
192.168.248.200
}
【haproxy 1的haproxy.conf 配置文件】 /etc/haproxy/haproxy.cfg
#---------------------------------------------------------------------
# Example configuration for a possible web application. See the
# full configuration options online.
#
# http://haproxy.1wt.eu/download/1.4/doc/configuration.txt
#
#---------------------------------------------------------------------
#---------------------------------------------------------------------
# Global settings
#---------------------------------------------------------------------
global
# to have these messages end up in /var/log/haproxy.log you will
# need to:
#
# 1) configure syslog to accept network log events. This is done
# by adding the \'-r\' option to the SYSLOGD_OPTIONS in
# /etc/sysconfig/syslog
#
# 2) configure local2 events to go to the /var/log/haproxy.log
# file. A line like the following can be added to
# /etc/sysconfig/syslog
#
# local2.* /var/log/haproxy.log
#
log 127.0.0.1 local2
chroot /var/lib/haproxy
pidfile /var/run/haproxy.pid
maxconn 4000
user haproxy
group haproxy
daemon
# turn on stats unix socket
stats socket /var/lib/haproxy/stats
#---------------------------------------------------------------------
# common defaults that all the \'listen\' and \'backend\' sections will
# use if not designated in their block
#---------------------------------------------------------------------
defaults
mode http
log global
option httplog
option dontlognull
option http-server-close
option forwardfor except 127.0.0.0/8
option redispatch
retries 3
timeout http-request 10s
timeout queue 1m
timeout connect 10s
timeout client 1m
timeout server 1m
timeout http-keep-alive 10s
timeout check 10s
maxconn 3000
#---------------------------------------------------------------------
# main frontend which proxys to the backends
#---------------------------------------------------------------------
frontend web *:80
frontend web1 192.168.248.200:80
# bind 192.168.248.200:80
mode http
use_backend app
#---------------------------------------------------------------------
# static backend for serving up images, stylesheets and such
#---------------------------------------------------------------------
backend static
balance roundrobin
server static 127.0.0.1:4331 check
#---------------------------------------------------------------------
# round robin balancing between the various backends
#---------------------------------------------------------------------
backend app
balance roundrobin
server app1 192.168.248.144:80 check
server app2 192.168.248.146:80 check
【haproxy 2的keepalived 配置文件】
global_defs {
router_id NodeB
}
vrrp_instance VI_1 {
state BACKUP #设置为主服务器
interface ens33 #监测网络接口
virtual_router_id 51 #主、备必须一样
priority 90 #(主、备机取不同的优先级,主机值较大,备份机值较小,值越大优先级越高)
advert_int 1 #VRRP Multicast广播周期秒数
authentication {
auth_type PASS #VRRP认证方式,主备必须一致
auth_pass 1111 #(密码)
}
virtual_ipaddress {
192.168.248.200
}
【haproxy 2的haproxy.cfg】 /etc/haproxy/haproxy.cfg
#---------------------------------------------------------------------
# Example configuration for a possible web application. See the
# full configuration options online.
#
# http://haproxy.1wt.eu/download/1.4/doc/configuration.txt
#
#---------------------------------------------------------------------
#---------------------------------------------------------------------
# Global settings
#---------------------------------------------------------------------
global
# to have these messages end up in /var/log/haproxy.log you will
# need to:
#
# 1) configure syslog to accept network log events. This is done
# by adding the \'-r\' option to the SYSLOGD_OPTIONS in
# /etc/sysconfig/syslog
#
# 2) configure local2 events to go to the /var/log/haproxy.log
# file. A line like the following can be added to
# /etc/sysconfig/syslog
#
# local2.* /var/log/haproxy.log
#
log 127.0.0.1 local2
chroot /var/lib/haproxy
pidfile /var/run/haproxy.pid
maxconn 4000
user haproxy
group haproxy
daemon
# turn on stats unix socket
stats socket /var/lib/haproxy/stats
#---------------------------------------------------------------------
# common defaults that all the \'listen\' and \'backend\' sections will
# use if not designated in their block
#---------------------------------------------------------------------
defaults
mode http
log global
option httplog
option dontlognull
option http-server-close
option forwardfor except 127.0.0.0/8
option redispatch
retries 3
timeout http-request 10s
timeout queue 1m
timeout connect 10s
timeout client 1m
timeout server 1m
timeout http-keep-alive 10s
timeout check 10s
maxconn 3000
#---------------------------------------------------------------------
# main frontend which proxys to the backends
#---------------------------------------------------------------------
frontend web *:80
frontend web1 192.168.248.200:80
# bind 192.168.248.200:80
mode http
use_backend app
#---------------------------------------------------------------------
# static backend for serving up images, stylesheets and such
#---------------------------------------------------------------------
backend static
balance roundrobin
server static 127.0.0.1:4331 check
#---------------------------------------------------------------------
# round robin balancing between the various backends
#---------------------------------------------------------------------
backend app
balance roundrobin
server app1 192.168.248.144:80 check
server app2 192.168.248.146:80 check
【web 服务器1 的http index文件内容】
[root@localhost zhou]# yum install -y httpd
[root@localhost zhou]# echo "Hello I am nginx-backend 1. " > /var/www/html/index.html
[root@localhost zhou]# service httpd start
Redirecting to /bin/systemctl start httpd.service
[root@localhost zhou]# firewall-cmd --permanent --add-port=80/tcp
success
[root@localhost zhou]# firewall-cmd --reload
success
[root@localhost zhou]#
【web 服务器2 的http index文件内容】
[root@localhost zhou]# yum install -y httpd
[root@localhost zhou]# echo "Hello I am nginx-backend 2. " > /var/www/html/index.html
[root@localhost zhou]# service httpd start
Redirecting to /bin/systemctl start httpd.service
[root@localhost zhou]# firewall-cmd --permanent --add-port=80/tcp
success
[root@localhost zhou]# firewall-cmd --reload
success
[root@localhost zhou]#
【haproxy 1的服务启动】 haproxy 2与之相同。
keepalived -f /etc/keepalived/keepalived.conf
haproxy -f /etc/haproxy/haproxy.cfg
firewall-cmd --permenant --add-port=80/tcp
firewall-cmd --reload
【验证结果】


如果关闭掉一个haproxy ,则不影响系统的正常工作,web网站还是可以正常访问,并且是轮询的结果。
以上是关于haproxy + keepalived 实现网站高可靠的主要内容,如果未能解决你的问题,请参考以下文章