RabbitMQ学习 Hello World!
Posted Stark_Tan
tags:
篇首语:本文由小常识网(cha138.com)小编为大家整理,主要介绍了RabbitMQ学习 Hello World!相关的知识,希望对你有一定的参考价值。
1. 简述RabbitMQ

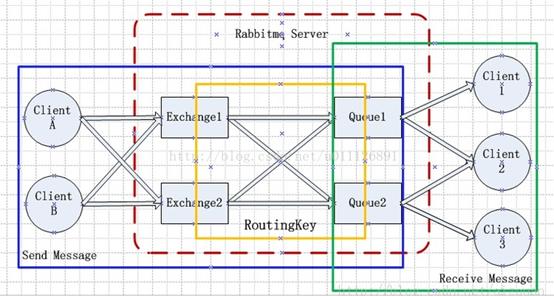
RabbitMQ使用结构图
Rabbit使用主要包含3个对象:
生产者(Producter):产生消息,发送到队列中
队列(Queue):接受生产者传输的消息,等待消费者取走
消费者(Consumer):从队列中获取消息,进行下一步处理
2. 做一个简单的实现
引入jar包
|
<dependency>
<groupId>com.rabbitmq</groupId>
<artifactId>amqp-client</artifactId>
<version>4.1.1</version>
</dependency>
|
创建生产者
public class Producter {

    //队列名称

    private final static String QUEUE_NAME = "first_try";

    public static void main(String[] args) throws IOException, TimeoutException {

        //配置rabbitmq服务器地址

        ConnectionFactory factory = new ConnectionFactory();

        factory.setHost("localhost");

        factory.setPort(5672);

        factory.setUsername("starktan");

        factory.setPassword("starktan");

        factory.setVirtualHost("/");

        //建立连接和通道

        Connection connection = factory.newConnection();

        Channel channel = connection.createChannel();

        //声明队列

        channel.queueDeclare(QUEUE_NAME, false, false, false, null);

        //发送消息

        String message = "RabbitMQ Test Message "+System.currentTimeMillis();

        channel.basicPublish("",QUEUE_NAME,true,null,message.getBytes());

        //关闭连接

        channel.close();

        connection.close();

    }

}
|
创建消费者
public class Consumer {

    //队列名称

    private final static String QUEUE_NAME = "first_try";

    public static void main(String[] args) throws IOException, InterruptedException, TimeoutException {

        //创建连接和通道

        ConnectionFactory factory = new ConnectionFactory();

        factory.setHost("localhost");

        Connection connection = factory.newConnection();

        Channel channel = connection.createChannel();

        //声明队列,主要为了防止消息接收者先运行此程序,队列还不存在时创建队列。

        channel.queueDeclare(QUEUE_NAME, false, false, false, null);

        //创建队列消费者

        QueueingConsumer consumer = new QueueingConsumer(channel);

        //指定消费队列

        channel.basicConsume(QUEUE_NAME, true, consumer);

        while (true)

        {

            //nextDelivery是一个阻塞方法(内部实现其实是阻塞队列的take方法)

            QueueingConsumer.Delivery delivery = consumer.nextDelivery();

            String message = new String(delivery.getBody());

            System.out.println("获取到消息 " + message + "\'");

        }

    }

}
|
3.实际操作
运行2次生产者,查看mq网页管理:看到队列中多了两条message

运行消费者: 将信息从队列中取出来了


注:amqp-client已经不再推荐使用QueueingConsumer了,建议使用继承DefaultConsumer,后期将进行修改
以上是关于RabbitMQ学习 Hello World!的主要内容,如果未能解决你的问题,请参考以下文章


