A-Z排序控件的实现
Posted 骑猪撞交警
tags:
篇首语:本文由小常识网(cha138.com)小编为大家整理,主要介绍了A-Z排序控件的实现相关的知识,希望对你有一定的参考价值。
- 前言
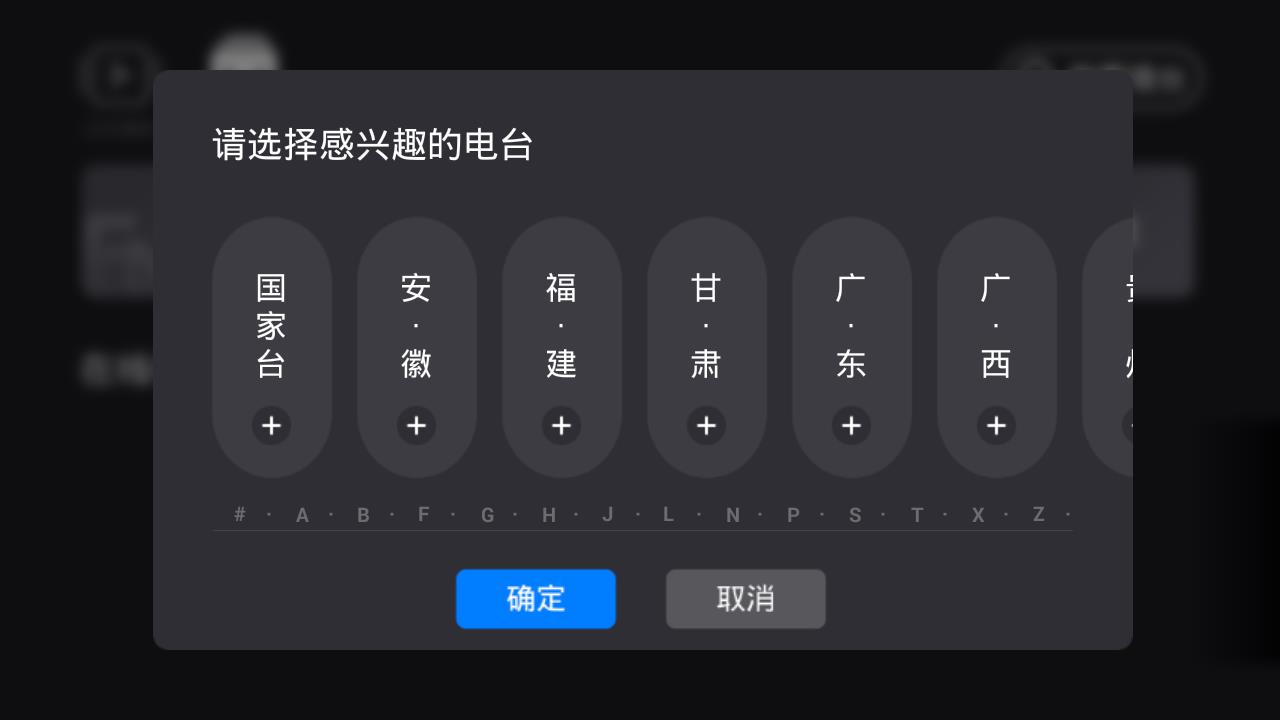
最近项目需要做一个地区首字母a-z排序的效果,记录一下自己如何实现的.
先看下效果图:

- 分析
这种效果自己实现还是第一次;之前见过这种效果:

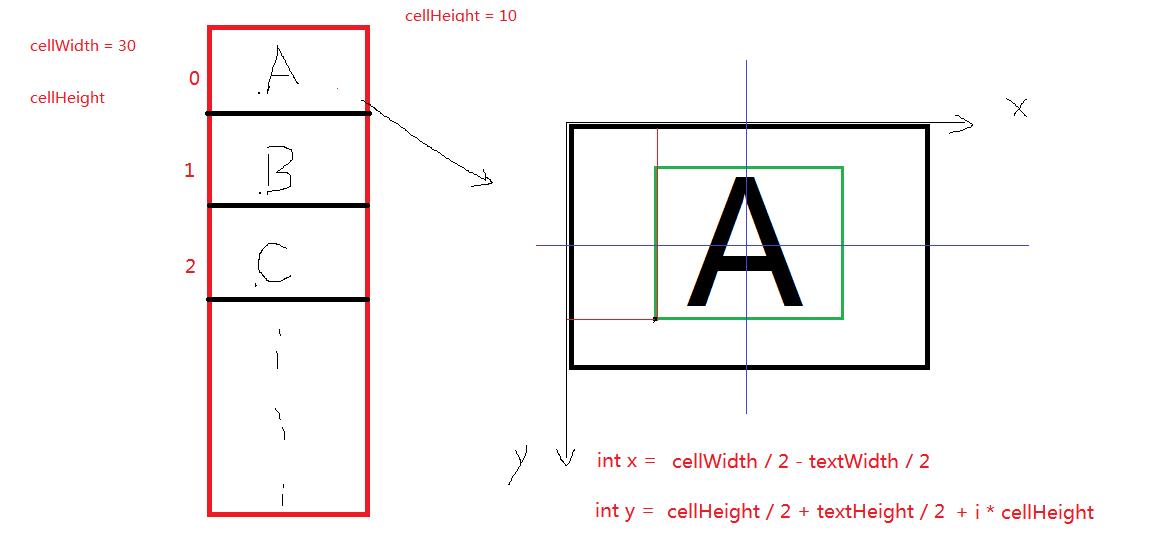
这些字母都是onDraw画上去的;只要知道每个字母的left,top,right,bottom就能知道它的具体位置,所以onMeasure方法中要确定每个单元格的宽高.文字排序可以先把汉字转换成拼音,再去比较首字母的顺序(特殊地区特殊处理,比如重庆);
具体看下是如何确定字母的位置:

于是乎,代码就出来了:
  1 public class QuickIndexBar extends View {
  2
  3     private OnLetterUpdateListener onLetterUpdateListener;
  4
  5     public interface OnLetterUpdateListener{
  6         void onLetterUpdate(String letter);
  7     }
  8
  9     public OnLetterUpdateListener getOnLetterUpdateListener() {
 10         return onLetterUpdateListener;
 11     }
 12
 13     public void setOnLetterUpdateListener(
 14             OnLetterUpdateListener onLetterUpdateListener) {
 15         this.onLetterUpdateListener = onLetterUpdateListener;
 16     }
 17     private static final String[] LETTERS = new String[]{
 18         "A", "B", "C", "D", "E", "F",
 19         "G", "H", "I", "J", "K", "L",
 20         "M", "N", "O", "P", "Q", "R",
 21         "S", "T", "U", "V", "W", "X",
 22         "Y", "Z"
 23     };
 24
 25     private Paint paint;
 26
 27     // 单元格宽度
 28     private int cellWidth;
 29
 30     // 单元格高度
 31     private float cellHeight;
 32
 33
 34     public QuickIndexBar(Context context) {
 35         this(context, null);
 36     }
 37
 38     public QuickIndexBar(Context context, AttributeSet attrs) {
 39         this(context, attrs, 0);
 40     }
 41
 42     public QuickIndexBar(Context context, AttributeSet attrs, int defStyle) {
 43         super(context, attrs, defStyle);
 44         // 创建一个抗锯齿的画笔
 45         paint = new Paint(Paint.ANTI_ALIAS_FLAG);
 46         // 画笔文本加粗
 47         paint.setTypeface(Typeface.DEFAULT_BOLD);
 48         // 颜色
 49         paint.setColor(Color.WHITE);
 50     }
 51
 52     @Override
 53     protected void onDraw(Canvas canvas) {
 54
 55         // 遍历26个英文字母, 计算坐标, 进行绘制
 56         for (int i = 0; i < LETTERS.length; i++) {
 57             String letter = LETTERS[i];
 58
 59             // 计算x坐标
 60             float x = cellWidth * 0.5f - paint.measureText(letter) * 0.5f;
 61             // 计算y坐标
 62             Rect bounds = new Rect();
 63             // 获取文本的矩形区域
 64             paint.getTextBounds(letter, 0, letter.length(), bounds);
 65
 66             float y = cellHeight * 0.5f + bounds.height() * 0.5f + i * cellHeight;
 67
 68             // 绘制文本
 69             canvas.drawText(letter, x, y, paint);
 70         }
 71     }
 72     private int lastIndex = -1;
 73
 74     @Override
 75     public boolean onTouchEvent(MotionEvent event) {
 76
 77         float y;
 78         int currentIndex;
 79
 80         switch (event.getAction()) {
 81         case MotionEvent.ACTION_DOWN:
 82             // 获取被点击到的字母索引
 83             y = event.getY();
 84             // 根据y值, 计算当前按下的字母位置
 85             currentIndex = (int) (y / cellHeight);
 86             if(currentIndex != lastIndex){
 87                 if(currentIndex >= 0 && currentIndex < LETTERS.length){
 88                     String letter = LETTERS[currentIndex];
 89                     if(onLetterUpdateListener != null){
 90                         onLetterUpdateListener.onLetterUpdate(letter);
 91                     }
 92                     System.out.println("letter: " + letter);
 93                     // 记录上一次触摸的字母
 94                     lastIndex = currentIndex;
 95                 }
 96             }
 97
 98             break;
 99         case MotionEvent.ACTION_MOVE:
100             // 获取被点击到的字母索引
101             y = event.getY();
102             // 根据y值, 计算当前按下的字母位置
103             currentIndex = (int) (y / cellHeight);
104             if(currentIndex != lastIndex){
105                 if(currentIndex >= 0 && currentIndex < LETTERS.length){
106                     String letter = LETTERS[currentIndex];
107                     if(onLetterUpdateListener != null){
108                         onLetterUpdateListener.onLetterUpdate(letter);
109                     }
110                     System.out.println("letter: " + letter);
111                     // 记录上一次触摸的字母
112                     lastIndex = currentIndex;
113                 }
114             }
115
116             break;
117         case MotionEvent.ACTION_UP:
118             lastIndex = -1;
119             break;
120         default:
121             break;
122         }
123
124         return true;
125     }
126
127     @Override
128     protected void onMeasure(int widthMeasureSpec, int heightMeasureSpec) {
129         super.onMeasure(widthMeasureSpec, heightMeasureSpec);
130         int mHeight = getMeasuredHeight();
131         cellWidth = getMeasuredWidth();
132         cellHeight = mHeight * 1.0f / LETTERS.length;
133     }
134
135
136
137 }
这种竖直的简单快速索引就搞定了,此外还添加了触摸和点击的监听
- 实现
再来看下我们要的效果图那种效果是如何实现的;主要区别就是字母所在位置和触摸位置的差异,偷点懒,直接上代码了:
 1   @Override
 2     protected void onDraw(Canvas canvas) {
 3
 4         // 遍历26个英文字母, 计算坐标, 进行绘制
 5         for (int i = 0; i < LETTERS.length; i++) {
 6             String letter = LETTERS[i];
 7
 8             // 计算x坐标
 9 //            float x = cellWidth * 0.5f - paint.measureText(letter) * 0.5f;
10             float y = cellHeight * 0.5f + paint.measureText(letter) * 0.5f;
11             // 计算y坐标
12             Rect bounds = new Rect();
13             // 获取文本的矩形区域
14             paint.getTextBounds(letter, 0, letter.length(), bounds);
15
16 //            float y = cellHeight * 0.5f + bounds.height() * 0.5f + i * cellHeight;
17             float x = cellWidth * 0.5f + bounds.width() * 0.5f + i * cellWidth;
18             // 绘制文本
19             canvas.drawText(letter, x, y, paint);
20         }
21     }
22
23     private int lastIndex = -1;
24
25     @Override
26     public boolean onTouchEvent(MotionEvent event) {
27
28         float x;
29         int currentIndex;
30
31         switch (event.getAction()) {
32             case MotionEvent.ACTION_DOWN:
33                 // 获取被点击到的字母索引
34                 x = event.getX();
35                 // 根据x值, 计算当前按下的字母位置
36                 currentIndex = (int) (x / cellWidth);
37                 if (currentIndex != lastIndex) {
38                     if (currentIndex >= 0 && currentIndex < LETTERS.length) {
39                         String letter = LETTERS[currentIndex];
40                         if (onLetterUpdateListener != null) {
41                             onLetterUpdateListener.onLetterUpdate(letter);
42                         }
43                         // 记录上一次触摸的字母
44                         lastIndex = currentIndex;
45                     }
46                 }
47
48                 break;
49             case MotionEvent.ACTION_MOVE:
50                 // 获取被点击到的字母索引
51                 x = event.getX();
52                 // 根据y值, 计算当前按下的字母位置
53                 currentIndex = (int) (x / cellWidth);
54                 if (currentIndex != lastIndex) {
55                     if (currentIndex >= 0 && currentIndex < LETTERS.length) {
56                         String letter = LETTERS[currentIndex];
57                         if (onLetterUpdateListener != null) {
58                             onLetterUpdateListener.onLetterUpdate(letter);
59                         }
60                         // 记录上一次触摸的字母
61                         lastIndex = currentIndex;
62                     }
63                 }
64
65                 break;
66             case MotionEvent.ACTION_UP:
67                 lastIndex = -1;
68                 break;
69             default:
70                 break;
71         }
72
73         return true;
74     }
75
76     @Override
77     protected void onMeasure(int widthMeasureSpec, int heightMeasureSpec) {
78         super.onMeasure(widthMeasureSpec, heightMeasureSpec);
79         int mWidth = getMeasuredWidth();
80         cellWidth = mWidth * 1.0f / LETTERS.length;
81         cellHeight = getMeasuredHeight();
82     }
可以看到主要区别就是单元格的宽度和高度相应改变了;后面会补充一张计算草图.
以上是关于A-Z排序控件的实现的主要内容,如果未能解决你的问题,请参考以下文章