如何提取手机端recovery.img
Posted
tags:
篇首语:本文由小常识网(cha138.com)小编为大家整理,主要介绍了如何提取手机端recovery.img相关的知识,希望对你有一定的参考价值。
参考技术A 方法1adb shell su -c "dd if=/dev/block/bootdevice/by-name/recovery of=/sdcard/recovery.img"
这个命令现在我都没执行成功
方法2
adb shell dd if=/dev/block/bootdevice/by-name/recovery of=/sdcard/recovery.img
成功了,但是这个鬼不能解包了,目前还不知道是哪里出问题了
方法3
执行 adb shell df 查看分区挂载情况,并找到recovery
adb shell dd if=/dev/block/把这里替换成recovery分区挂载代码 of=/sdcard/recovery.img
奇怪的是我这个小米MAX2没有看到recovery挂载分区 参考技术B 呵呵,不要想提取recovery了,还没听说过这样可以的。就算你会提取,提取出来的你一般也用不了,直接百度下载一个,可能是img也可能是exe格式的,然后重新刷吧
Android recovery支持adb shell
Android recovery支持adb shell
最近开发过程注意到recovery不支持adb shell,为了便于调试方便,决定增加此功能。
刚开始我们采用的是user版本系统,进入recovery后,输入adb shell命令,提示“error: no devices/emulators found”,我们先确认recovery.img是否包含有adb,看out\\debug\\target\\product\\xxx\\recovery\\root\\sbin是否有adb文件(源代码\\system\\core\\adb),然后检查\\bootable\\recovery\\etc\\init.rc下关于adbd
service adbd /sbin/adbd--root_seclabel=u:r:su:s0 --device_banner=recovery
   disabled
   socket adbd stream 660 system system
   seclabel u:r:adbd:s0

# Always start adbd on userdebug and engbuilds
on property:ro.debuggable=1
   write /sys/class/android_usb/android0/enable 1
   start adbd

# Restart adbd so it can run as root
on property:service.adb.root=1
   write /sys/class/android_usb/android0/enable 0
   restart adbd
write/sys/class/android_usb/android0/enable 1
从上面可知init.rc 中adbd 是配置的,disabled 表示开机不启动,如 ro.debuggable 被置为1,那么adb 就会开启,或是service.adb.root设置为1,则重启adbd。
ro.debuggable 在\\build\\core\\main.mk下面的内容赋值
ifeq (true,$(strip$(enable_target_debugging)))
  #Target is more debuggable and adbd is on by default
 ADDITIONAL_DEFAULT_PROPERTIES += ro.debuggable=1
enable_target_debugging 在\\build\\core\\main.mk下面的内容赋值:
## user/userdebug ##

user_variant := $(filter useruserdebug,$(TARGET_BUILD_VARIANT))
enable_target_debugging := true
tags_to_install :=
ifneq (,$(user_variant))
  #Target is secure in user builds.
 ADDITIONAL_DEFAULT_PROPERTIES += ro.secure=1

 ifeq ($(user_variant),userdebug)
    #Pick up some extra useful tools
   tags_to_install += debug

    #Enable Dalvik lock contention logging for userdebug builds.
   ADDITIONAL_BUILD_PROPERTIES += dalvik.vm.lockprof.threshold=500
 else
    #Disable debugging in plain user builds.
   enable_target_debugging :=

    #Add for testUsbDebugging()
   ADDITIONAL_DEFAULT_PROPERTIES += ro.adb.secure=1
  Endif
…
Endif
可知默认为enable_target_debugging := true,根据user_variant的值如果为user,则enable_target_debugging :=,这又和TARGET_BUILD_VARIANT有关,此变量对应于VARIANT_CHOICES=(user userdebug eng)中的一个值,由我们来选择,相关的实现在\\build\\envsetup.sh中。
根据上面可知,编译时如果选择userdebug或是eng,则ro.debuggable=1,下面我们选择eng版本编译recovery.img,进入recovery后,输入adb shell命令,提示:
Exec ‘/system/bin/sh’ failed:No such fileor directory(2)
表示没有sh这个文件,无法进入shell,检查ramdisk 文件系统 system 目录为(out\\debug\\target\\product\\xxx\\recovery\\root\\system)空,但我们知道boot.img下是可以的,看\\system\\core\\rootdir\\init.rc检查boot.img 启动的init.rc 关于sh的
service console /system/bin/sh
   class core
   console
   disabled
   user shell
   group shell log
   seclabel u:r:shell:s0

on property:ro.debuggable=1
start console
可知是启动了sh这控制台的,所以需要在bootable\\recovery\\etc\\init.rc增加相应的内容:
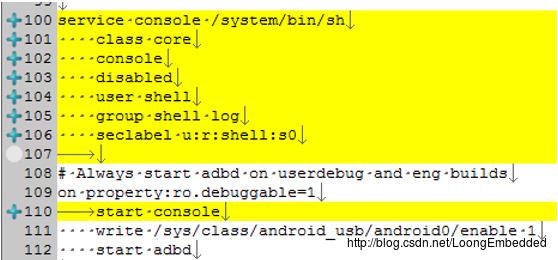
图1
我们知道out\\debug\\target\\product\\xxx\\recovery\\root\\system下没有bin文件夹(当然也没有sh),所以需要在编译的时候创建,需要\\build\\core\\Makefile增加创建目录和把out目录下的/system/bin/sh拷贝到out/recovery/system/bin目录下
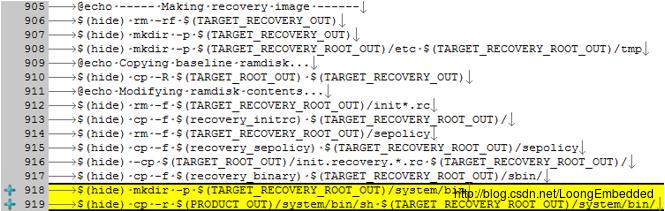
图2
但这样还是不行,后来知道recovery可执行文件是静态编译的,之所以这样是因为recovery模式中没有共享库还有缺动态链接库加载器(/system/bin/linker,Android动态连接器linker与静态连接器ld)。
所以\\external\\mksh\\Android.mk
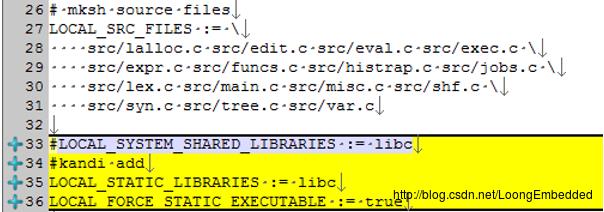
图3
参考链接:
Android recovery.img 支持adb shell
http://blog.csdn.net/chituhuan/article/details/52383655
[IMX6Q][Android5.1]移植笔记 --- Recovery mode的shell功能实现(sh+toolbox)
http://blog.csdn.net/kris_fei/article/details/50921384
Android Recovery 支持 Adb
http://www.jianshu.com/p/a0bdcce0a5e1
以上是关于如何提取手机端recovery.img的主要内容,如果未能解决你的问题,请参考以下文章