R-----shiny包的部分解释和控件介绍
Posted 方舟
tags:
篇首语:本文由小常识网(cha138.com)小编为大家整理,主要介绍了R-----shiny包的部分解释和控件介绍相关的知识,希望对你有一定的参考价值。
R-----shiny包的部分解释和控件介绍
作者:周彦通、贾慧
shinyApp(
ui = fixedPage(
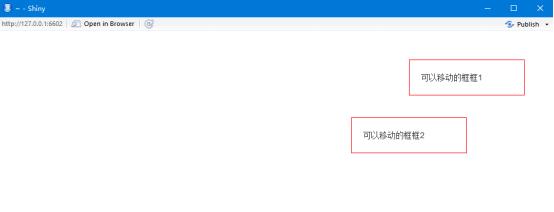
fixedPanel(
top = 50, right=50, width=200, draggable = TRUE, style="padding: 20px; border: 1px solid red;",
"可以移动的框框1"
),
absolutePanel(
top = 150, right=150, width=200, draggable = TRUE, style="padding: 20px; border: 1px solid red;",
"可以移动的框框2"
)
),
server = function(session, input, output) {
})

shinyApp(
ui = fixedPage(
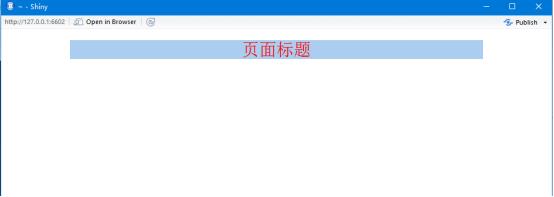
tags$head(
tags$title(\'窗口标题\'),
tags$style(
rel = \'stylesheet\',
\'.title-panel {background: #ABCDEF} \',
\'.title-panel h2 {text-align:center; color: #FF0000}\'
)
),
div(
class=\'col-md-12 title-panel\',
h2(\'页面标题\')
)
),
server = function(input, output, session) {}
)

shinyApp(
ui = fixedPage(
tags$style(
".container div {border: 1px solid gray; min-height:30px;}",
"h4 {color:red; margin-top: 20px;}"
),
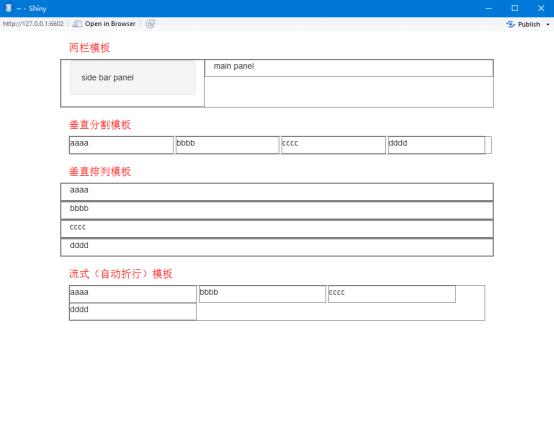
h4("两栏模板"),
sidebarLayout(
sidebarPanel("side bar panel"),
mainPanel("main panel")
),
h4("垂直分割模板"),
splitLayout("aaaa", "bbbb", "cccc", "dddd"),
h4("垂直排列模板"),
verticalLayout("aaaa", "bbbb", "cccc", "dddd"),
h4("流式(自动折行)模板"),
flowLayout("aaaa", "bbbb", "cccc", "dddd")
),
server = function(session, input, output) {
}
)

排版样式
shinyApp(
ui = fixedPage(
textInput(\'itx1\', \'\', value=\'1111\'),
textInput(\'itx2\', \'\', value=\'2222\'),
textOutput(\'otx\', container=pre)
),
server = function(input, output, session) {
output$otx <- renderPrint({
a <- NULL
isolate(a <- input$itx1)
b <- input$itx2
list(a=a, b=b)
})
})
阻止响应
测试
shinyApp(
ui = fixedPage(
h1(\'测试\'), hr(),
radioButtons(\'opts\', \'\', choices = c(\'图像\', \'文字\'), inline = T, selected=\'图像\'),
conditionalPanel(
condition = \'input.opts==="图像"\',
plotOutput(\'pl\')
),
conditionalPanel(
condition = \'input.opts==="文字"\',
textOutput(\'tx\', container=pre)
)
),
server = function(input, output, session) {
air <- na.omit(airquality)
pp <- ggplot(air, aes(x=Solar.R, y=Ozone)) + geom_point()
observe({
xtype <- input$opts
if(xtype==\'图像\') output$pl <- renderPlot({ pp })
else output$tx <- renderPrint({ str(pp) })
})
})
文件上传
shinyApp(
ui = fixedPage(
fileInput(\'f\', \'上传文件\', multi=T, accept=\'text/plain, image/*\'),
textOutput(\'tx\', container=pre)
),
server = function(input, output, session) {
output$tx <- renderPrint({ str(input$f) })
})
保存
library(\'ggplot2\')fig.w <- 400fig.h <- 300shinyApp(
ui = fixedPage(
plotOutput(\'pl\', width=fig.w, height=fig.h),
radioButtons(\'xtype\', \'图片格式\', c(\'png\', \'jpeg\', \'bmp\'), selected=\'png\', inline=T),
downloadLink(\'file\', \'保存图片\')
),
server = function(input, output, session) {
air <- na.omit(airquality)
pp <- ggplot(air, aes(x=Solar.R, y=Ozone)) + geom_point()
output$pl <- renderPlot({ pp })
observeEvent(
input$xtype,
output$file <- downloadHandler(
filename = paste0(\'plot.\', input$xtype),
content = function(file) {
image <- switch(input$xtype,
png=png, jpeg=jpeg, bmp=bmp)
image(file, width=fig.w, height=fig.h)
print(pp)
dev.off()
}
)
)
})
控件
shinyApp(
ui = fixedPage(
h2(\'输入控件演示\'),
hr(),
sidebarLayout(
sidebarPanel(
textInput(\'tx\', \'文字输入\', value=\'abc\'),
checkboxGroupInput(\'cg\', \'选项组\', choice=LETTERS[1:4], selected=c(\'A\', \'D\'), inline=TRUE),
sliderInput(\'sl\', \'滑动选数\', min=1, max=10, value=6),
html(\'<label for="tt">文本框输入</label>\',
\'<textarea id="tt" class="form-control" style="resize:none"></textarea>\'
),
HTML(\'<label for="clx">颜色选取</label>\',
\'<input id="clx" type="color" class="form-control" value="#FF0000">\',
\'<input id="cl" type="text" class="form-control" value="#FF0000" style="display:none">\',
\'<script>\',
\'$(function(){$("#clx").change(function(){$("#cl").val($(this).val()).trigger("change");});})\',
\'</script>\'
)
),
mainPanel(
HTML(\'<textarea id="ta" class="form-control shiny-text-output"\',
\'style="resize:none; height:200px;" readonly></textarea>\'
)
)
)
),
server = function(input, output, session) {
output$ta <- renderText({
paste(c(input$tx, input$tt, paste(input$cg, collapse=\'; \'),
input$sl, input$cl), collapse=\'\\n\')
})
observe({
updateTextInput(session, inputId=\'tt\', value=paste(\'文本输入:\', input$tx))
})
})
Shiny、输出语法
shinyApp(
ui = fixedPage(
textOutput(\'tx\', container=h1),
plotOutput(\'pl\', width=\'100%\', height=\'400px\')
),
server = function(input, output, session) {
output$tx <- renderText({
"这是服务器输出的文字"
})
output$pl <- renderPlot({
a <- rnorm(20)
par(mar=c(3, 3, 0.5, 0.5), mgp=c(2, 0.5, 0))
plot(a)
})
})
函数xxxOutput和renderXXX函数
ls("package:shiny", pattern="Output$")
ls("package:shiny", pattern="^render")
renderXXX函数的一般形式是:
renderXXX(expr, ...)
(红色不分为关键参数)
更新输入演示案列
Server。R
function(input, output, clientData, session) {
observe({
# We\'ll use these multiple times, so use short var names for
# convenience.
c_label <- input$control_label
c_num <- input$control_num
# Text =====================================================
# Change both the label and the text
updateTextInput(session, "inText",
label = paste("New", c_label),
value = paste("New text", c_num)
)
# Number ===================================================
# Change the value
updateNumericInput(session, "inNumber", value = c_num)
# Change the label, value, min, and max
updateNumericInput(session, "inNumber2",
label = paste("Number ", c_label),
value = c_num, min = c_num-10, max = c_num+10, step = 5)
# Slider input =============================================
# Only label and value can be set for slider
updateSliderInput(session, "inSlider",
label = paste("Slider", c_label),
value = c_num)
# Slider range input =======================================
# For sliders that pick out a range, pass in a vector of 2
# values.
updateSliderInput(session, "inSlider2",
value = c(c_num-1, c_num+1))
# An NA means to not change that value (the low or high one)
updateSliderInput(session, "inSlider3",
value = c(NA, c_num+2))
# Date input ===============================================
# Only label and value can be set for date input
updateDateInput(session, "inDate",
label = paste("Date", c_label),
value = paste("2013-04-", c_num, sep=""))
# Date range input =========================================
# Only label and value can be set for date range input
updateDateRangeInput(session, "inDateRange",
label = paste("Date range", c_label),
start = paste("2013-01-", c_num, sep=""),
end = paste("2013-12-", c_num, sep=""),
min = paste("2001-01-", c_num, sep=""),
max = paste("2030-12-", c_num, sep="")
)
# # Checkbox ===============================================
updateCheckboxInput(session, "inCheckbox",value = c_num %% 2)
# Checkbox group ===========================================
# Create a list of new options, where the name of the items
# is something like \'option label x A\', and the values are
# \'option-x-A\'.
cb_options <- list()
cb_options[[paste("option label", c_num, "A")]] <-
paste0("option-", c_num, "-A")
cb_options[[paste("option label", c_num, "B")]] <-
paste0("option-", c_num, "-B")
# Set the label, choices, and selected item
updateCheckboxGroupInput(session, "inCheckboxGroup",
label = paste("checkboxgroup", c_label),
choices = cb_options,
selected = paste0("option-", c_num, "-A")
)
# Radio group ==============================================
# Create a list of new options, where the name of the items
# is something like \'option label x A\', and the values are
# \'option-x-A\'.
r_options <- list()
r_options[[paste("option label", c_num, "A")]] <-
paste0("option-", c_num, "-A")
r_options[[paste("option label", c_num, "B")]] <-
paste0("option-", c_num, "-B")
# Set the label, choices, and selected item
updateRadioButtons(session, "inRadio",
label = paste("Radio", c_label),
choices = r_options,
selected = paste0("option-", c_num, "-A")
)
# Select input =============================================
# Create a list of new options, where the name of the items
# is something like \'option label x A\', and the values are
# \'option-x-A\'.
s_options <- list()
s_options[[paste("option label", c_num, "A")]] <-
paste0("option-", c_num, "-A")
s_options[[paste("option label", c_num, "B")]] <-
paste0("option-", c_num, "-B")
# Change values for input$inSelect
updateSelectInput(session, "inSelect",
choices = s_options,
selected = paste0("option-", c_num, "-A")
)
# Can also set the label and select an item (or more than
# one if it\'s a multi-select)
updateSelectInput(session, "inSelect2",
label = paste("Select label", c_label),
choices = s_options,
selected = paste0("option-", c_num, "-B")
)
# Tabset input =============================================
# Change the selected tab.
# The tabsetPanel must have been created with an \'id\' argument
if (c_num %% 2) {
updateTabsetPanel(session, "inTabset", selected = "panel2")
} else {
updateTabsetPanel(session, "inTabset", selected = "panel1")
}
})}
ui.R
fluidPage(
titlePanel("Changing the values of inputs from the server"),
fluidRow(
column(3, wellPanel(
h4("These inputs control the other inputs on the page"),
textInput("control_label",
"This controls some of the labels:",
"LABEL TEXT"),
sliderInput("control_num",
"This controls values:",
min = 1, max = 20, value = 15)
)),
column(3, wellPanel(
textInput("inText", "Text input:", value = "start text"),
numericInput("inNumber", "Number input:",
min = 1, max = 20, value = 5, step = 0.5),
numericInput("inNumber2", "Number input 2:",
min = 1, max = 20, value = 5, step = 0.5),
sliderInput("inSlider", "Slider input:",
min = 1, max = 20, value = 15),
sliderInput("inSlider2", "Slider input 2:",
min = 1, max = 20, value = c(5, 15)),
sliderInput("inSlider3", "Slider input 3:",
min = 1, max = 20, value = c(5, 15)),
dateInput("inDate", "Date input:"),
dateRangeInput("inDateRange", "Date range input:")
)),
column(3,
wellPanel(
checkboxInput("inCheckbox", "Checkbox input",
value = FALSE),
checkboxGroupInput("inCheckboxGroup",
"Checkbox group input:",
c("label 1" = "option1",
"label 2" = "option2")),
radioButtons("inRadio", "Radio buttons:",
c("label 1" = "option1",
"label 2" = "option2")),
selectInput("inSelect", "Select input:",
c("label 1" = "option1",
"label 2" = "option2")),
selectInput("inSelect2", "Select input 2:",
multiple = TRUE,
c("label 1" = "option1",
"label 2" = "option2"))
),
tabsetPanel(id = "inTabset",
tabPanel("panel1", h2("This is the first panel.")),
tabPanel("panel2", h2("This is the second panel."))
)
)
))
首先需要将ui.R和server.R两个代码保存为文件放在同一个文件夹下,然后就可以调用这个app了。
如果变量的值不使用input列表,这里有两种赋值方法:
server = function(input, output, session) {
var1 <- list(a=1, b=2, c=3)
var2 <- reactiveValues(a=1, b=2, c=3)}
以上是关于R-----shiny包的部分解释和控件介绍的主要内容,如果未能解决你的问题,请参考以下文章