iOS draw出各种图形
Posted
tags:
篇首语:本文由小常识网(cha138.com)小编为大家整理,主要介绍了iOS draw出各种图形相关的知识,希望对你有一定的参考价值。
参考技术A - (void)drawRect:(CGRect)rect//写字
[@"程序员"drawInRect:CGRectMake(20,380,100,50)withAttributes:@NSFontAttributeName:[UIFontsystemFontOfSize:20],NSForegroundColorAttributeName:[UIColorredColor]];
CGContextRefcontext =UIGraphicsGetCurrentContext();
//画线
CGPointaPoints[3];//坐标点
aPoints[0] =CGPointMake(100,80);//坐标1
aPoints[1] =CGPointMake(130,80);//坐标2
aPoints[2] =CGPointMake(130,100);//坐标3
CGContextAddLines(context, aPoints,3);//添加线
CGContextDrawPath(context,kCGPathStroke);//根据坐标绘制路径
//弧线(方法一)
/*
从(140,80)到(148,68)画一条直线,从(148,68)到(156,80)画一条直线,两条线之间画一条10度的曲线
*/
CGContextSetRGBStrokeColor(context,89/255.0,89/255.0,89/255.0,1);//改变画笔颜色
CGContextMoveToPoint(context,140,80);//开始坐标p1
CGContextAddArcToPoint(context,148,68,156,80,10);
CGContextStrokePath(context);//绘画路径
//弧线(方法二)
/*
以(200,100)为圆心,30为半径,逆时针画60度弧线(1为顺时针,0为逆时针)
*/
CGContextAddArc(context,200,100,30,0,M_PI/3,0);
CGContextStrokePath(context);//绘画路径
//简单矩形
CGContextStrokeRect(context,CGRectMake(100,150,10,10));//画方框
CGContextFillRect(context,CGRectMake(120,180,10,10));//填充框
//画矩形(填充颜色)
/*
*/
UIColor*aColor = [UIColorcolorWithRed:1green:0.0blue:0alpha:1];
//矩形,并填充颜色
CGContextSetLineWidth(context,2.0);//线的宽度
aColor = [UIColorblueColor];//blue蓝色
CGContextSetFillColorWithColor(context, aColor.CGColor);//填充颜色
aColor = [UIColoryellowColor];
CGContextSetStrokeColorWithColor(context, aColor.CGColor);//线框颜色
CGContextAddRect(context,CGRectMake(140,220,60,30));//画方框
CGContextDrawPath(context,kCGPathFillStroke);//绘画路径
//矩形(填充渐变颜色)
//方式一:
CAGradientLayer*gradient1 = [CAGradientLayerlayer];
gradient1.frame=CGRectMake(240,300,60,30);
gradient1.colors= [NSArrayarrayWithObjects:(id)[UIColorwhiteColor].CGColor,
(id)[UIColorgrayColor].CGColor,
(id)[UIColorblackColor].CGColor,
(id)[UIColoryellowColor].CGColor,
(id)[UIColorblueColor].CGColor,
(id)[UIColorredColor].CGColor,
(id)[UIColorgreenColor].CGColor,
(id)[UIColororangeColor].CGColor,
(id)[UIColorbrownColor].CGColor,nil];
[self.layerinsertSublayer:gradient1atIndex:0];
//方式二:
CGColorSpaceRefrgb =CGColorSpaceCreateDeviceRGB();
CGFloatcolors[] =
1,1,1,1.00,
1,1,0,1.00,
1,0,0,1.00,
1,0,1,1.00,
0,1,1,1.00,
0,1,0,1.00,
0,0,1,1.00,
0,0,0,1.00,
;
CGGradientRefgradient =CGGradientCreateWithColorComponents
(rgb, colors,NULL,sizeof(colors)/(sizeof(colors[0])*4));//形成梯形,渐变的效果
CGColorSpaceRelease(rgb);
//画线形成一个矩形
//CGContextSaveGState与CGContextRestoreGState的作用
/*
CGContextSaveGState函数的作用是将当前图形状态推入堆栈。之后,您对图形状态所做的修改会影响随后的描画操作,但不影响存储在堆栈中的拷贝。在修改完成后,您可以通过CGContextRestoreGState函数把堆栈顶部的状态弹出,返回到之前的图形状态。这种推入和弹出的方式是回到之前图形状态的快速方法,避免逐个撤消所有的状态修改;这也是将某些状态(比如裁剪路径)恢复到原有设置的唯一方式。
*/
CGContextSaveGState(context);
CGContextMoveToPoint(context,220,90);
CGContextAddLineToPoint(context,240,90);
CGContextAddLineToPoint(context,240,110);
CGContextAddLineToPoint(context,220,110);
CGContextClip(context);//context裁剪路径,后续操作的路径
//CGContextDrawLinearGradient(CGContextRef context,CGGradientRef gradient, CGPoint startPoint, CGPoint endPoint,CGGradientDrawingOptions options)
//gradient渐变颜色,startPoint开始渐变的起始位置,endPoint结束坐标,options开始坐标之前or开始之后开始渐变
CGContextDrawLinearGradient(context, gradient,CGPointMake
(220,90) ,CGPointMake(240,110),
kCGGradientDrawsAfterEndLocation);
CGContextRestoreGState(context);//恢复到之前的context
//再写一个看看效果
CGContextSaveGState(context);
CGContextMoveToPoint(context,260,90);
CGContextAddLineToPoint(context,280,90);
CGContextAddLineToPoint(context,280,100);
CGContextAddLineToPoint(context,260,100);
CGContextClip(context);//裁剪路径
//说白了,开始坐标和结束坐标是控制渐变的方向和形状
CGContextDrawLinearGradient(context, gradient,CGPointMake
(260,90) ,CGPointMake(260,100),
kCGGradientDrawsAfterEndLocation);
CGContextRestoreGState(context);//恢复到之前的context
//颜色渐变的圆
[@"颜色渐变的圆:"drawInRect:CGRectMake(20,380,150,50)withAttributes:@NSFontAttributeName:[UIFontsystemFontOfSize:20],NSForegroundColorAttributeName:[UIColorredColor]];
CGContextDrawRadialGradient(context, gradient,CGPointMake(200,400),0.0,CGPointMake(200,400),10,kCGGradientDrawsBeforeStartLocation);
//画椭圆
CGContextAddEllipseInRect(context,CGRectMake(160,180,20,8));//椭圆
CGContextDrawPath(context,kCGPathFillStroke);
//画三角形
//只要三个点就行跟画一条线方式一样,把三点连接起来
CGPointsPoints[3];//坐标点
sPoints[0] =CGPointMake(100,220);//坐标1
sPoints[1] =CGPointMake(130,220);//坐标2
sPoints[2] =CGPointMake(130,160);//坐标3
CGContextAddLines(context, sPoints,3);//添加线
CGContextClosePath(context);//封起来
CGContextDrawPath(context,kCGPathFillStroke);//根据坐标绘制路径
//*画圆角矩形*/
floatfw =180;
floatfh =280;
CGContextMoveToPoint(context, fw, fh-20);//开始坐标右边开始
CGContextAddArcToPoint(context, fw, fh, fw-20, fh,10);//右下角角度
CGContextAddArcToPoint(context,120, fh,120, fh-20,10);//左下角角度
CGContextAddArcToPoint(context,120,250, fw-20,250,10);//左上角
CGContextAddArcToPoint(context, fw,250, fw, fh-20,10);//右上角
CGContextClosePath(context);
CGContextDrawPath(context,kCGPathFillStroke);//根据坐标绘制路径
/*画贝塞尔曲线*/
//二次曲线
CGContextMoveToPoint(context,10,500);//设置Path的起点
CGContextAddQuadCurveToPoint(context,50,480,60,460);//设置贝塞尔曲线的控制点坐标和终点坐标
CGContextStrokePath(context);
//三次曲线函数
CGContextMoveToPoint(context,40,600);//设置Path的起点
CGContextAddCurveToPoint(context,50,620,80,650,100,700);//设置贝塞尔曲线的控制点坐标和控制点坐标终点坐标
CGContextStrokePath(context);
/*图片*/
UIImage*image = [UIImageimageNamed:@"qianggou dianji-1"];
[imagedrawInRect:CGRectMake(60,600,40,40)];//在坐标中画出图片
//[image drawAtPoint:CGPointMake(100, 340)];//保持图片大小在point点开始画图片,可以把注释去掉看看
CGContextDrawImage(context,CGRectMake(100,340,20,20), image.CGImage);
//使用这个使图片上下颠倒了,参考http://blog.csdn.net/koupoo/article/details/8670024
//CGContextDrawTiledImage(context, CGRectMake(0, 0, 20, 20), image.CGImage);//平铺图
WinForm画图
在.NET中,画图主要是通过Graphics类实现的,这个类主要通过两类方法完成画图,一类是DrawXXX,画各种线条图形;另一类是FillXXX,用各种形状,填充各种图形。Graphics是画板,Draw各个方法是各种盏笔(不过在调用Draw方法时,参数需要一个Pen对象),Fill的各个方法就是种种刷子(确实Fill的方法参数也需要一个Brush对象)。首先要熟悉各个Draw和Fill方法,以及他们的参数,那么剩下的事就是对坐票了,画什么,在那里画,怎么用Draw和Fill了。
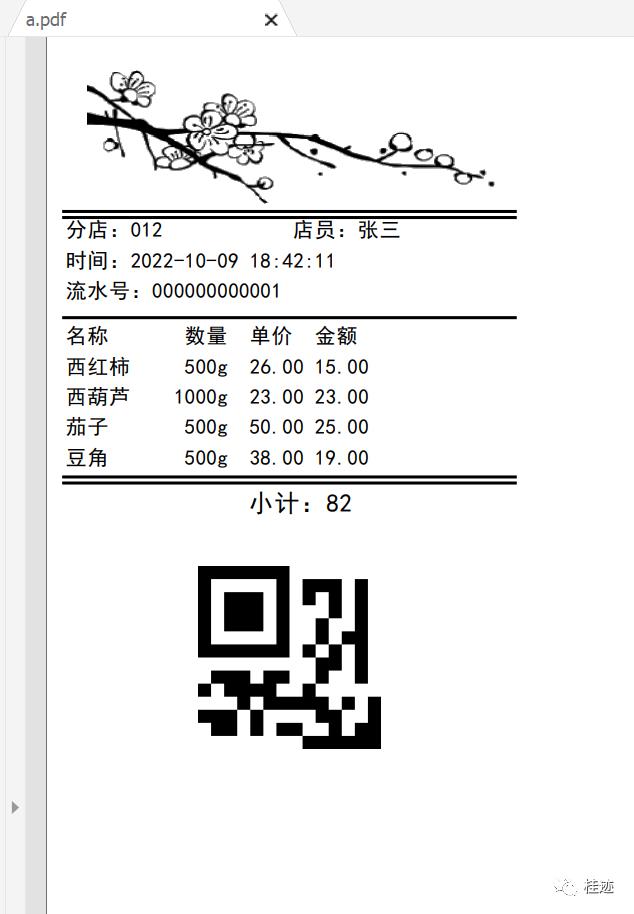
下面是在Form上画了一个小票,然后调用打印组件在虚拟打印机里打印出来的效果。
using QRCoder;
using System.Drawing;
using System.Drawing.Drawing2D;
using System.Drawing.Imaging;


namespace WinFormsDemo12

    public partial class Form1 : Form

        public Form1()

            InitializeComponent();

        void Draw(Graphics graphics)

            var y = 15;
            using var logo = new Bitmap(Directory.GetCurrentDirectory() + "/aeon.png");
            graphics.DrawImage(MakeGrayscale(logo), 60, y, 200, 80);
            graphics.DrawLine(new Pen(Color.Black, 2), 10, y += 80, 310, y);
            graphics.DrawLine(new Pen(Color.Black, 2), 10, y += 4, 310, y);
            var font = new Font("黑体", 10);
            var brush = new SolidBrush(Color.Black);
            graphics.DrawString("分店:012", font, brush, 10, y += 1);
            graphics.DrawString("店员:张三", font, brush, 160, y);
            graphics.DrawString($"时间:DateTime.Now.ToString("yyyy-MM-dd HH:mm:ss")", font, brush, 10, y += 20);
            var no = "000000000001";
            graphics.DrawString($"流水号:no", font, brush, 10, y += 20);
            graphics.DrawLine(new Pen(Color.Black, 2), 10, y += 25, 310, y);
            graphics.DrawString("名称       数量  单价  金额", font, brush, 10, y += 5);
            graphics.DrawString("西红柿     500g  26.00 15.00", font, brush, 10, y += 20);
            graphics.DrawString("西葫芦    1000g  23.00 23.00", font, brush, 10, y += 20);
            graphics.DrawString("茄子       500g  50.00 25.00", font, brush, 10, y += 20);
            graphics.DrawString("豆角       500g  38.00 19.00", font, brush, 10, y += 20);
            graphics.DrawLine(new Pen(Color.Black, 2), 10, y += 20, 310, y);
            graphics.DrawLine(new Pen(Color.Black, 2), 10, y += 4, 310, y);
            var sumfont = new Font("黑体", 12);
            graphics.DrawString("              小计:82", sumfont, brush, 10, y += 5);


            var qrCodeAsBitmapByteArr = PngByteQRCodeHelper.GetQRCode(no, QRCodeGenerator.ECCLevel.Q, 20, false);
            using var qrcode = Image.FromStream(new MemoryStream(qrCodeAsBitmapByteArr));
            graphics.DrawImage(qrcode, 100, y += 50, 120, 120);


        public static Bitmap MakeGrayscale(Bitmap original)

            var newBitmap = new Bitmap(original.Width, original.Height);
            var g = Graphics.FromImage(newBitmap);
            var colorMatrix = new System.Drawing.Imaging.ColorMatrix(
               new float[][]

                  new float[] .3f, .3f, .3f, 0, 0,
                  new float[] .59f, .59f, .59f, 0, 0,
                  new float[] .11f, .11f, .11f, 0, 0,
                  new float[] 0, 0, 0, 1, 0,
                  new float[] 0, 0, 0, 0, 1
              );
            var attributes = new System.Drawing.Imaging.ImageAttributes();
            attributes.SetColorMatrix(colorMatrix);
            g.DrawImage(original, new Rectangle(0, 0, original.Width, original.Height), 0, 0, original.Width, original.Height, GraphicsUnit.Pixel, attributes);
            g.Dispose();
            return newBitmap;

        private void printDocument1_PrintPage(object sender, System.Drawing.Printing.PrintPageEventArgs e)

            if (e.Graphics != null)

                Draw(e.Graphics);


        private void button2_Click(object sender, EventArgs e)

            printDocument1.Print();

        private void button1_Click(object sender, EventArgs e)

            var graphics = this.CreateGraphics();
            Draw(graphics);
MakeGrayscale方法是把彩色logo转黑白的一个算法,关注画图部分请忽略。
Graphics实现了IDisposable,用后请释放。
窗体的浏览效果:
虚拟打印机输出的PDF效果图:
以上是关于iOS draw出各种图形的主要内容,如果未能解决你的问题,请参考以下文章