FrameLayout和TableLayout
Posted
tags:
篇首语:本文由小常识网(cha138.com)小编为大家整理,主要介绍了FrameLayout和TableLayout相关的知识,希望对你有一定的参考价值。
FrameLayout
相比于前面两种布局就简单很多,因此它的应用场景也少了很多,FrameLayout没有任何定位方式,所有控件都放在布局的左上角,如果拜访量多个控件,则最后定义的压在其他控件的最上面。
TableLayout
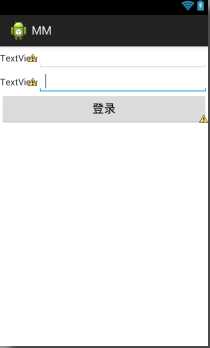
这种布局允许我们使用表格的方式来排列控件,这种布局也不是很常用,你只需要了解一下他的基本用法就可以了。既然是表格就一定有列和行,设计表格是我们应该尽量让每一行都拥有相同的列数,这样的表格也是简单的。当某一行要有不相等的列数时,可以进行单元格合并解决这个问题,通过layout_span="2"表示这个控件占两列。
每加入一个TextRow就相当于加入一行,每在一个TextRow中加入一个控件就相当于添加一列
当前登录界面并没有充分利用屏幕的宽度,右侧还空出一块,因为在TableRow中我们无法顶空间的宽度,这时使用android:stretchColumns属性就可以很好地解决这个问题,它允许将TableLayoutzhong的某一列进行拉伸,以达到自动适应屏幕宽度的作用。这里将android:stretchColumns设为"1"表示如果表格不能完全占满屏幕宽度,就将第二列进行拉伸,指定0就是拉伸第一列
 1 <?xml version="1.0" encoding="utf-8"?>
 2 <TableLayout xmlns:android="http://schemas.android.com/apk/res/android"
 3     android:layout_width="match_parent"
 4     android:layout_height="match_parent"
 5     android:stretchColumns="1"
 6     >
 7     <TableRow>
 8
 9         <TextView
10             android:id="@+id/textView1"
11             android:layout_width="wrap_content"
12             android:layout_height="wrap_content"
13             android:text="TextView" />
14
15         <EditText
16             android:id="@+id/editText1"
17             android:layout_width="wrap_content"
18             android:layout_height="wrap_content"
19             android:ems="10"
20             android:inputType="textPersonName" >
21
22             <requestFocus />
23         </EditText>
24     </TableRow>
25
26     <TableRow>
27
28         <TextView
29             android:id="@+id/textView2"
30             android:layout_width="wrap_content"
31             android:layout_height="wrap_content"
32             android:text="TextView" />
33
34         <EditText
35             android:id="@+id/editText2"
36             android:layout_width="wrap_content"
37             android:layout_height="wrap_content"
38             android:ems="10"
39             android:inputType="textPassword" >
40
41             <requestFocus />
42         </EditText>
43     </TableRow>
44
45     <TableRow>
46
47         <Button
48             android:id="@id/button1"
49             android:layout_height="wrap_content"
50             android:layout_span="2"
51             android:text="登录" />
52     </TableRow>
53
54 </TableLayout>

android中其实还有一个AbsoluteLayout不过这个连官方都已经不准备使用了。因此我们直接忽略即可。
以上是关于FrameLayout和TableLayout的主要内容,如果未能解决你的问题,请参考以下文章