istio服务案例实践
Posted
tags:
篇首语:本文由小常识网(cha138.com)小编为大家整理,主要介绍了istio服务案例实践相关的知识,希望对你有一定的参考价值。
参考技术A 一般的服务不需要做过多修改,开启自动注入后,istio会自动注入siderbar等依赖服务和组件。这里新建一个命名空间(参照前面的文章)进行实验,并设置成默认空间
kubectl config set-context $(kubectl config current-context) --namespace=dwaynt-istio
开启siderbar默认注入,指定dwaynt-istio命名空间:
kubectl label namespace dwaynt-istio istio-injection=enabled
Kubectl apply 部署应用。Siderbar会自动注入到该服务。
helloworld.yaml:
Istio中使用ingressgateway作为入口,创建istio-gress.yaml,创建gateway规则,注意VirtualService中的route host指的是服务的hostname,同一个namespace里面就是service-name。port number要和istio初始化时使用的配置(manifests/profiles/demo.yaml)istio-ingressgateway中的设置对应(我选用的是demo配置),http协议80端口。
apiVersion: networking.istio.io/v1alpha3
kind: Gateway
metadata:
name: spring-boot-istio-gateway
spec:
selector:
istio: ingressgateway
servers:
- port:
number: 80
name: http-hellogateway
protocol: HTTP
hosts:
- "*"
---
apiVersion: networking.istio.io/v1alpha3
kind: VirtualService
metadata:
name: helloworld-istio
spec:
hosts:
- "www.helloworld.com"
gateways:
- spring-boot-istio-gateway
http:
- match:
- uri:
prefix: /helloworld
route:
- destination:
host: helloworld-master
port:
number: 17077
kubectl patch service istio-ingressgateway -n istio-system -p '"spec":"type":"NodePort"'
export INGRESS_HOST=$(kubectl get po -l istio=ingressgateway -n istio-system -o 'jsonpath=.items[0].status.hostIP')
export INGRESS_PORT=$(kubectl -n istio-system get service istio-ingressgateway -o jsonpath='.spec.ports[?(@.name=="http2")].nodePort')
浏览器通过ip+port访问,路由设置了host,本地绑定域名,通过域名访问
http://www.helloworld.com:31779/helloworld
upstream connect error or disconnect/reset before headers. reset reason: connection failure, transport failure reason: TLS error: 268436501:SSL routines:OPENSSL_internal:SSLV3_ALERT_CERTIFICATE_EXPIRED
解决方法:
重启istio服务
kubectl delete pods istio-egressgateway-65bdddf685-mzzmg istio-ingressgateway-7b545cdbc7-68pgx istiod-864977fd6c-qj75n -n istio-system
查看集群内dns(找一个在集群内的服务查看容器内的设置):
增加到本地dns(在启动coredns时一般会自动修改/etc/resolve.conf,ubuntu18.04 systemd服务会刷新,所以需要修改该服务的配置):
测试服务请求:
服务地址一般为<service-name>.<namespace>.svc.cluster.local:port
增加一个helloworld-istio服务,和前面的helloworld-master服务区分,helloworld-istio调用helloworld-master服务:
@RestController
public class AController
@Autowired
RestTemplate restTemplate;
@RequestMapping(value = "/hellosecond/helloworld", method = RequestMethod. GET )
public Response hello()
Response res = new Response();
String result = restTemplate.getForObject("http://helloworld-master.dwaynt-istio.svc.cluster.local:17077/helloworld", String.class);
res.setMsg("helloworld-istio-second:" +
"get from master:" + result);
return res;
helloworld-istio.yaml示例:
apiVersion: v1
kind: Service
metadata:
name: helloworld-istio
namespace: dwaynt-istio
labels:
verison: "1.0.0"
env: "test"
spec:
selector:
app: helloworld-istio
release: master
ports:
- name: http
port: 17078
targetPort: 17002
---
apiVersion: apps/v1
kind: Deployment
metadata:
name: helloworld-istio
namespace: dwaynt-istio
spec:
replicas: 1
selector:
matchLabels:
app: helloworld-istio
release: master
template:
metadata:
labels:
app: helloworld-istio
release: master
version: "1.0.0"
spec:
containers:
- name: demo-hello-world-istio
image: dw/demo-hello-world-istio
imagePullPolicy: IfNotPresent
ports:
- name: http
containerPort: 17078
增加helloworld-istio服务的路由:
apiVersion: networking.istio.io/v1alpha3
kind: VirtualService
metadata:
name: helloworld-istio
spec:
hosts:
- "www.helloworld.com"
gateways:
- spring-boot-istio-gateway
http:
- match:
- uri:
prefix: /hellosecond
route:
- destination:
host: helloworld-istio
port:
number: 17078
- match:
- uri:
prefix: /helloworld
route:
- destination:
host: helloworld-master
port:
number: 17077
浏览器访问测试:
查看链路:
DestinationRule组件,设置限流和熔断规则
参考: http://dljz.nicethemes.cn/news/show-99078.html
注意,对于HTTP1而言,限制并发数=maxConnections*maxRequestsPerConnection,对于HTTP2而言,限制并发数=http2MaxRequests, outlierDetection是异常检测,熔断机制,baseEjectionTime拒绝服务时间,maxEjectionPercent拒绝比例。
Yaml例子参考,设置hello-istio服务的限流和熔断:
apiVersion: networking.istio.io/v1alpha3
kind: DestinationRule
metadata:
name: hello-rule
spec:
host: helloworld-istio
trafficPolicy:
connectionPool:
tcp:
maxConnections: 1
http:
http1MaxPendingRequests: 1
maxRequestsPerConnection: 1
http2MaxRequests: 1
outlierDetection:
consecutive5xxErrors: 1
interval: 1s
baseEjectionTime: 30s
maxEjectionPercent: 100
Helloworld-istio服务增加一个2.0.0版本:
---
apiVersion: apps/v1
kind: Deployment
metadata:
name: helloworld-istio-2
namespace: dwaynt-istio
spec:
replicas: 1
selector:
matchLabels:
app: helloworld-istio
release: master
template:
metadata:
labels:
app: helloworld-istio
release: master
version: "2.0.0"
spec:
containers:
- name: demo-hello-world-istio
image: dw/demo-hello-world-istio-2
imagePullPolicy: IfNotPresent
ports:
- name: http
containerPort: 17078
应用yaml:
kubectl apply -f helloworld.yaml
多次访问http://www.helloworld.com:31779/hellosecond/helloworld,查看调用链路。默认情况下负载是轮询,平均负载压力:
按比例灰度访问:
修改destinationrule,增加subset:
apiVersion: networking.istio.io/v1alpha3
kind: DestinationRule
metadata:
name: hello-rule
spec:
host: helloworld-istio
trafficPolicy:
connectionPool:
tcp:
maxConnections: 1
http:
http1MaxPendingRequests: 1
maxRequestsPerConnection: 1
http2MaxRequests: 1
outlierDetection:
consecutive5xxErrors: 1
interval: 1s
baseEjectionTime: 30s
maxEjectionPercent: 100
subsets:
- labels:
version: "1.0.0"
name: v1
- labels:
version: "2.0.0"
name: v2
修改virtualservice,增加比例,v1:v2按照4:1配置:
route:
- destination:
host: helloworld-istio
subset: v1
port:
number: 17078
weight: 80
- destination:
host: helloworld-istio
subset: v2
port:
number: 17078
weight: 20
测试,测试100次,基本是4:1的负载比例:
Istio技术与实践05:如何用istio实现流量管理
Istio是什么?
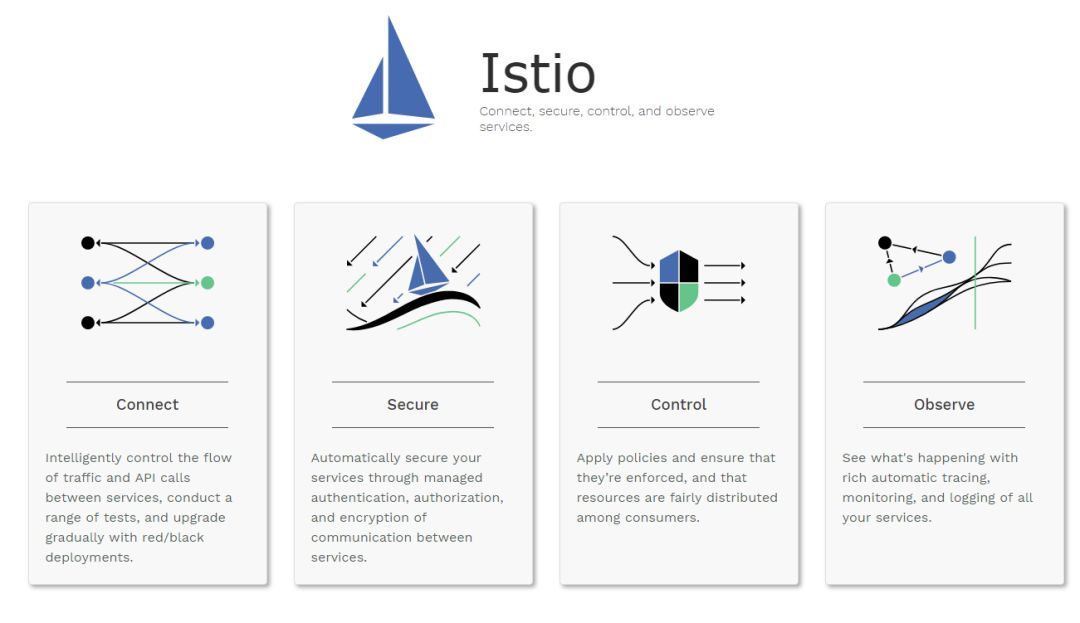
Istio是Google继Kubernetes之后的又一开源力作,主要参与的公司包括Google,IBM,Lyft等,它提供了完整的非侵入式的微服务治理解决方案,解决微服务的管理、网络连接以及安全管理等应用网络治理问题
它无需修改任何代码就能够实现微服务的负载均衡,服务与服务之间的认证授权以及流量监控和治理。从整个基础设施角度上看,可以将它理解为PaaS平台上的一个面向微服务管理平台的补充。

Istio与Kubernetes
Kubernetes提供了部署、升级和有限的运行流量管理能力,利用service的机制来做服务注册和发现,转发,通过kubeproxy有一定的转发和负载均衡能力。但并不具备上层如熔断、限流降级、调用链治理等能力。
Istio则很好的补齐了k8s在微服务治理上的这部分能力,同时是基于k8s构建的,但不是像SpringCloud Netflix等完全重新做一套。Istio是谷歌微服务治理上的非常关键的一环。

Istio流量管理能力介绍
Istio,用于连接、保护、控制和观测服务。今天,我们就来谈谈Istio第一主打功能——连接服务。那么,便引出3个问题:
Istio如何实现服务之间的连接?
连接后具备哪些流量管理能力?
如何告诉Istio发挥这些能力?
1、 Istio如何实现服务的连接?

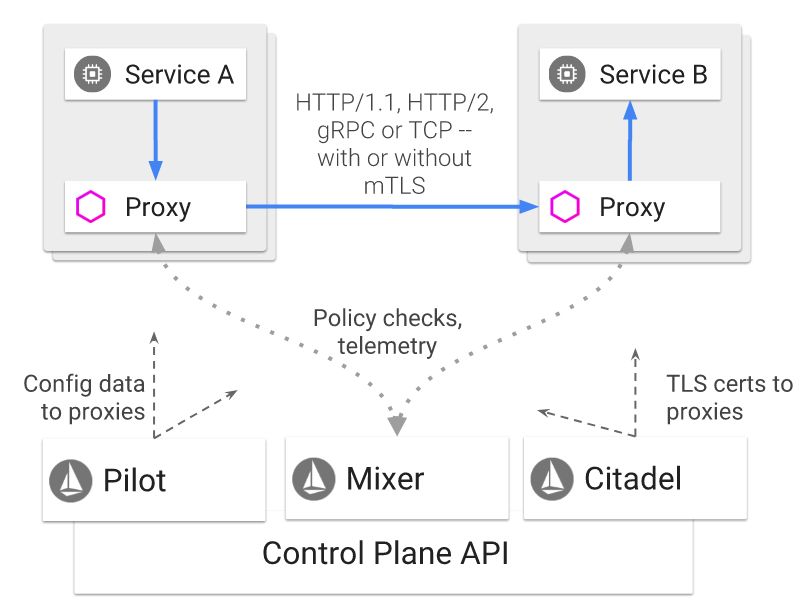
如上图所示的Istio架构图,让我们关注控制面的Pilot,它是Istio实现流量管理的核心组件。
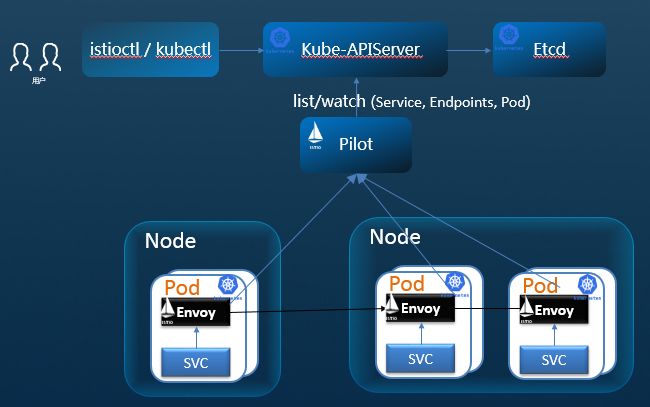
而在数据面,每个Service,都会被注入1个Proxy。Istio通过Pilot下发配置信息给数据面每1个Service的Proxy,从而通过这些Proxy,间接地控制每1个Service之间以及和外部的连接。Proxy通常采用另一个知名的开源项目Envoy来实现。
1个Pilot和(N+N)个(Service+Proxy)组合,便形成了Service Mesh,即服务网格。有了这一套服务网格系统,对服务之间的流量进行管理,便不在话下。
2、连接后具备哪些流量管理能力?
从服务间的流量管理角度而言,Istio可以实现这4项功能:请求路由、服务发现和负载均衡、故障处理和故障注入。
A.请求路由

如上图所示,Istio引入了服务版本的概念,可以通过(Current Version,Canary Version)2个版本对服务进行进一步的细分。基于这种划分,通过Pilot,可以下发配置到Service A的Proxy,使得其95%的流量路由至Service B的Current版本,5%的流量路由至Service B的Canary版本。当然也可以选择雨露均沾,各分50%流量,或者霸道总裁,让Canary版本占有100%的流量。

如上图所示,除了按照百分比在不同版本之间分发流量,你还可以按照请求内容,将请求路由至不同的版本。例如,你可以发布一个Canary版本,只让用着Macbook笔记本,且安装了windows操作系统,还使用着360浏览器的用户能够访问到。
这一切改变,都只需要你改动一个叫VirtualService的配置文件(详见下章),眨个眼的功夫,Istio就已经通过Pilot帮你把新的配置下发下去了。
B.服务发现和负载均衡
如上图所示,服务网格存在3个生命周期的动态循环:服务注册、服务发现、负载均衡。
通常kubernetes,mesos等容器管理平台已经提供了服务注册表,以跟踪服务的负载实例,所以Pilot能轻而易举地获知服务网格内的所有服务注册信息,并将这些信息告知所有服务里的Proxy,Proxy根据这些信息执行服务发现,并相应地动态更新其负载均衡池。一个服务通常有多个负载实例,Service A请求ServiceB时,可以配置不同的负载均衡模式:轮询、随机和带权重的最少请求。假设此时Service B的某个负载实例出现故障,因为Service A中的Proxy会定期地执行服务发现,从而能及时将故障实例从其负载均衡池里排出。
C.故障处理
Envoy 提供了一套开箱即用,可选的故障处理功能,对应用中的服务大有裨益。这些功能包括:
超时
具备超时预算,并进行有限重试,重试之间的时长可抖动
并发连接数和上游服务请求数限制
对负载均衡池中的每个成员进行主动(定期)运行健康检查
细粒度熔断器(被动健康检查)- 适用于负载均衡池中的每个实例
以Service A请求调用Service B为例。
对于功能1。若Service B明确地知道10s以后的超时,必定会带来失败,那将超时时长缩短,使得Service A可以更快得知结果并作出应对,不失为一个明智之举。
对于功能2。对超载的Service B来说,重试之间的抖动极大的降低了重试造成的影响,而超时预算确保Service A在可预测的时间范围内获得响应(成功/失败)。
对于功能3。限制Service A或其他服务对Service B的连接数和请求数,可以使得Service B免于遭遇DDOS攻击,或承受过重的流量负担而崩溃。
对于功能4和5。主动和被动健康检查的组合最大限度地减少了在负载平衡池中访问不健康实例的机会。当与平台级健康检查(例如由 Kubernetes 或 Mesos 支持的检查)相结合时,应用程序可以确保将不健康的负载实例快速地从服务网格中去除,从而最小化请求失败和延迟产生影响。
总之,这些功能使得服务网格能够耐受故障节点,并防止本地故障导致的其他节点的稳定性下降。
D.故障注入
虽然Proxy为在Istio上运行的服务提供了上节所言的大量故障处理机制,但测试整个服务网格所组成应用的端到端的故障恢复能力依然是必须的。错误配置的故障恢复策略(例如,跨服务调用的不兼容/限制性超时)可能导致应用程序中的关键服务持续不可用,从而破坏用户体验。
Istio 能在不杀死负载实例的情况下,将协议特定的故障注入到网络中,在 TCP 层制造数据包的延迟或损坏。我们的理由是,无论网络级别的故障如何,应用层观察到的故障都是一样的,并且可以在应用层注入更有意义的故障(例如,HTTP经典的4xx和5xx错误代码),以检验和改善应用的韧性。
运维人员可以为符合特定条件的请求配置故障,还可以进一步限制遭受故障的请求的百分比。可以注入两种类型的故障:延迟和中断。延迟是计时故障,模拟网络延迟上升或上游服务超载的情况。中断是模拟上游服务的崩溃故障。中断通常以 HTTP 错误代码或 TCP 连接失败的形式表现。
依旧以Service A请求调用Service B为例。
若给Service B设定了10s的延时或503中断,则Service A将至少10s后才能得到请求的响应或请求的响应为503错误,通过多种场景覆盖测试,可以得到Service A面对这些场景时的综合表现情况,从而做出针对性的改良,增加其韧性。
3、如何告诉Istio发挥这些能力?
Istio有4个配置文件,帮我们全方位地定制以上所有流量管理需求: VirtualService, DestinationRule, ServiceEntry和 Gateway:
通过配置VirtualService,可以实现请求路由的功能;
通过配置DestinationRule,可以实现服务发现和负载均衡、故障处理和故障注入的功能;
通过配置ServiceEntry,让服务网格内的服务,可以看到外面的世界;
通过配置Gateway,让服务网格的服务,可以被全世界看到;
有了以上4大法宝,我们对服务网格进行流量管理的所有需求,都可以被满足了。
限于篇幅,让我们举3个简单的栗子:
假设我们的服务网格存在1个服务explorer,只有1个v1版本;存在另1个服务helloworld,有v1,v2两个版本。
①若要使得explorer发起的所有请求,以75%的概率走向helloworld的v1版本,以25%走向v2版本,只要配置如下两个文件VirtualService和DestinationRule,便可实现:
  apiVersion:networking.Istio.io/v1alpha3


  kind:VirtualService


  metadata:


    name:helloworld


  spec:


    hosts:


      - helloworld


    http:


    - route:


      - destination:


          host:helloworld


          subset:v1


        weight:75


      - destination:


          host: helloworld


          subset: v2


       weight: 25


  apiVersion:networking.Istio.io/v1alpha3


  kind:DestinationRule


  metadata:


    name: helloworld


  spec:


    host: helloworld


    subsets:


    - name:v1


      labels:


        version: v1


    - name: v2


     labels:


        version: v2
②如果helloworld内部需要通过访问www.google.com来获取一些信息,才能告诉explorer这个世界是怎么样的,需要配置如下2个文件ServiceEntry和DestinationRule:
  apiVersion:networking.Istio.io/v1alpha3


  kind:ServiceEntry


  metadata:


    name: googleapis


  spec:


    hosts:


    - "*.google.com"


    ports:


    - number:443


      name:https


      protocol:http


  apiVersion:networking.Istio.io/v1alpha3


  kind:DestinationRule


  metadata:


   name: googleapis


  spec:


    host: "*.google.com"
③如果helloworld需要被服务网格外,而不仅仅是explorer服务访问到,则需要配置如下2个文件Gateway和VirtualService:
  apiVersion:networking.Istio.io/v1alpha3


  kind:Gateway


  metadata:


    name: helloworld-gateway


  spec:


      selector:


        Istio:ingressgateway


    servers:


    - port:


        number: 80


        name: http


        protocol: HTTP


      hosts:


      - 'helloworld.com'


  apiVersion:networking.Istio.io/v1alpha3


  kind:VirtualService


  metadata:


   name: bookinfo


  spec:


   hosts:


      - 'helloworld.com'


    gateways:


    - helloworld-gateway


    http:


    - route:


     - destination:


          host: helloworld


          port:


            number: 9080
至此,我们做一个简单的总结:Istio提供的Pilot和Proxy,将成百上千个服务组成了一个服务网格。基于此,我们可以实现请求路由、服务发现和负载均衡、故障处理以及故障注入等流量管理能力,这一切,我们只需要通过对VirtualService, DestinationRule, ServiceEntry和Gateway这4个资源做简单的配置,即可实现。
K8S和Istio的碰撞,会在Cloud Native的世界里,勾出怎样的天雷和地火呢?
拭目以待!
阅读原文,领略厦门站云原生技术的美!
以上是关于istio服务案例实践的主要内容,如果未能解决你的问题,请参考以下文章