resin安装与配置
Posted
tags:
篇首语:本文由小常识网(cha138.com)小编为大家整理,主要介绍了resin安装与配置相关的知识,希望对你有一定的参考价值。
下面我们来介绍resin服务。resin服务和tomcat服务相类似,都是可以用来解析jsp的程序。resin服务同样需要jdk的支持,所以我们也得安装jdk。
一、安装JDK
直接进JDK官网选择正确的版本:http://www.oracle.com/technetwork/java/javase/downloads/jdk8-downloads-2133151.html
安装jdk参考之前配置tomcat服务中jdk的安装与配置,在这里就不叙述了。
二、安装resin
去resin官网下载合适的版本:http://caucho.com/
resin有两个版本,一个是免费的,一个是收费的,我们在虚拟机上测试,只用免费的就够了。
1、下载
[[email protected] ~]# cd /usr/local/src/
[[email protected] src]# wget http://caucho.com/download/resin-4.0.45.tar.gz
2、解压
[[email protected] src]# tar -zxvf resin-4.0.45.tar.gz
3、编译
[[email protected] src]# cd resin-4.0.45
[[email protected] resin-4.0.45]# ./configure --prefix=/usr/local/resin --with-java=/usr/local/jdk1.8.0_131/
4、安装
[[email protected] resin-4.0.45]# make
[[email protected] resin-4.0.45]# make install
[[email protected] resin-4.0.45]# ls /usr/local/resin/
app-inf conf endorsed libexec project-jars webapp-jars
bin doc lib log resin-inf webapps
[[email protected] resin-4.0.45]# ls /etc/init.d/resin (自动生成启动脚本)
/etc/init.d/resin
5、启动resin
[[email protected] resin-4.0.45]# service resin start
注:因为resin监听的端口为8080,而我们之前定义的tomcat的监听端口也是8080,所以启动之前先关闭tomcat服务。
查看resin服务是否启动:
[[email protected] resin-4.0.45]# ps aux|grep resin
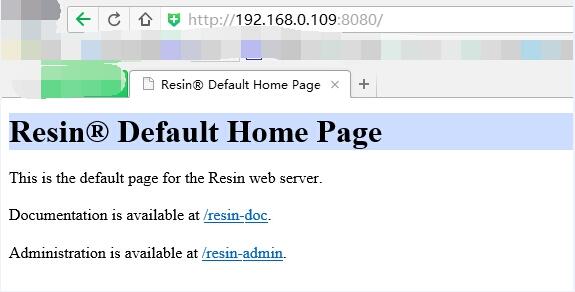
接着我们可以在浏览器上输入192.168.0.109:8080进入resin的首页。(记得关闭防火墙)
三、配置resin
1、配置访问端口
resin服务默认监听的是8080端口,如果想改为80端口,则需修改resin.properties文件。
[[email protected] resin-4.0.45]# cd /usr/local/resin/conf/
[[email protected] conf]# vim resin.properties
找到
app.http : 8080
改为
app.http : 80
重启resin服务
[[email protected] conf]# service resin restart
接着我们在浏览器上输入192.168.0.109就可以直接访问resin首页了。
2、配置新的虚拟主机
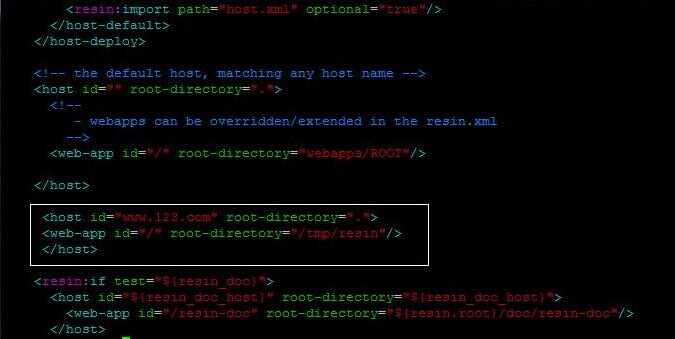
如果想增加新的虚拟主机,则需修改resin.xml文件
[[email protected] conf]# vim resin.xml
//在<cluster id="app">下添加如下内容
<host id="www.123.com" root-directory=".">
<web-app id="/" root-directory="/data/resin"/>
</host>
如图:
创建网站文件存放的目录
[[email protected] conf]# mkdir -p /data/resin
重启resin服务
[[email protected] conf]# service resin restart
3、测试resin
测试resin和测试tomcat步骤一样。先创建tomcat的测试文件:
[[email protected] conf]# vim /data/resin/111.jsp
//加入如下内容:
<html>
<body>
<center>
Now time is: <%=new java.util.Date()%>
</center>
</body>
</html>
保存后,使用curl测试:
[[email protected] conf]# curl -xlocalhost:80 www.123.com/111.jsp
//运行结果如下
<html>
<body>
<center>
Now time is: Mon Sep 21 00:42:47 CST 2015
</center>
</body>
</html>
另外,也可以用浏览器来测试:
找到本机 C:\Windows\System32\drivers\etc下的hosts文件,添加下面内容
192.168.0.109 www.123.com
在浏览器地址栏上输入:www.123.com/111jsp,显示下图所示,则说明resin搭建成功。
停止和启动:
[[email protected] conf]# /etc/init.d/resin stop
Stopping resin: .
[[email protected] conf]# /etc/init.d/resin start
Starting resin: .
本文出自 “12350027” 博客,谢绝转载!
以上是关于resin安装与配置的主要内容,如果未能解决你的问题,请参考以下文章


