企业级日志收集系统——ELKstack
Posted 沐雨橙风
tags:
篇首语:本文由小常识网(cha138.com)小编为大家整理,主要介绍了企业级日志收集系统——ELKstack相关的知识,希望对你有一定的参考价值。
ELKstack简介:
ELKstack是Elasticsearch、Logstash、Kibana三个开源软件的组合而成,形成一款强大的实时日志收集展示系统。
各组件作用如下:
Logstash:日志收集工具,可以从本地磁盘,网络服务(自己监听端口,接受用户日志),消息队列中收集各种各样的日志,然后进行过滤分析,并将日志输出到Elasticsearch中。
Elasticsearch:日志分布式存储/搜索工具,原生支持集群功能,可以将指定时间的日志生成一个索引,加快日志查询和访问。
Kibana:可视化日志Web展示工具,对Elasticsearch中存储的日志进行展示,还可以生成炫丽的仪表盘。
使用ELKstack对运维工作的好处:
1、应用程序的日志大部分都是输出在服务器的日志文件中,这些日志大多数都是开发人员来看,然后开发却没有登陆服务器的权限,如果开发人员需要查看日志就需要到服务器来拿日志,然后交给开发;试想下,一个公司有10个开发,一个开发每天找运维拿一次日志,对运维人员来说就是一个不小的工作量,这样大大影响了运维的工作效率,部署ELKstack之后,开发任意就可以直接登陆到Kibana中进行日志的查看,就不需要通过运维查看日志,这样就减轻了运维的工作。
2、日志种类多,且分散在不同的位置难以查找:如LAMP/LNMP网站出现访问故障,这个时候可能就需要通过查询日志来进行分析故障原因,如果需要查看apache的错误日志,就需要登陆到Apache服务器查看,如果查看数据库错误日志就需要登陆到数据库查询,试想一下,如果是一个集群环境几十台主机呢?这时如果部署了ELKstack就可以登陆到Kibana页面进行查看日志,查看不同类型的日志只需要电动鼠标切换一下索引即可。
ELKstack实验架构图:
redis消息队列作用说明:
1、防止Logstash和ES无法正常通信,从而丢失日志。
2、防止日志量过大导致ES无法承受大量写操作从而丢失日志。
3、应用程序(php,java)在输出日志时,可以直接输出到消息队列,从而完成日志收集。
补充:如果redis使用的消息队列出现扩展瓶颈,可以使用更加强大的kafka,flume来代替。
实验环境说明:
|
1
2
3
4
|
[[email protected] ~]# cat /etc/redhat-release CentOS Linux release 7.2.1511 (Core) [[email protected] ~]# uname -rm3.10.0-327.el7.x86_64 x86_64 |
使用软件说明:
1、jdk-8u92 官方rpm包
2、Elasticsearch 2.3.3 官方rpm包
3、Logstash 2.3.2 官方rpm包
4、Kibana 4.5.1 官方rpm包
5、Redis 3.2.1 remi rpm 包
6、nginx 1.10.0-1 官方rpm包
部署顺序说明:
1、Elasticsearch集群配置
2、Logstash客户端配置(直接写入数据到ES集群,写入系统messages日志)
3、Redis消息队列配置(Logstash写入数据到消息队列)
4、Kibana部署
5、nginx负载均衡Kibana请求
6、手机nginx日志
7、Kibana报表功能说明
配置注意事项:
1、时间必须同步
2、关闭防火墙,selinux
3、出了问题,检查日志
Elasticsearch集群安装配置
1、配置Java环境
|
1
2
3
4
5
|
[[email protected] ~]# yum -y install jdk1.8.0_92[[email protected] ~]# java -versionjava version "1.8.0_92"Java(TM) SE Runtime Environment (build 1.8.0_92-b14)Java HotSpot(TM) 64-Bit Server VM (build 25.92-b14, mixed mode) |
2、安装Elasticsearch,因为我这里yum源已经创建好,所以可以直接安装
官方文档:https://www.elastic.co/guide/en/elasticsearch/reference/current/index.html
官方下载地址:https://www.elastic.co/downloads/elasticsearch
|
1
2
3
4
5
6
7
8
9
10
11
12
13
|
[[email protected] ~]# yum -y install elasticstarch[[email protected] ~]# rpm -ql elasticsearch/etc/elasticsearch/etc/elasticsearch/elasticsearch.yml #主配置文件/etc/elasticsearch/logging.yml/etc/elasticsearch/scripts/etc/init.d/elasticsearch/etc/sysconfig/elasticsearch/usr/lib/sysctl.d/usr/lib/sysctl.d/elasticsearch.conf/usr/lib/systemd/system/elasticsearch.service #启动脚本/usr/lib/tmpfiles.d/usr/lib/tmpfiles.d/elasticsearch.conf |
3、修改配置文件,这里的一些路径看个人习惯
|
1
2
3
4
5
6
7
8
9
|
[[email protected] ~]# vim /etc/elasticsearch/elasticsearch.yml 17 cluster.name: "linux-ES"23 node.name: es1.bjwf.com33 path.data: /elk/data37 path.logs: /elk/logs43 bootstrap.mlockall: true54 network.host: 0.0.0.058 http.port: 920068 discovery.zen.ping.unicast.hosts: ["192.168.130.221", "192.168.130.222"] |
4、创建相关目录并赋予权限
|
1
2
3
4
5
|
[[email protected] ~]# mkdir -pv /elk/{data,logs}[[email protected] ~]# chown -R elasticsearch.elasticsearch /elk[[email protected] ~]# ll /elkdrwxr-xr-x. 2 elasticsearch elasticsearch 6 Jun 28 03:51 datadrwxr-xr-x. 2 elasticsearch elasticsearch 6 Jun 28 03:51 logs |
5、启动ES,并检查是否监听9200和9300端口
|
1
2
3
4
|
[[email protected] ~]# systemctl start elasticsearch.service[[email protected] ~]# netstat -tnlp|egrep "9200|9300"tcp6 0 0 :::9200 :::* LISTEN 17535/java tcp6 0 0 :::9300 :::* LISTEN 17535/java |
6、安装另一台机器,步骤与第一台一样
|
1
2
|
[[email protected] ~]# vim /etc/elasticsearch/elasticsearch.yml 23 node.name: es2.bjwf.com #主要修改主机名 |
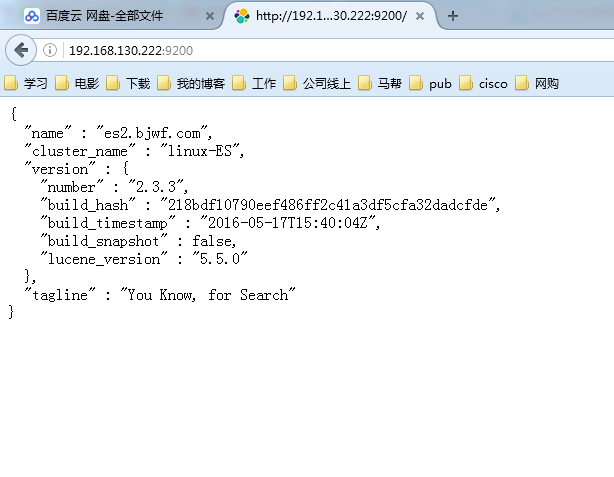
7、查看两个节点的状态
配置集群管理插件(head、kopf等)
官方提供了一个ES集群管理插件,可以非常直观的查看ES的集群状态和索引数据信息
|
1
2
|
[[email protected] ~]# /usr/share/elasticsearch/bin/plugin install mobz/elasticsearch-head[[email protected] ~]# /usr/share/elasticsearch/bin/plugin install lmenezes/elasticsearch-kopf |
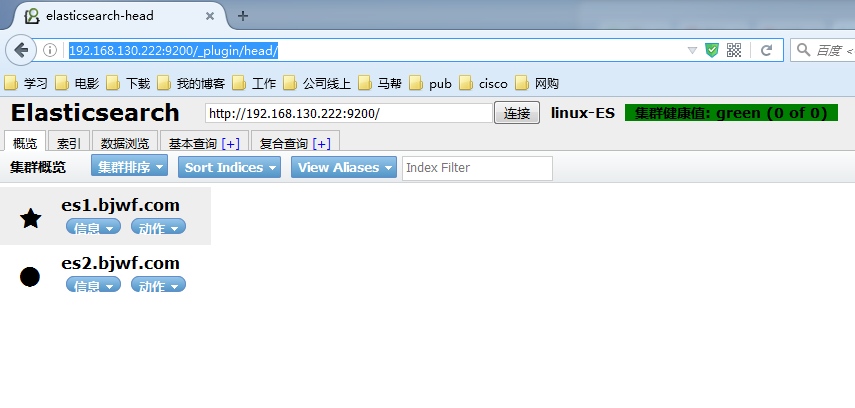
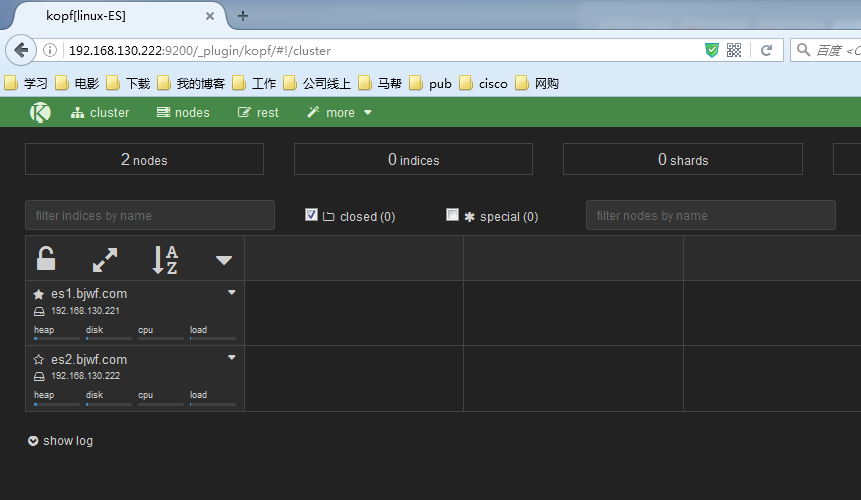
访问插件:
http://192.168.130.222:9200/_plugin/head/
http://192.168.130.222:9200/_plugin/kopf/
上面已经把ES集群配置完成了,下面就可以配置Logstash向ES集群中写入数据了
Logstash部署
1、配置Java环境,安装logstash
|
1
2
|
[[email protected] ~]# yum -y install jdk1.8.0_92[[email protected] ~]# yum -y install logstash |
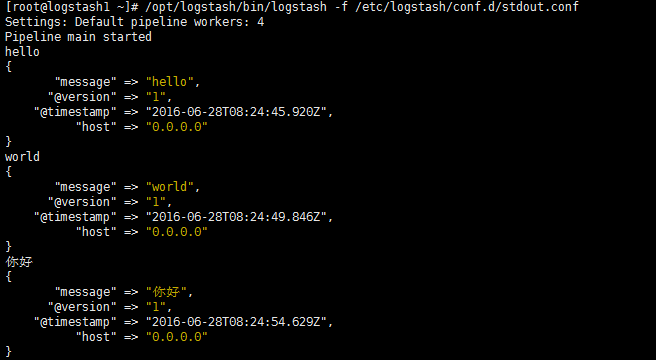
2、通过配置文件验证Logstash的输入和输出
|
1
2
3
4
5
6
7
8
9
10
|
[[email protected] ~]# vim /etc/logstash/conf.d/stdout.confinput { stdin {}}output { stdout { codec => "rubydebug" }} |
3、定义输出到Elasticsearch
|
1
2
3
4
5
6
7
8
9
10
11
12
13
14
15
16
17
18
19
|
[[email protected] ~]# vim /etc/logstash/conf.d/logstash.confinput { stdin {}}output {input { stdin {}}output { elasticsearch { hosts => ["192.168.130.221:9200","192.168.130.222:9200"] index => "test" }}[[email protected] ~]# /opt/logstash/bin/logstash -f /etc/logstash/conf.d/logstash.conf Settings: Default pipeline workers: 4Pipeline main startedhello!你好 |
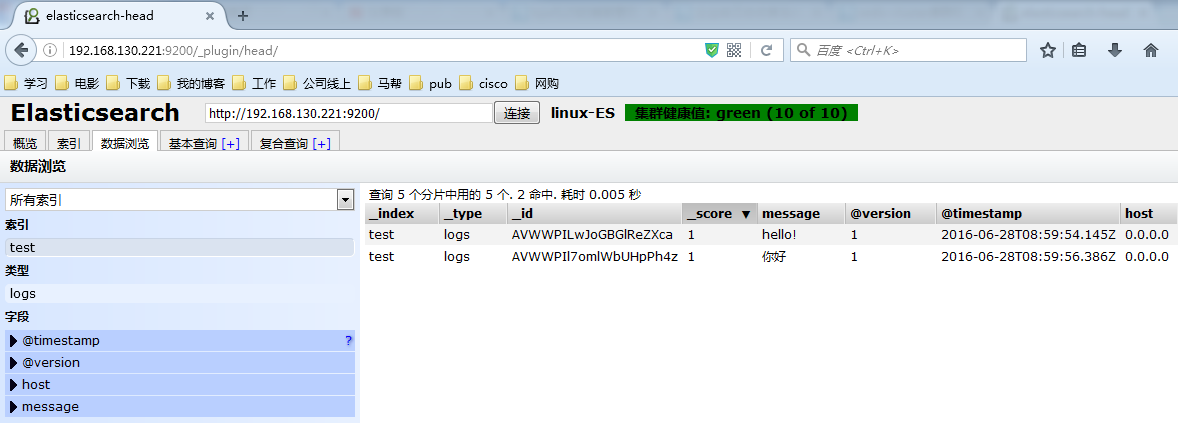 这个时候说明,Logstash接好Elasticsearch是可以正常工作的,下面介绍如何收集系统日志
4、Logstash收集系统日志
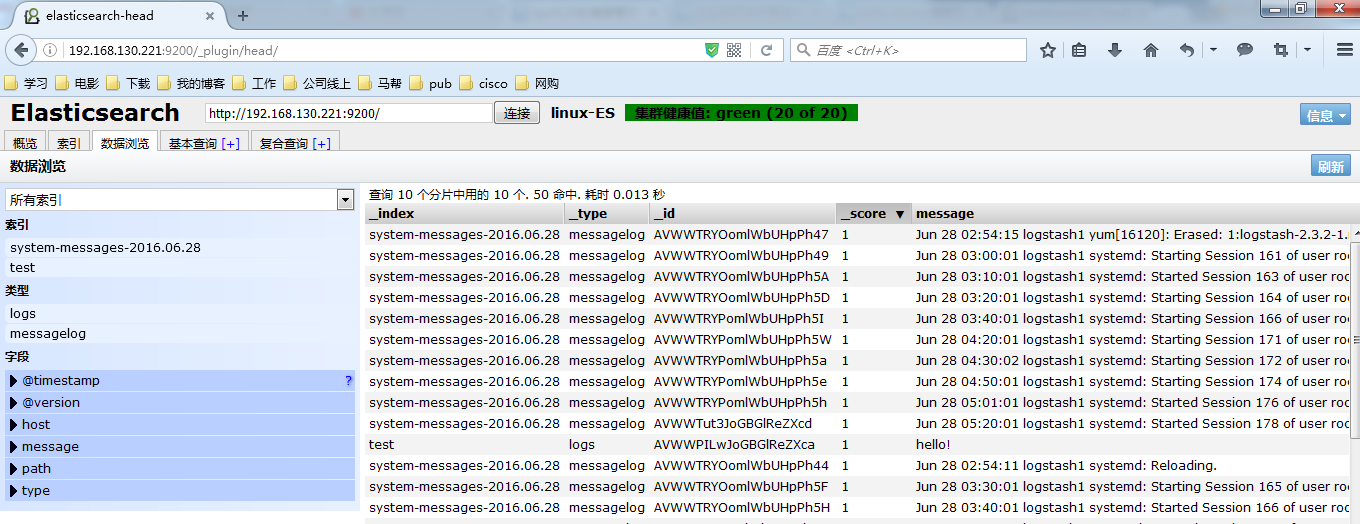
修改Logstash配置文件如下所示内容,并启动Logstash服务就可以在head中正常看到messages的日志已经写入到了ES中,并且创建了索引
|
1
2
3
4
5
6
7
8
9
10
11
12
13
14
15
16
17
18
19
20
21
22
23
24
25
26
27
|
[[email protected] ~]# vim /etc/logstash/conf.d/logstash.confinput { file { type => "messagelog" path => "/var/log/messages" start_position => "beginning" }}output { file { path => "/tmp/123.txt" } elasticsearch { hosts => ["192.168.130.221:9200","192.168.130.222:9200"] index => "system-messages-%{+yyyy.MM.dd}" }}#检查配置文件语法:/etc/init.d/logstash configtest/opt/logstash/bin/logstash -f /etc/logstash/conf.d/logstash.conf --configtest#更改启动Logstash用户:# vim /etc/init.d/logstashLS_USER=rootLS_GROUP=root#通过配置文件启动[[email protected] ~]# /opt/logstash/bin/logstash -f /etc/logstash/conf.d/logstash.conf & |
收集成功如图所示,自动生成了system-messages的索引
Kibana部署
说明:我这里是在两个ES节点部署kibana并且使用nginx实现负载均衡,如果没有特殊需要,可以只部署单台节点
|
1
2
3
4
5
6
7
8
|
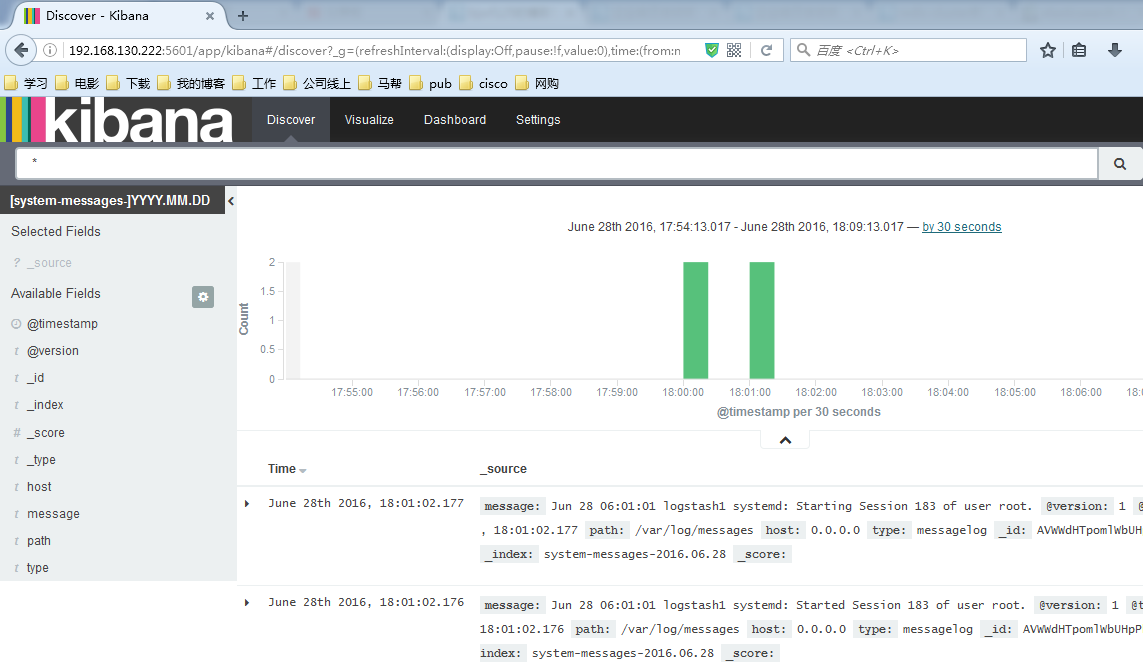
1、安装Kibana,每个ES节点部署一个[[email protected] ~]# yum -y install kibana2、配置Kibana,只需要指定ES地址其他配置保持默认即可[[email protected] ~]# vim /opt/kibana/config/kibana.yml 15 elasticsearch.url: "http://192.168.130.221:9200"[[email protected] ~]# systemctl start kibana.service[[email protected] ~]# netstat -tnlp|grep 5601 #Kibana监听端口tcp 0 0 0.0.0.0:5601 0.0.0.0:* LISTEN 17880/node |
查看效果,这个图是盗版的。。我做的这,忘记截图了
filebeat部署收集日志
|
1
2
3
4
5
6
7
8
9
10
11
12
13
14
15
16
17
18
19
20
21
22
23
24
25
26
27
28
29
30
31
32
33
34
35
36
37
38
39
40
41
42
43
44
45
46
47
48
49
50
51
52
53
54
55
56
57
58
59
60
61
62
63
64
65
66
67
68
69
70
71
72
73
74
75
76
77
78
79
80
81
82
83
84
85
86
87
88
89
90
91
92
93
94
95
96
97
98
99
100
101
102
103
104
105
106
107
108
109
110
111
112
113
114
115
116
117
118
119
120
121
122
123
124
125
126
127
128
129
130
131
132
133
134
135
136
137
138
139
140
141
142
143
144
145
146
147
148
149
150
151
152
153
154
155
156
157
158
159
160
161
162
163
164
165
166
167
168
169
170
171
172
173
174
175
176
177
178
179
180
181
182
183
184
185
186
187
188
189
190
191
192
193
194
195
196
197
198
199
200
201
202
203
204
205
206
207
208
209
210
211
212
213
214
215
216
217
218
219
220
221
222
223
224
225
226
227
228
229
230
231
232
233
234
235
236
237
238
239
240
241
242
243
244
245
246
247
248
|
1、安装nginx并将日志转换为json[[email protected] ~]# yum -y install nginx[[email protected] ~]# vim /etc/nginx/nginx.conf log_format access1 ‘{"@timestamp":"$time_iso8601",‘ ‘"host":"$server_addr",‘ ‘"clientip":"$remote_addr",‘ ‘"size":$body_bytes_sent,‘ ‘"responsetime":$request_time,‘ ‘"upstreamtime":"$upstream_response_time",‘ ‘"upstreamhost":"$upstream_addr",‘ ‘"http_host":"$host",‘ ‘"url":"$uri",‘ ‘"domain":"$host",‘ ‘"xff":"$http_x_forwarded_for",‘ ‘"referer":"$http_referer",‘ ‘"status":"$status"}‘; access_log /var/log/nginx/access.log access1;#保存配置文件,启动服务[[email protected] ~]# systemctl start nginx#验证nginx日志转json[[email protected] ~]# tail /var/log/nginx/log/host.access.log {"@timestamp":"2016-06-27T05:28:47-04:00",‘"host":"192.168.130.223",‘‘"clientip":"192.168.120.222",‘‘"size":15,‘‘"responsetime":0.000,‘‘"upstreamtime":"-",‘"192.168.130.223",‘‘"xff":"-",‘‘"referer":"-",‘‘"status":"200"}‘2、安装tomcat并将日志转换为json[[email protected] ~]# tar xf apache-tomcat-8.0.36.tar.gz -C /usr/local[[email protected] ~]# cd /usr/local[[email protected] ~]# vim /usr/local/tomcat/conf/server.xml<Contest path="" docBase="/web"/> <Valve className="org.apache.catalina.valves.AccessLogValve" directory="logs" prefix="localhost_access_log" suffix=".txt" pattern="{"clientip":"%h","ClientUser" :"%l","authenticated":"%u"," AccessTime":"%t","method":" %r","status":"%s","SendBytes" :"%b","Query?string":"%q","partner ":"%{Referer}i", "AgentVersion":"%{User-Agent}i"}"/>#启动服务验证日志[[email protected] ~]# /usr/local/tomcat/bin/startup.sh[[email protected] ~]# tail /usr/local/tomcat/logs/localhost_access_log.2016-06-28.txt{"clientip":"192.168.120.8","ClientUser":"-","authenticated":"-","AccessTime":"[28/Jun/2016:23:31:31 -0400]","method":"GET /bg-button.png HTTP/1.1","status":"200","SendBytes":"713","Query?string":"","partner":"http://192.168.130.223:8080/tomcat.css", "AgentVersion":"Mozilla/5.0 (Windows NT 6.1; WOW64; rv:47.0)Gecko/20100101 Firefox/47.0"}3、web安装filebeat并配置filebeat收集nginx和tomcat日志发送给logstash#官方文档 https://www.elastic.co/guide/en/beats/filebeat/current/index.html#下载地址 https://www.elastic.co/downloads/beats/filebeat#安装 [[email protected] ~]# yum -y install filebeat#作用:在web端实时收集日志并传递给Logstash#为什么不用logstash在web端收集? 依赖java环境,一旦java出问题,可能会影响到web服务 系统资源占用率高 配置比较复杂,支持匹配过滤 Filebeat挺好的,专注日志手机,语法简单##配置filebeat从两个文件收集日志传给Logstashfilebeat: prospectors: - paths: - /var/log/messages #收集系统日志 input_type: log document_type: nginx1-system-message - paths: - /var/log/nginx/log/host.access.log #nginx访问日志 input_type: log document_type: nginx1-nginx-log - paths: - /usr/local/tomcat/logs/localhost_access_log.*.txt #tomcat访问日志 input_type: log document_type: nginx1-tomcat-log# registry_file: /var/lib/filebeat/registry #这一条不知道怎么回事,出错了output: logstash: #将收集到的文件输出到Logstash hosts: ["192.168.130.223:5044"] path: "/tmp" filename: filebeat.txtshipper: logging: to_files: true files: path: /tmp/mybeat#配置logstash从filebeat接受nginx日志[[email protected] ~]# vim /etc/logstash/conf.d/nginx-to-redis.confinput { beats { port => 5044 codec => "json" #编码格式为json }}output { if [type] == "nginx1-system-message" { redis { data_type => "list" key => "nginx1-system-message" #写入到redis的key名称 host => "192.168.130.225" #redis服务器地址 port => "6379" db => "0" } } if [type] == "nginx1-nginx-log" { redis { data_type => "list" key => "nginx1-nginx-log" host => "192.168.130.225" port => "6379" db => "0" } } if [type] == "nginx1-tomcat-log" { redis { data_type => "list" key => "nginx1-tomcat-log" host => "192.168.130.225" port => "6379" db => "0" } } file { path => "/tmp/nginx-%{+yyyy-MM-dd}messages.gz" #测试日志输出 }} #这块必须注意符号的问题,符号如果不对,有可能发生错误#启动Logstash和filebeat[[email protected] ~]# /etc/init.d/logstash start[[email protected] ~]# netstat -tnlp|grep 5044 #查看是否正常运行tcp6 0 0 :::5044 :::* LISTEN 18255/java [[email protected] ~]# /etc/init.d/filebeat start#查看本地输出日志[[email protected] ~]# tail /tmp/nginx-2016-06-29messages.gz {"message":"Jun 29 01:40:04 logstash1 systemd: Unit filebeat.service entered failed state.","tags":["_jsonparsefailure","beats_input_codec_json_applied"],"@version":"1","@timestamp":"2016-06-29T05:50:54.697Z","offset":323938,"type":"nginx1-system-message","input_type":"log","source":"/var/log/messages","count":1,"fields":null,"beat":{"hostname":"logstash1.bjwf.com","name":"logstash1.bjwf.com"},"host":"logstash1.bjwf.com"}4、安装配置redis[[email protected] ~]# yum -y install redis[[email protected] ~]# vim /etc/redis.confbind 0.0.0.0 #监听本机所有地址daemonize yes #在后台运行appendonly yes #开启aof[[email protected] ~]# systemctl start redis.service#这里需要访问nginx和tomcat生成一些日志[[email protected] ~]# netstat -tnlp|grep 6379tcp 0 0 0.0.0.0:6379 0.0.0.0:* LISTEN 17630/redis-server #连接redis查看生成的日志是否存在[[email protected] ~]# redis-cli -h 192.168.130.225192.168.130.225:6379> KEYS *1) "nginx1-tomcat-log"2) "nginx1-system-message"3) "nginx1-nginx-log"5、在另外一台logstash上收集nginx的日志[[email protected] ~]# yum -y install logstash[[email protected] ~]# vim /etc/logstash/conf.d/redis-to-elast.confinput { redis { host => "192.168.130.225" port => "6379" db => "0" key => "nginx1-system-message" data_type => "list" codec => "json" } redis { host => "192.168.130.225" port => "6379" db => "0" key => "nginx1-nginx-log" data_type => "list" codec => "json" } redis { host => "192.168.130.225" port => "6379" db => "0" key => "nginx1-tomcat-log" data_type => "list" codec => "json" }}filter { if [type] == "nginx1-nginx-log" or [type] == "nginx1-tomcat-log" { geoip { source => "clientip" target => "geoip"# database => "/etc/logstash/GeoLiteCity.dat" add_field => [ "[geoip][coordinaters]","%{[geoip][longitude]}" ] add_field => [ "[geoip][coordinaters]","%{[geoip][latitude]}" ] } mutate { convert => [ "geoip][coordinates]","float"] } }}output { if [type] == "nginx1-system-message" { elasticsearch { hosts => ["192.168.130.221:9200","192.168.130.222:9200"] index => "nginx1-system-message-%{+yyyy.MM.dd}" manage_template => true fulsh_size => 2000 idle_flush_time => 10 } } if [type] == "nginx1-nginx-log" { elasticsearch { hosts => ["192.168.130.221:9200","192.168.130.222:9200"] index => "logstash1-nginx1-nginx-log-%{+yyyy.MM.dd}" manage_template => true fulsh_size => 2000 idle_flush_time => 10 } } if [type] == "nginx1-tomcat-log" { elasticsearch { hosts => ["192.168.130.221:9200","192.168.130.222:9200"] index => "logstash-nginx1-tomcat-log-%{+yyyy.MM.dd}" manage_template => true fulsh_size => 2000 idle_flush_time => 10 } } file { path => "/tmp/log-%{+yyyy-MM-dd}messages.gz" gzip => "true" } }[[email protected] ~]# /etc/init.d/logstash configtestConfiguration OK[[email protected] ~]# /etc/init.d/logstash start#验证数据写入#Elasticsearch的数据目录,可以确定已经写入[[email protected] 0]# du -sh /elk/data/linux-ES/nodes/0/indices/* 148K /elk/data/linux-ES/nodes/0/indices/logstash1-nginx1-nginx-log-2016.06.29180K /elk/data/linux-ES/nodes/0/indices/logstash-nginx1-tomcat-log-2016.06.29208K /elk/data/linux-ES/nodes/0/indices/nginx1-system-message-2016.06.29576K /elk/data/linux-ES/nodes/0/indices/system-messages-2016.06.28580K /elk/data/linux-ES/nodes/0/indices/system-messages-2016.06.29108K /elk/data/linux-ES/nodes/0/indices/test |
配置nginx进行反向代理
|
1
2
3
4
5
6
7
8
9
10
11
12
13
14
15
|
[[email protected] ~]# vim /etc/nginx/nginx.conf upstream kibana { #定义后端主机组 server 192.168.130.221:5601 weight=1 max_fails=2 fail_timeout=2; server 192.168.130.221:5602 weight=1 max_fails=2 fail_timeout=2; } server { listen 80; server_name 192.168.130.226; location / { #定义反向代理,将访问自己的请求,都转发到kibana服务器 proxy_pass http://kibana/; index index.html index.htm; } }[[email protected] ~]# systemctl start nginx.service #启动服务 |
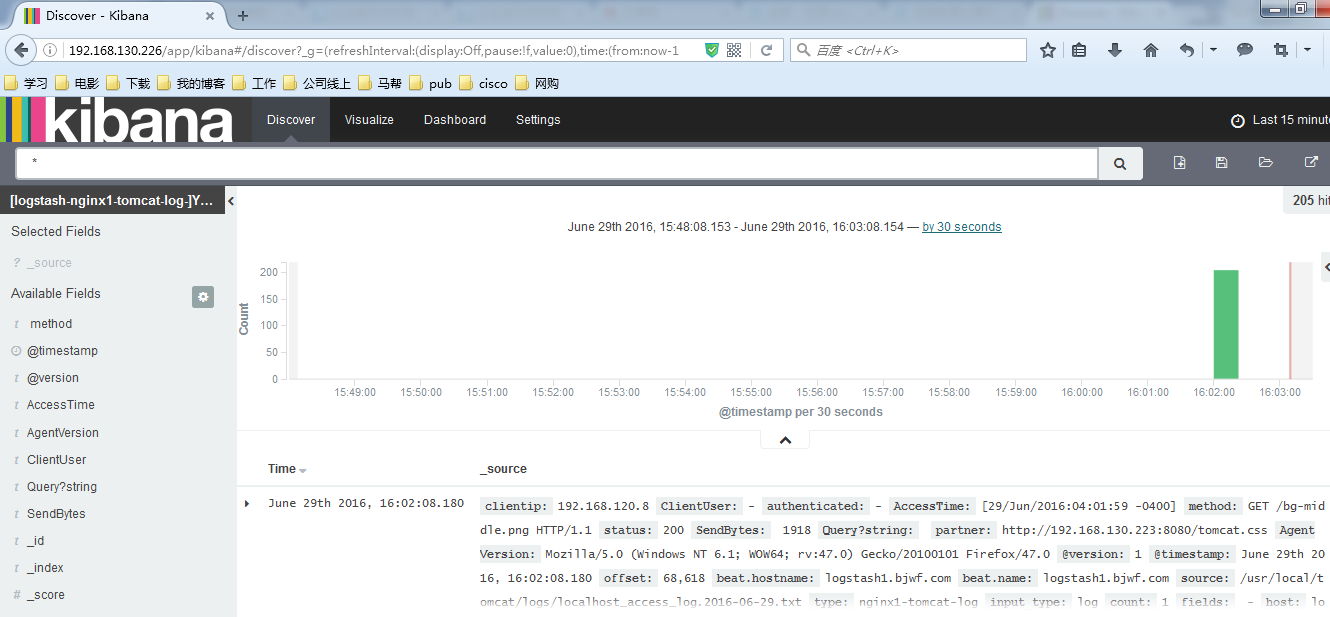
#查看Elasticsearch和Kibana输出结果
以上是关于企业级日志收集系统——ELKstack的主要内容,如果未能解决你的问题,请参考以下文章


