使用NFS启动Tiny4412开发板根文件系统
Posted LoTGu
tags:
篇首语:本文由小常识网(cha138.com)小编为大家整理,主要介绍了使用NFS启动Tiny4412开发板根文件系统相关的知识,希望对你有一定的参考价值。
1、Ubuntu14.04上搭建NFS服务
1.1、安装NFS服务
$ sudo apt-get install nfs-kernel-server //安装NFS服务
1.2 创建Tiny4412开发板根文件系统
这部分内容参考《Busybox构建根文件系统和制作Ramdisk》部分。
假设Tiny4412开发板根文件系统路径为/home/felix/nfs
1.3. 配置NFS服务器
配置NFS主要涉及配置文件/etc/exports,它用于NFS服务器端,其中列出了NFS服务器中要导出的目录、可以访问这些目录的NFS客户机及其访问权限。
/etc/exports文件的格式如下:
dir_to_export NFS_client (permissions) [NFS_client (permissions)…]
例如:
/tmp 192.168.100.0/24(ro) localhost(rw) *(ro,sync)
[分享目录] [第一个客户端(权限)] [可用主机名] [可用通配符]
因此,需要在/etc/exports文件中添加如下内容:
/home/felix/nfs *(rw,sync,no_root_squash,no_subtree_check)
/home/felix/nfs:刚才创建的共享文件夹
*:允许所有的网段访问,也可以使用具体的IP
rw:挂接此目录的客户端对该共享目录具有读写权限
sync:资料同步写入内存和硬盘
no_subtree_check:不检查父目录的权限。
no_root_squash:root用户具有对根目录的完全管理访问权限。
1.4、启动NFS服务器。
在命令行终端输入如下命令:
$ sudo exportfs –rv //使exports 文件生效
$ sudo /etc/init.d/rpcbind restart //重启rpcbind 服务
$ sudo /etc/init.d/nfs-kernel-server restart //重启nfs服务
在Ubuntu上执行:
$ showmount -e
显示出共享的目录说明搭建成功。
2.配置tiny4412开发板内核,板子启动自动挂载NFS文件系统
2.1、配置tiny4412开发板内核支持NFS
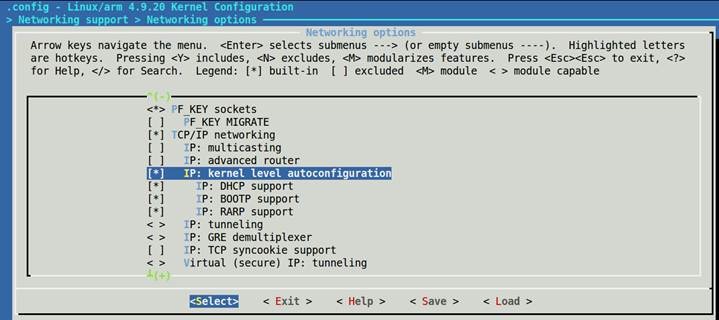
输入 make ARCH=arm menuconfig 命令进入 linux 内核配置界面,
进入[*] Networking support --->
Networking options --->
选中[*] IP: kernel level autoconfiguration
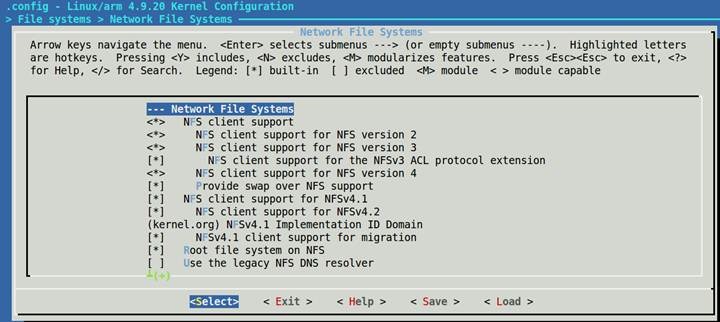
再进入File systems --->
[*] Network File Systems --->
选中如下选项:
<*> NFS client support
<*> NFS client support for NFS version 2
<*> NFS client support for NFS version 3
[*] NFS client support for the NFSv3 ACL protocol extension
<*> NFS client support for NFS version 4
[*] Provide swap over NFS support
[*] NFS client support for NFSv4.1
[*] NFS client support for NFSv4.2
[*] NFSv4.1 client support for migration
[*] Root file system on NFS
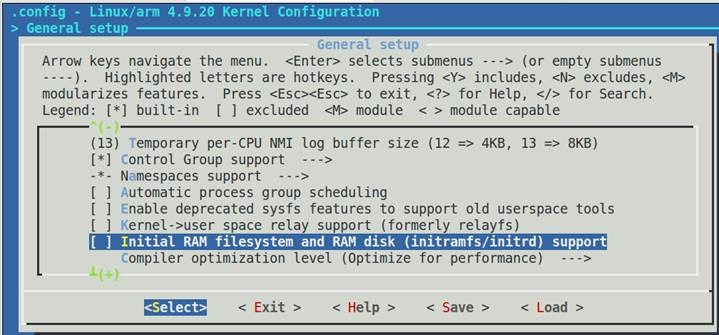
再进入General setup --->
设置Initial RAM filesystem and RAM disk (initramfs/initrd) support项为
[ ] Initial RAM filesystem and RAM disk (initramfs/initrd) support
配置完成后,保存退出并编译内核。
2.2、配置U-boot启动参数
2.2.1、设置U-boot的bootargs参数:
# setenv bootargs \'root=/dev/nfs rw nfsroot=192.168.1.102:/home/felix/nfs ethmac=00:00:ff:ff:00:00 ip=192.168.1.103:192.168.1.102:192.168.1.1:255.255.255.0::eth0:off console=ttySAC0,115200 init=/linuxrc\'
# saveenv
其中关键是对ip参数的设置:
ip=<client-ip>:<server-ip>:<gw-ip>:<netmask>:<hostname>:<device>:<autoconf>:<dns0-ip>:<dns1-ip>
bootargs中关于nfs的参数解释如下:
root=/dev/nfs rw nfsroot=192.168.1.102:/home/felix/nfs 表示挂载的 nfs 服务器 ip 是
192.168.1.102,挂载的目录是/home/felix/nfs(注意:/home/felix/nfs是前面搭建 nfs 服务器设置的);
ethmac=00:00:ff:ff:00:00表示网卡的地址是00:00:ff:ff:00:00,该地址在网卡驱动加载成功后会打印出来;
ip=192.168.1.103:192.168.1.102:192.168.1.1:255.255.255.0::eth0:off中192.168.1.103是我们开发板的ip地址,192.168.1.102是nfs服务器的ip,192.168.1.1是开发板的网关,255.255.255.0 是子网掩码,eth0是网卡设备的名称。
对bootargs的设置可以放在设备树中或者u-boot中,并且u-boot的bootargs的优先级更高,会将设备树中的bootargs覆盖了。具体请参考内核文档:
Documentation/kernel-parameters.txt
Documentation/filesystems/nfs/nfsroot.txt
2.2.2、设置U-boot的bootcmd参数:
如果用NFS启动根文件系统的话,使用bootm启动内核的时候,就不需要传递ramdisk的地址了(如:bootm 0x40000000 – 0x4200000 ),否则根文件系统还是ramdisk。U-boot的bootcmd参数设置如下:
# setenv bootcmd \'usb start; usb reset;tftp 0x40007000 uImage; tftp 0x42000000 exynos4412-tiny4412sdk.dtb;bootm 0x40007000 - 0x42000000; boot\'
# 以上是关于使用NFS启动Tiny4412开发板根文件系统的主要内容,如果未能解决你的问题,请参考以下文章


