设置UITableView的圆角(OC和swift)
Posted
tags:
篇首语:本文由小常识网(cha138.com)小编为大家整理,主要介绍了设置UITableView的圆角(OC和swift)相关的知识,希望对你有一定的参考价值。
参考技术A 先看以下的效果图- (void)tableView:(UITableView*)tableViewwillDisplayCell:(UITableViewCell*)cellforRowAtIndexPath:(NSIndexPath*)indexPath
// 圆角角度
CGFloatradius =10.f;
// 设置cell 背景色为透明
cell.backgroundColor = UIColor.clearColor;
// 创建两个layer
CAShapeLayer*normalLayer = [[CAShapeLayeralloc]init];
CAShapeLayer*selectLayer = [[CAShapeLayeralloc]init];
// 获取显示区域大小
CGRectbounds =CGRectInset(cell.bounds,10,0);
// 获取每组行数
NSIntegerrowNum = [tableViewnumberOfRowsInSection:indexPath.section];
// 贝塞尔曲线
UIBezierPath*bezierPath =nil;
//考虑一行和多行的情况,若行数为1,则这个cell的每个角都是圆角,否则第一行的左上和右上为圆角,最后一行的左下和右下为圆角
if(rowNum ==1)
// 一组只有一行(四个角全部为圆角)
bezierPath = [UIBezierPathbezierPathWithRoundedRect:bounds
byRoundingCorners:UIRectCornerAllCorners
cornerRadii:CGSizeMake(radius, radius)];
else
if(indexPath.row==0)
// 每组第一行(添加左上和右上的圆角)
bezierPath = [UIBezierPathbezierPathWithRoundedRect:bounds
byRoundingCorners:(UIRectCornerTopLeft|UIRectCornerTopRight)
cornerRadii:CGSizeMake(radius, radius)];
else if(indexPath.row== rowNum -1)
// 每组最后一行(添加左下和右下的圆角)
bezierPath = [UIBezierPathbezierPathWithRoundedRect:bounds
byRoundingCorners:(UIRectCornerBottomLeft|UIRectCornerBottomRight)
cornerRadii:CGSizeMake(radius, radius)];
else
// 每组不是首位的行不设置圆角
bezierPath = [UIBezierPathbezierPathWithRect:bounds];
//将贝塞尔曲线的路径赋值给图层,并将图层添加到view
// 把已经绘制好的贝塞尔曲线路径赋值给图层,然后图层根据path进行图像渲染render
normalLayer.path= bezierPath.CGPath;
selectLayer.path= bezierPath.CGPath;
UIView*nomarBgView = [[UIViewalloc]initWithFrame:bounds];
// 设置填充颜色
normalLayer.fillColor = [UIColor colorWithWhite:0.95 alpha:1.0].CGColor;
// 添加图层到nomarBgView中
[nomarBgView.layerinsertSublayer:normalLayeratIndex:0];
nomarBgView.backgroundColor = UIColor.clearColor;
cell.backgroundView= nomarBgView;
//圆角显示就完成了,但是如果没有取消cell的点击效果,会出现一个灰色的长方形的形状,再用上面创建的selectLayer给cell添加一个selectedBackgroundView
UIView*selectBgView = [[UIViewalloc]initWithFrame:bounds];
selectLayer.fillColor = [UIColor colorWithWhite:0.95 alpha:1.0].CGColor;
[selectBgView.layerinsertSublayer:selectLayeratIndex:0];
selectBgView.backgroundColor = UIColor.clearColor;
cell.selectedBackgroundView= selectBgView;
func tableView(_tableView:UITableView, willDisplay cell:UITableViewCell, forRowAt indexPath:IndexPath)
// 圆角角度
let radius =calculate(w:35.0)
// 设置cell 背景色为透明
cell.backgroundColor = UIColor.clear
// 创建两个layer
let normalLayer =CAShapeLayer()
let selectLayer =CAShapeLayer()
// 获取显示区域大小
let bounds = cell.bounds.insetBy(dx:10.0, dy:0)
// 获取每组行数
let rowNum = tableView.numberOfRows(inSection: indexPath.section)
// 贝塞尔曲线
var bezierPath:UIBezierPath
if(rowNum==1)
// 一组只有一行(四个角全部为圆角)
bezierPath =UIBezierPath(roundedRect: bounds, byRoundingCorners: .allCorners, cornerRadii:CGSize(width: radius, height: radius))
else
if(indexPath.row==0)
// 每组第一行(添加左上和右上的圆角)
bezierPath =UIBezierPath(roundedRect: bounds, byRoundingCorners: [UIRectCorner.topLeft,UIRectCorner.topRight], cornerRadii:CGSize(width: radius, height: radius))
elseif(indexPath.row==rowNum-1)
// 每组最后一行(添加左下和右下的圆角)
bezierPath =UIBezierPath(roundedRect: bounds, byRoundingCorners: [UIRectCorner.bottomLeft,UIRectCorner.bottomRight], cornerRadii:CGSize(width: radius, height: radius))
else
// 每组不是首位的行不设置圆角
bezierPath =UIBezierPath(rect: bounds)
// 把已经绘制好的贝塞尔曲线路径赋值给图层,然后图层根据path进行图像渲染render
normalLayer.path= bezierPath.cgPath;
selectLayer.path= bezierPath.cgPath;
let nomarBgView =UIView(frame: bounds);
// 设置填充颜色
normalLayer.fillColor=UIColor.white.cgColor
// 添加图层到nomarBgView中
nomarBgView.layer.insertSublayer(normalLayer, at:0)
nomarBgView.backgroundColor=UIColor.clear
cell.backgroundView= nomarBgView
let selectBgView =UIView(frame: bounds)
selectLayer.fillColor= UIColor.white.cgColor
selectBgView.layer.insertSublayer(selectLayer, at:0)
selectBgView.backgroundColor=UIColor.clear
cell.selectedBackgroundView= selectBgView
Swift几行代码设置UIcollectionView的section底色,圆角
前言
具体代码demo如下:
GitHub_OC版本:Demo具体代码
GitHub_Swift版本:Demo具体代码
码云_OC:Demo具体代码
??简单设计collectionview 底色和根据section不同设置不同颜色,支持collection横竖样式、自定义偏移量、投影。
??由于APP设计样式的多样性,很多时候我们需要用到一些特别的样式,例如投影、圆角、某个空间下增加底色和投影等组合,这些看似很简单的样式,其实也需要花不少时间进行样式的布局和调整等。
??例如本人遇到需要在collectionView,根据section不同设置不同的底色,需要动态设置是否包含headerview,还需要设置投影等等,所以设计了这个可配置且动态更新的 collection 背景颜色 控件。可基本满足各种要求。
设计思路
1、继承UICollectionViewFlowLayout,重写prepareLayout方法,在方法内计算每个section的大小,并根据用户设置的sectiooninset,进行frame补充。
2、继承UICollectionViewLayoutAttributes,增加底色、投影等参数。
3、在prepareLayout计算每个section的UICollectionViewLayoutAttributes并设置底色参数,并进行保存,
4、在layoutAttributesForElementsInRect进行rect判断获取attr。
5、在applyLayoutAttributes内机进行样式设置。
效果图:

支持类型:
1、collectionView section底色。?
2、是否包含headerview。
3、是否包含footerview。?
4、支持borderWidth、borderColor。
5、支持shadow投影。?
6、支持collectionView,Vertical,Horizontal。
7、支持根据不同section分别设置不同底色显示。
核心代码
/// 计算默认不包含headerview和footerview的背景大小

/// @paramframeframe description
/// @paramsectionInsetsectionInset description
//MARK: 默认section无偏移大小
extension JJCollectionViewRoundFlowLayout_Swift{
    func calculateDefaultFrameWithSectionFrame(_ frame:CGRect ,sectionInset:UIEdgeInsets) -> CGRect{
        var sectionFrame = frame;
        sectionFrame.origin.x -= sectionInset.left;
        sectionFrame.origin.y -= sectionInset.top;
        if (self.scrollDirection == UICollectionView.ScrollDirection.horizontal) {
            sectionFrame.size.width += sectionInset.left + sectionInset.right;
            //减去系统adjustInset的top
            if #available(iOS 11, *) {
                sectionFrame.size.height = self.collectionView!.frame.size.height - self.collectionView!.adjustedContentInset.top;
            } else {
                sectionFrame.size.height = self.collectionView!.frame.size.height - abs(self.collectionView!.contentOffset.y)/*适配iOS11以下*/;
            }
        }else{
            sectionFrame.size.width = self.collectionView!.frame.size.width;
            sectionFrame.size.height += sectionInset.top + sectionInset.bottom;
        }
        return sectionFrame;
    }
}

override func layoutAttributesForElements(in rect: CGRect) -> [UICollectionViewLayoutAttributes]? {
    var attrs = super.layoutAttributesForElements(in: rect) ?? []
    for attr in self.decorationViewAttrs {
        attrs.append(attr)
    }
    return attrs
}

  override public func prepare() 代码有点多,就不贴出来了。下面有demo。
如何使用:
pod?‘JJCollectionViewRoundFlowLayout_Swift‘
//可选设置
open var isCalculateHeader : Bool = false    // 是否计算header
open var isCalculateFooter : Bool = false    // 是否计算footer
/// 设置底色偏移量(该设置只设置底色,与collectionview原sectioninsets区分)
/// - Parameter collectionView: collectionView description
/// - Parameter collectionViewLayout: collectionViewLayout description
/// - Parameter section: section description
func collectionView(_ collectionView : UICollectionView , layout collectionViewLayout:UICollectionViewLayout,borderEdgeInsertsForSectionAtIndex section : Int) -> UIEdgeInsets;

/// 设置底色相关
/// - Parameter collectionView: collectionView description
/// - Parameter collectionViewLayout: collectionViewLayout description
/// - Parameter section: section description
func collectionView(_ collectionView : UICollectionView, layout collectionViewLayout : UICollectionViewLayout , configModelForSectionAtIndex section : Int ) -> JJCollectionViewRoundConfigModel_Swift;
在collectionview页面代码上加入代理(JJCollectionViewDelegateRoundFlowLayout)
并实现如下两个方法:
#pragma mark - JJCollectionViewDelegateRoundFlowLayout

func collectionView(_ collectionView: UICollectionView, layout collectionViewLayout: UICollectionViewLayout, borderEdgeInsertsForSectionAtIndex section: Int) -> UIEdgeInsets {
    return UIEdgeInsets.init(top: 5, left: 12, bottom: 5, right: 12)
}

func collectionView(_ collectionView: UICollectionView, layout collectionViewLayout: UICollectionViewLayout, configModelForSectionAtIndex section: Int) -> JJCollectionViewRoundConfigModel_Swift {
    let model = JJCollectionViewRoundConfigModel_Swift.init();

    model.backgroundColor = UIColor.init(red: 233/255.0, green:233/255.0 ,blue:233/255.0,alpha:1.0)
    model.cornerRadius = 10;
    return model;
}
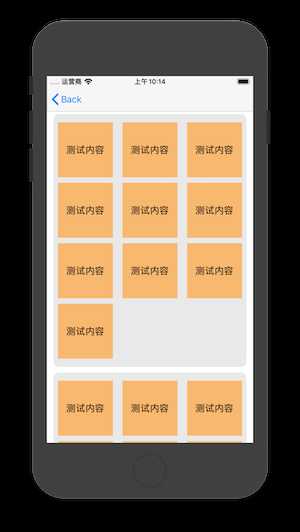
效果如下:
具体代码demo如下:
GitHub_OC版本:Demo具体代码
GitHub_Swift版本:Demo具体代码
码云_OC:Demo具体代码 大家有空可star。
后续可能会单独更新swift版本,敬请期待。
如有问题,可以直接提issues,或者发送邮件到kingjiajie@sina.com,或者直接回复。谢谢。
以上是关于设置UITableView的圆角(OC和swift)的主要内容,如果未能解决你的问题,请参考以下文章