3Jenkins持续集成之持续集成
Posted
tags:
篇首语:本文由小常识网(cha138.com)小编为大家整理,主要介绍了3Jenkins持续集成之持续集成相关的知识,希望对你有一定的参考价值。
3、Jenkins持续集成之持续集成.md配置ansible实现无密钥交互
安装阿里云YUM源码
[[email protected] ~]# cat <<EOF>>/etc/yum.repos.d/epel.repo
[epel]
name=epel for aliyun
baseurl=https://mirrors.aliyun.com/epel/7/x86_64/
enabled=1
gpgcheck=0
[os]
name=os for aliyun
baseurl=https://mirrors.aliyun.com/centos/7/os/x86_64/
enabled=1
gpgcheck=0
EOF
[[email protected] ~]$ yum clean all
[[email protected] ~]$ yum makecache
安装ansible
[[email protected] ~]$ yum list |grep ansible*
ansible.noarch                           2.3.0.0-3.el7                 epel
ansible-doc.noarch                       2.3.0.0-3.el7                 epel
ansible-inventory-grapher.noarch         2.3.2-1.el7                   epel
ansible-lint.noarch                      3.4.9-1.el7                   epel
ansible-openstack-modules.noarch         0-20140902git79d751a.el7      epel
ansible-review.noarch                    0.13.0-2.el7                  epel
kubernetes-ansible.noarch                0.6.0-0.1.gitd65ebd5.el7      epel
python2-ansible-tower-cli.noarch         3.1.3-1.el7                   epel
[[email protected] ~]$ yum install -y ansible
利用jenkins密钥对实现ansible免密分发
[[email protected] ~]$ ls .ssh/
id_rsa  id_rsa.pub  known_hosts
将ansible所有权给我们的jenkins用户
[[email protected] ~]# chown -R jenkins:jenkins /etc/ansible/
将两台客户端服务器加入我们的ansible认真hosts表里,并归纳为test组
[[email protected] ~]# tail -3 /etc/ansible/hosts
[jenkins]
192.168.1.72
192.168.1.73
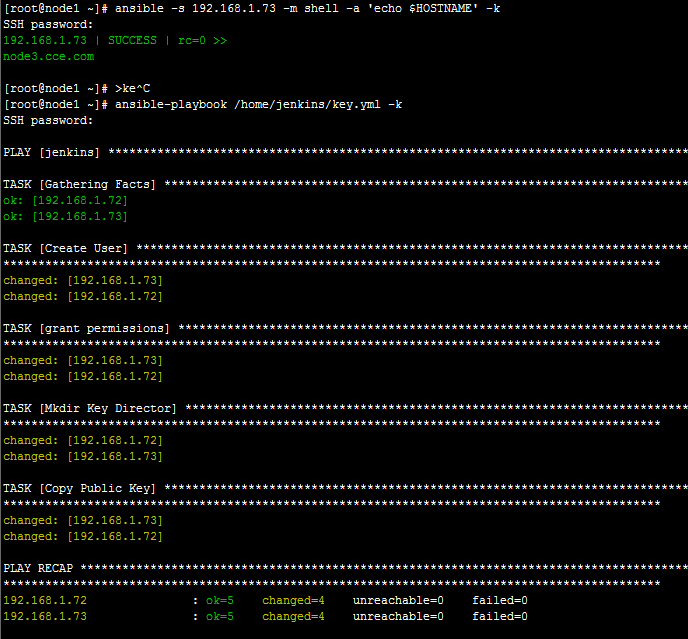
编写简单的YML来实现以上创建步骤(我们的jenkins用户也需要开通sudo权限来完成一些例如服务重启的工作)
[[email protected] ~]# cat key.yml
---
- hosts: jenkins
  remote_user: root
  tasks:
        - name: Create User
          user: name=jenkins
        - name: grant permissions
          shell: usermod -aG wheel jenkins
        - name: Mkdir Key Director
          file: path=/home/jenkins/.ssh mode=0700 owner=jenkins group=jenkins state=directory
        - name: Copy Public Key
          copy: src=/home/jenkins/.ssh/id_rsa.pub dest=/home/jenkins/.ssh/authorized_keys owner=jenkins group=jenkins mode=600
配置ansible支持无密钥登录
[[email protected] ~]$ egrep "^[^#\[]" /etc/ansible/ansible.cfg
inventory      = /etc/ansible/hosts
remote_tmp     = ~/.ansible/tmp
local_tmp      = ~/.ansible/tmp
forks          = 5
poll_interval  = 15
sudo_user      = root
executable = /bin/bash
private_key_file = /home/jenkins/.ssh/id_rsa
connect_timeout = 30
connect_retries = 30
connect_interval = 1
切换至jenkins用户测试无密钥登录是否正常
配置我们的node2作为我们的web前端
[[email protected] ~]# yum install mysql mysql-devel httpd httpd-devel php mariadb-server php-mysql
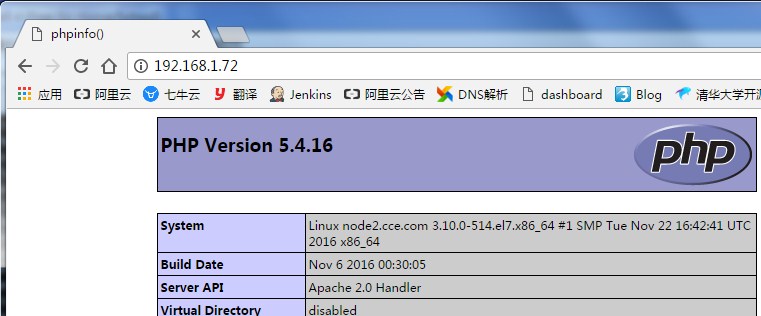
配置测试页面查看我们的PHP环境是否安装成功
[[email protected] ~]# cat /var/www/html/index.php
<?php
phpinfo();
?>
[[email protected] ~]# systemctl start httpd
[[email protected] ~]# systemctl start mariadb
配置我们的node3作为备份服务器
[[email protected] ~]# mkdir -pv /data/www/sourcecode/
[[email protected] ~]# chown -R jenkins:jenkins /data/www/
配置我们的jenkins
首先安装以下插件:
Environment Injector Plugin
Safe Restart Plugin
Javadoc Plugin
jQuery plugin
Extended Choice Parameter Plug-In
Pre SCM BuildStep Plugin
Robot Framework plugin
Git Parameter Plug-In
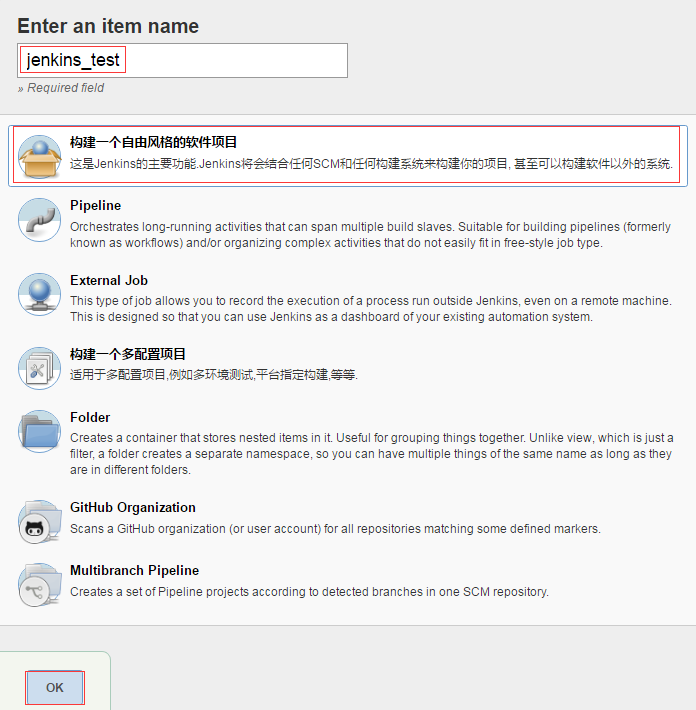
创建一个自由风格的软件项目
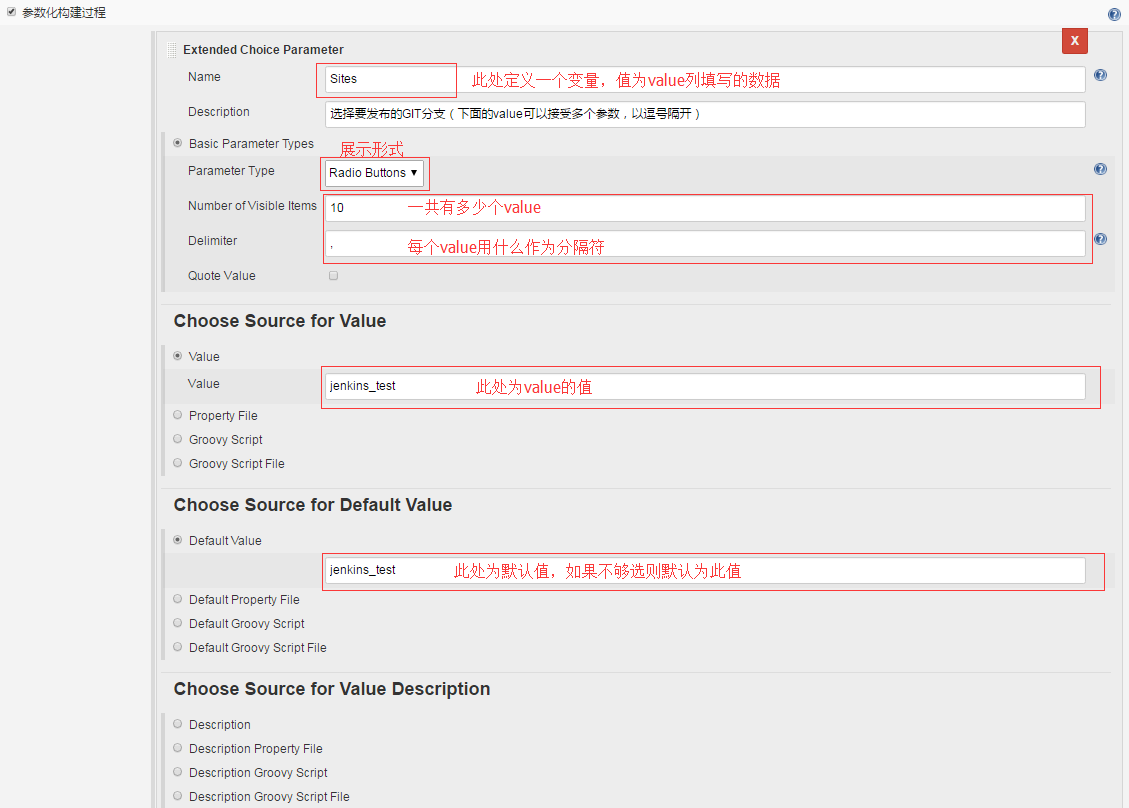
配置参数化构建
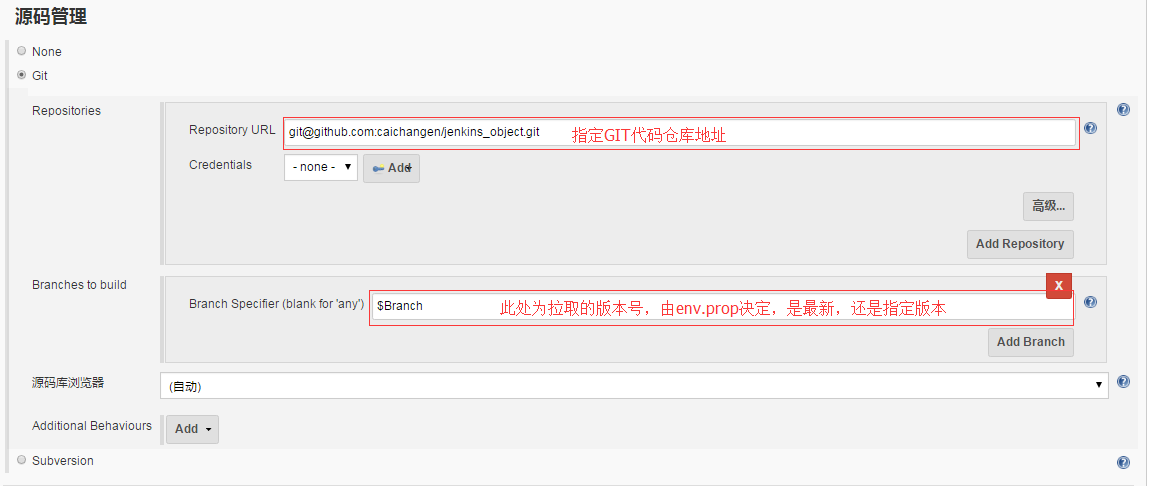
配置GIT参数
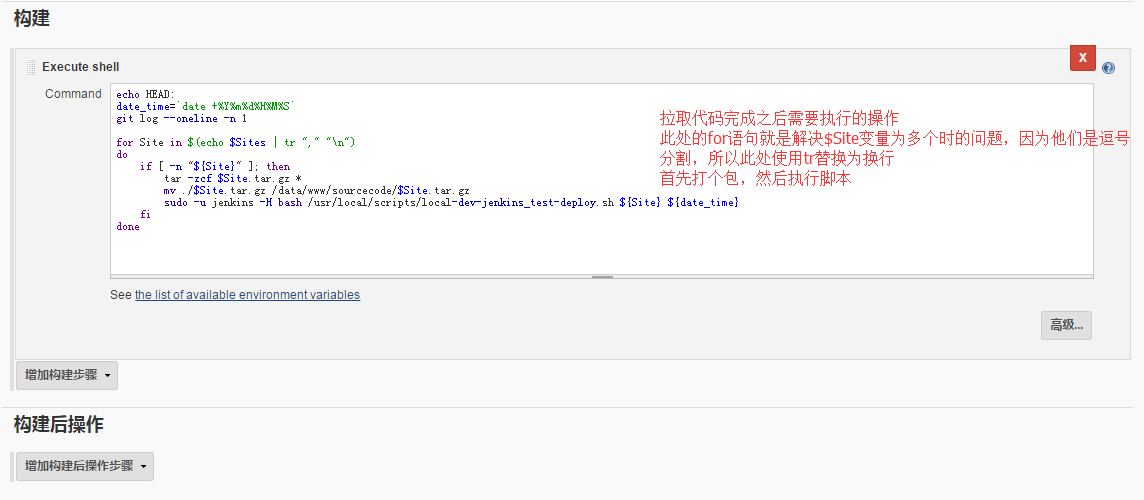
配置构建后的操作
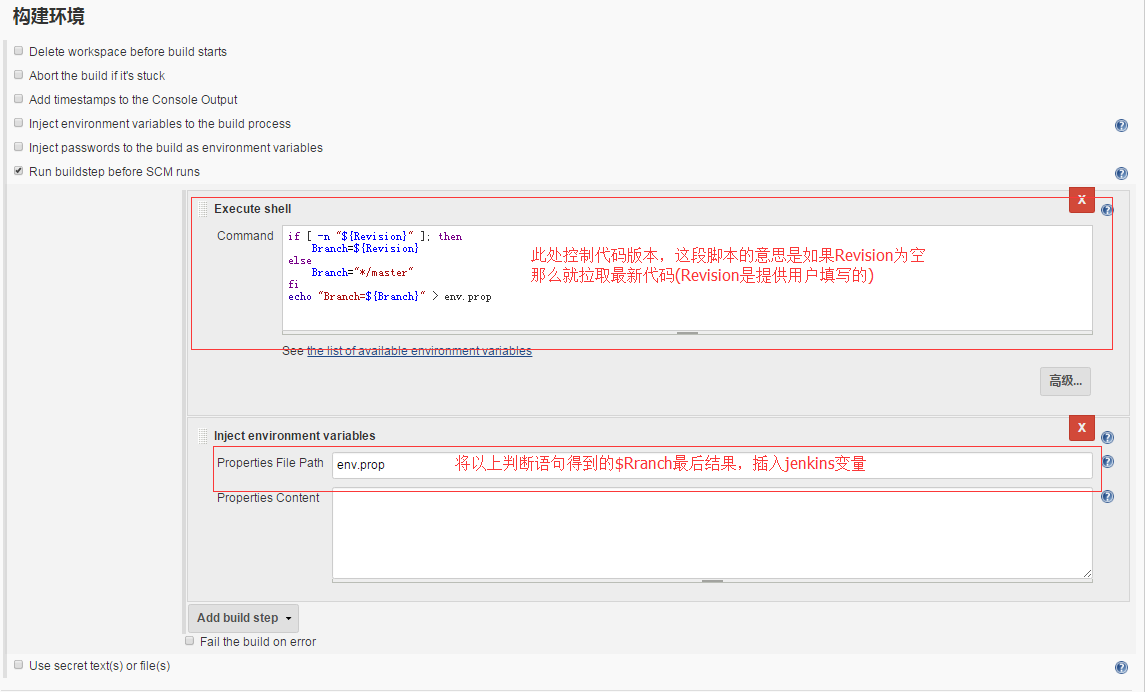
配置环境
[[email protected] ~]$ sudo mkdir /data/www/sourcecode/  #此处为代码存放目录
[[email protected] ~]$ sudo chown -R jenkins:jenkins /data/www/ #将属主修改为jenkins以免出现权限问题
配置分发脚本
[[email protected] ~]$ cat /usr/local/scripts/local-dev-jenkins_test-deploy.sh
#!/bin/bash

### check
if [ ! -n "$1" ];then
        echo "Please enter your file‘s name."
        exit 10
fi

name=$1
datetime=$2
destination=‘jenkins‘
##此处的destination是72和73,73作为备份服务器所以也需要推送,72则需要部署上线操作
ansible ${destination} -m copy -a "src=/data/www/sourcecode/${name}.tar.gz dest=/data/www/jenkins_packet/" && \
ansible 192.168.1.72 -m shell -a "sudo nohup bash -x /usr/local/scripts/local-dev-jenkins_test-deploy.sh ${name} ${datetime}"  ##nohup在tomcat需要重启的时候必须使用,否则会出现tomcat被杀掉起不起来的情况
配置我们的72和73
配置73的源代码存放目录
[[email protected] ~]# mkdir /data/www/jenkins_packet/
[[email protected] ~]# chown -R jenkins:jenkins /data/www/
配置72的代码存放目录和部署脚本
[[email protected] ~]# mkdir /data/www/jenkins_packet/
[[email protected] ~]# chown -R jenkins:jenkins /data/www/
[[email protected] ~]# mkdir /usr/local/scripts/
[[email protected] scripts]# cat  /usr/local/scripts/local-dev-jenkins_test-deploy.sh
#!/bin/bash
#
name=${1}.tar.gz
SITE_NAME=${1}
date_time=$2

if [ -d /tmp/${SITE_NAME} ];then
        rm -rf /tmp/${SITE_NAME}
fi
mkdir /tmp/${SITE_NAME}

rm -rf /var/www/html_bak
#systemctl stop httpd
if [ -d /var/www/html ];then
        mv /var/www/html /var/www/html_bak
fi

tar -zxf /data/www/jenkins_packet/${name} -C /tmp/${SITE_NAME}

mv -f /tmp/${SITE_NAME} /var/www/html
chown -R apache:apache /var/www/html
#systemctl start httpd  ##PHP环境无需重启
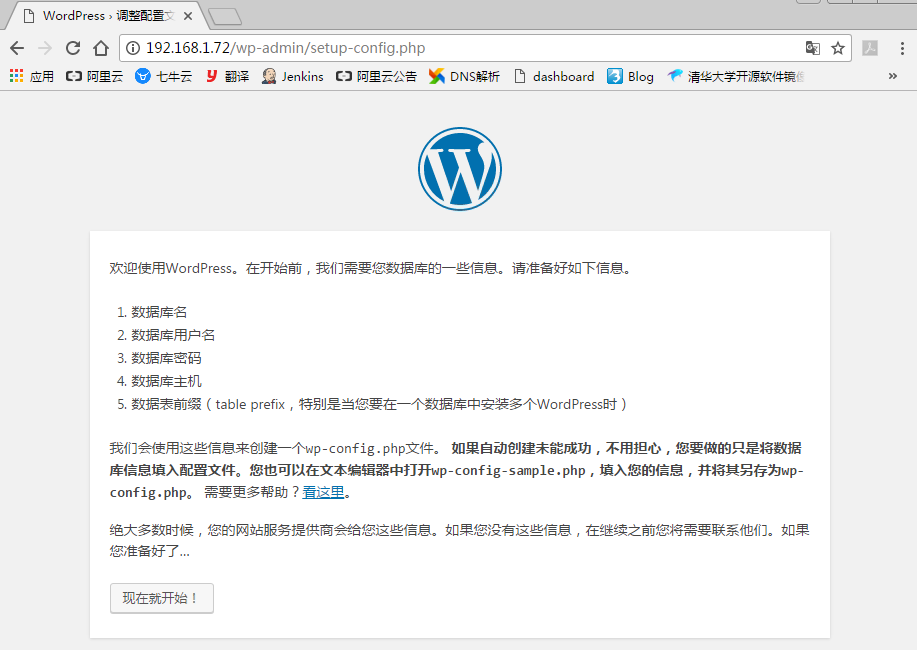
正式发布我们的代码
查看node2部署情况
查看node3备份情况
本文出自 “Char” 博客,谢绝转载!
以上是关于3Jenkins持续集成之持续集成的主要内容,如果未能解决你的问题,请参考以下文章
