LNMP环境的搭建
tags:
篇首语:本文由小常识网(cha138.com)小编为大家整理,主要介绍了LNMP环境的搭建相关的知识,希望对你有一定的参考价值。
MP和LNMP可以并存,但是端口(80)冲突,需要修改端口;
LNMP须重新安装php,编译参数不一样。LAMP中apache需要与PHP建立关联;
LNMP和LAMP可以实现数据迁移,因为本身的数据库没变化
1.安装mysql,参照LAMP的随笔
2.安装PHP(须重新安装)
tar zxf php-5.5.30.tar.gz
useradd -s /sbin/nologin php-fpm //添加php相关账户
cd php-5.3.27
./configure \\ //配置编译参数
--prefix=/usr/local/nginx_php \\
--with-config-file-path=/usr/local/nginx_php/etc\\
--enable-fpm \\
--with-fpm-user=php-fpm \\
--with-fpm-group=php-fpm \\
--with-mysql=/usr/local/mysql \\
--with-mysql-sock=/tmp/mysql.sock \\
--with-libxml-dir \\
--with-gd \\
--with-jpeg-dir \\
--with-png-dir \\
--with-freetype-dir \\
--with-iconv-dir \\
--with-zlib-dir \\
--with-mcrypt \\
--enable-soap \\
--enable-gd-native-ttf \\
--enable-ftp \\
--enable-mbstring \\
--enable-exif \\
--enable-zend-multibyte \\
--disable-ipv6 \\
--with-pear \\
--with-curl \\
--with-openssl
注: (报错解决方法)
yum list|grep libcurl
yum install libcurl-devel.x86_64
make
make install
cp php.ini-production /usr/local/nginx_php/etc/php.ini //配置文件
cp /usr/local/src/php-5.5.30/sapi/fpm/init.d.php-fpm etc/init.d/php-fpm //拷贝启动文件
chmod 755 /etc/init.d/php-fpm // 更改权限
chkconfig --add php-fpm //添加开机启动php-fpm服务
chkconfig php-fpm on
chkconfig --list|grep php-fpm
cp sapi/fpm/php-fpm.conf /usr/local/nginx_php/etc/ //配置文件/etc/init.d/php-fpm startps aux|grep php
3.nginx的安装
cd ..
wget http://nginx.org/download/nginx-1.4.4.tar.gz
tar zxvf nginx-1.4.4.tar.gz
cd nginx-1.4.4
./configure --prefix=/usr/local/nginx--with-pcre //配置编译参数
yum list|grep pcre // error解决办法
yum install pcre-devel.x86_64
./configure --prefix=/usr/local/nginx--with-pcre //继续配置参数
make
make install
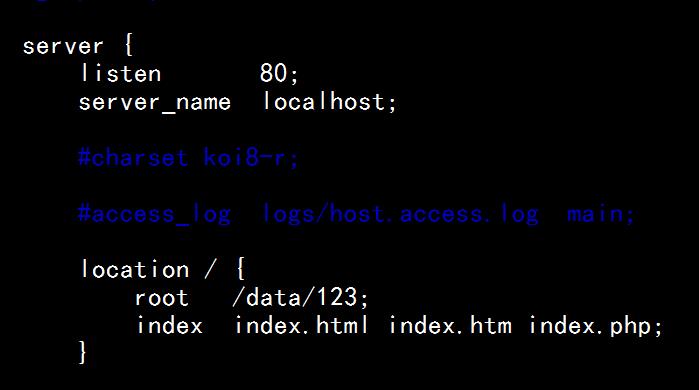
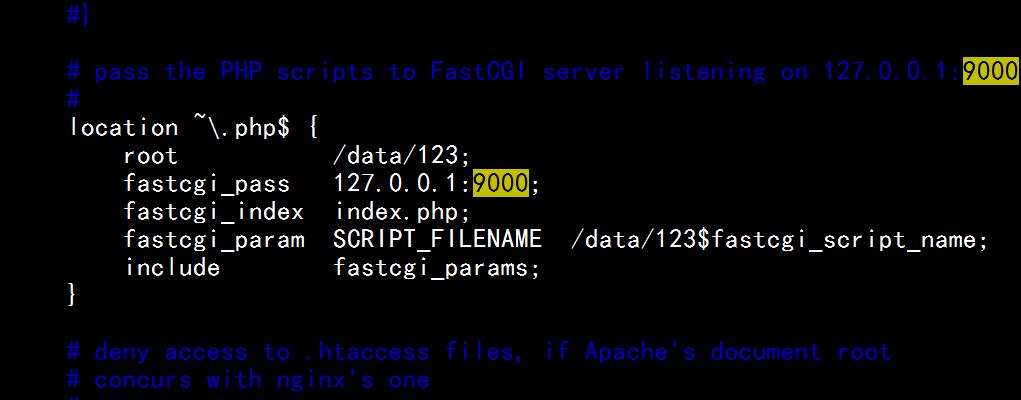
vim /usr/local/nginx/conf/nginx.conf //修改配置文件
//须修改 root后为:/data/123(为自己网站所在目录);
//默认页面index中添加 : index.php;
//白字部分需要去掉注释,并根据自己配置进行修改
/usr/local/nginx/sbin/nginx –t //查错
killall httpd //结束httpd服务,防止接口冲突
/usr/local/nginx/sbin/nginx //启动nginx
/usr/local/nginx/sbin/nginx -s reopen //重启nginx
ps aux|grep nginx //查看nginx进程
4.测试网站
浏览器中输入 127.0.0.1
以上是关于LNMP环境的搭建的主要内容,如果未能解决你的问题,请参考以下文章